IPERF Network Speed Monitoring
IT Consultant
How to get old versions of macOS
As per reference:
https://support.apple.com/en-ca/HT211683
If your Mac isn't compatible with the latest macOS, you might still be able to upgrade to an earlier macOS, such as macOS Catalina, Mojave, High Sierra, Sierra, or El Capitan.
To get the latest features and maintain the security, stability, compatibility, and performance of your Mac, it's important to keep your software up to date. Apple recommends that you always use the latest macOS that is compatible with your Mac.
Learn how to upgrade to macOS Big Sur, the latest version of macOS.
If a macOS installer can't be used on your Mac, the installer will let you know. For example, it might say that it's too old to be opened on this version of macOS, or that your Mac doesn't have enough free storage space for the installation.
To confirm compatibility before downloading, check the minimum requirements for macOS Catalina, Mojave, High Sierra, Sierra, El Capitan, or Yosemite. You can also find compatibility information on the product-ID page for MacBook Pro, MacBook Air, MacBook, iMac, Mac mini, or Mac Pro.
Before installing, it’s a good idea to back up your Mac. Time Machine makes it simple, and other backup methods are also available. Learn how to back up your Mac.
It takes time to download and install macOS, so make sure that you're plugged into AC power and have a reliable internet connection.
Safari uses these links to find the old installers in the App Store. After downloading from the App Store, the installer opens automatically.
Safari downloads the following older installers as a disk image named InstallOS.dmg or InstallMacOSX.dmg. Open the disk image, then open the .pkg installer inside the disk image. It installs an app named Install [Version Name]. Open that app from your Applications folder to begin installing the operating system.
Follow the onscreen instructions in the installer. It might be easiest to begin installation in the evening so that it can complete overnight, if needed.
If the installer asks for permission to install a helper tool, enter the administrator name and password that you use to log in to your Mac, then click Add Helper.
Please allow installation to complete without putting your Mac to sleep or closing its lid. Your Mac might restart, show a progress bar, or show a blank screen several times as it installs macOS and related firmware updates.
You might also be able to use macOS Recovery to reinstall the macOS you're using now, upgrade to the latest compatible macOS, or install the macOS that came with your Mac.
IT Consultant
How to create a bootable installer for macOS
As from the reference:
https://support.apple.com/en-us/HT201372
You can use an external drive or secondary volume as a startup disk from which to install the Mac operating system.
These advanced steps are primarily for system administrators and others who are familiar with the command line. You don't need a bootable installer to upgrade macOS or reinstall macOS, but it can be useful when you want to install on multiple computers without downloading the installer each time.
MyVolume in these commands with the name of your volume.Big Sur:*
sudo /Applications/Install\ macOS\ Big\ Sur.app/Contents/Resources/createinstallmedia --volume /Volumes/MyVolume
Catalina:*
sudo /Applications/Install\ macOS\ Catalina.app/Contents/Resources/createinstallmedia --volume /Volumes/MyVolume
Mojave:*
sudo /Applications/Install\ macOS\ Mojave.app/Contents/Resources/createinstallmedia --volume /Volumes/MyVolume
High Sierra:*
sudo /Applications/Install\ macOS\ High\ Sierra.app/Contents/Resources/createinstallmedia --volume /Volumes/MyVolume
El Capitan:
sudo /Applications/Install\ OS\ X\ El\ Capitan.app/Contents/Resources/createinstallmedia --volume /Volumes/MyVolume --applicationpath /Applications/Install\ OS\ X\ El\ Capitan.app
* If your Mac is using macOS Sierra or earlier, include the --applicationpath argument and installer path, similar to the way this is done in the command for El Capitan.
After typing the command:
Y to confirm that you want to erase the volume, then press Return. Terminal shows the progress as the volume is erased.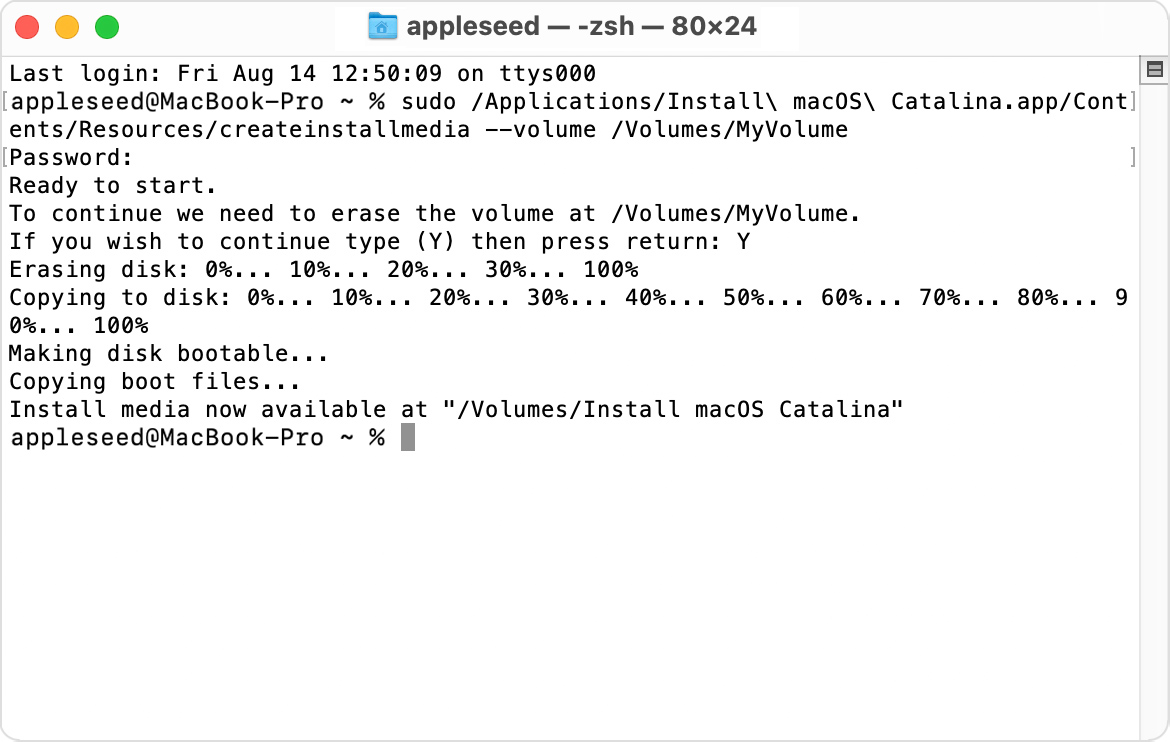
Determine whether you're using a Mac with Apple silicon, then follow the appropriate steps:
A bootable installer doesn't download macOS from the internet, but it does require an internet connection to get firmware and other information specific to the Mac model.
For information about the createinstallmedia command and the arguments you can use with it, make sure that the macOS installer is in your Applications folder, then enter the appropriate path in Terminal:
/Applications/Install\ macOS\ Big\ Sur.app/Contents/Resources/createinstallmedia
/Applications/Install\ macOS\ Catalina.app/Contents/Resources/createinstallmedia
/Applications/Install\ macOS\ Mojave.app/Contents/Resources/createinstallmedia
/Applications/Install\ macOS\ High\ Sierra.app/Contents/Resources/createinstallmedia
/Applications/Install\ OS\ X\ El\ Capitan.app/Contents/Resources/createinstallmedia
IT Consultant
inventory forecasting food manufacturing
Hi i would like to speak to someone about your product, i am located in canada and have some leads in the food manufacturing industry needing and inventory forecasting solution, so they can project their production level in advance at different warehouses. My phone number is 514-777-4527 Frederic
https://www.stocktrim.com/contact
https://ca.syspro.com/company/contact/
https://ca.syspro.com/thank-you/?submissionGuid=a9d2fd24-02e1-42e2-a25e-d2c07e2bad3d
Hi i would like to speak to someone about your product, i am located in canada and have some leads in the food manufacturing industry needing and inventory forecasting solution, so they can project their production level in advance at different warehouses. My phone number is 514-777-4527 Frederic
INVENTORY PLANNER
https://www.inventory-planner.com/features
https://www.youtube.com/watch?v=lVTkOqJqouY
IT Consuling
Registraire des Entreprises Quebec - Business administration
Declaration initiale si pas fait lors de la declaration de l'enregistrement de l'immatriculation.
Formulaire re-200
http://www.registreentreprises.gouv.qc.ca/documents/formulaires/re-200(2017-04)dxi.pdf
IT Consultant
https://promo.acronis.com/Global-FY21-Q2-EN-Igloo_Launch_Assets_Page_LandingPagewithoutform.html
Acronis Cyber Protect Cloud - Core - Product Deck
https://promo.acronis.com/rs/929-HVV-335/images/PP-Acronis-Cyber-Protect-Cloud-Core-EN-US-200330.pdf
Acronis Cyber Cloud 21.03 Licensing
WHMCS
https://solutions.acronis.com/whmcs/
IT Consultant
HTTP to HTTPS Redirection - Apache - SSL TLS Web
Our Linux Servers have the mod_rewrite module enabled. You can make use of this module to automatically redirect your visitors from HTTP to HTTPS.
Ensure that the Digital Certificate is properly installed on your Hosting Order, and the site is resolving on https://yourdomainname.com.
Your site will work on https://yourdomainname.com or https://www.yourdomainname.com or https://subdomain.yourdomainname.com, depending on the Common Name for which you had the certificate issued. Resolving HTTPS on anything other than this Common Name would result in a certificate name mismatch error.
Create a .htaccess file under the site's directory and add the following lines to it. In case there already exists a .htaccess in your site's directory, carefully edit it to add these lines:
RewriteEngine On
RewriteCond %{HTTPS} off
RewriteRule (.*) https://<common_name>%{REQUEST_URI}
<common_name> needs to be replaced by the Common Name for which the Digital Certificate is issued.
IT Consultant
EaseUS Data and Disk management software utilities
30% off code "business"
EaseUS Data Recovery Wizard Technician
Data Recovery Solution for Business and Service Providers
https://www.easeus.com/datarecoverywizardpro/drwpro-unlimited.htm
$500
EaseUS Partition Master Enterprise
Feature-rich Software to Optimize Partitions and System
https://www.easeus.com/partition-manager/epm-enterprise.html
$700
EaseUS Todo PCTrans Technician
Comprehensive Migration Solution For Business
$700-$999
EaseUS Disk Copy Technician
Key Features of EaseUS Disk Copy
$300
IT Consultant
StarTech Disk readers tools
SATA M.2: SM2NGFFMBU33 - https://www.startech.com/en-us/hdd/sm2ngffmbu33
NVMe M.2: M2E1BMU31C - https://www.startech.com/en-us/hdd/m2e1bmu31c
SATA HDD/SSD dock: SATDOCK2REU3 - https://www.startech.com/en-us/hdd/satdock2reu3
IT Consultant
Data Recovery
Windows XP - 10
https://www.stellardatarecovery.com/
UNDELETE SERVER
Windows servers and clients
https://condusiv.com/
GETDATA
RECOVER MY FILES
Windows Desktops. Computer FORENSICS
https://getdata.com/recovermyfiles/data-recovery-software-purchase.php
REMO SOFTWARE
REMO RECOVER
Restore Deleted Files In Windows Server 2008
EaseUS® Data Recovery
DATA RECOVERY all OS
Data Recovery Solution for Business and Service Providers
https://www.easeus.com/datarecoverywizardpro/drwpro-unlimited.htm
PROSOFT ENG
https://www.prosofteng.com/
IT Consultant
As of the article at
https://docs.microsoft.com/en-us/power-platform/guidance/coe/starter-kit
POWERAPPS
https://powerapps.microsoft.com/en-us/
aka.ms/appinaday (demo workshop)
A Center of Excellence (CoE) in an organization drives innovation and improvement and brings together like-minded people with similar business goals to share knowledge and success, while at the same time providing standards, consistency, and governance to the organization.
The Microsoft Power Platform CoE Starter Kit is a collection of components and tools that are designed to help you get started with developing a strategy for adopting and supporting Microsoft Power Platform, with a focus on Power Apps and Power Automate.

Overview
Define goals and expected outcomes of your CoE
Watch a quick overview of the CoE Starter Kit.
Microsoft Power Platform admin guide
Application lifecycle management (ALM) with Microsoft Power Platform
Power BI documentation
Power Apps documentation
Power Automate documentation
Power Virtual Agents documentation
Note
Can you tell us about your documentation language preferences? Take a short survey.
The survey will take about seven minutes. No personal data is collected (privacy statement).
The topics in this section provide detailed information about Power Apps and Power Automate licensing.
For information about:
Power BI licensing, see Power BI Pricing.
Power Virtual Agents licensing, see Licensing for Power Virtual Agents and for information about pricing, see Power Virtual Agents pricing plans.
Standalone Power Apps and Microsoft flow plans provide users the ability to create and run apps across data sources that extend beyond Microsoft 365, such as Salesforce, on-premises and custom data sources. These plans also include access to Dataverse to store and manage data. Learn more: What is Dataverse?
More details around pricing and capabilities of standalone plans can be found in Microsoft Power Apps and Power Automate Licensing Guide.
Power Apps/Power Automate capabilities for Microsoft 365 enable users to extend and customize the Office experience with Power Apps and Power Automate. Users can create applications and flows based on Microsoft 365 data. These productivity apps can also utilize data outside of Microsoft 365 by connecting to common services including Box.com, Facebook, and many more via the use of standard connectors.
Here is a brief overview of capabilities included with Power Apps for Microsoft 365 plan. More details around which Microsoft 365 plans include these capabilities can be found in Microsoft Power Apps and Power Automate Licensing Guide
As Dataverse continues to grow, more Microsoft applications like Microsoft Project are using Dataverse. To enable these Microsoft applications, limited Dataverse functionality is added to select Microsoft 365 licenses. This is achieved by adding a new service plan named "Dataverse" to the Microsoft 365 licenses. To see the new service plan in the Microsoft 365 admin center, select a user, select the Licenses and Apps tab, and then scroll down and expand the Apps section.
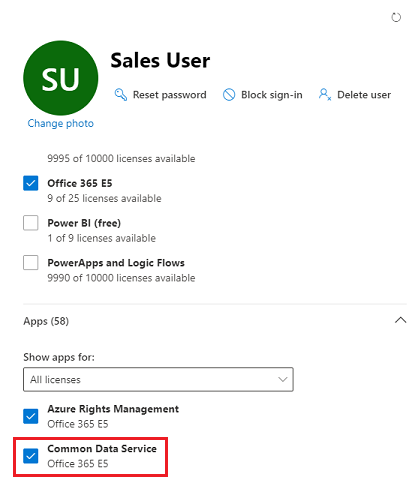
Dataverse functionality required by other Microsoft 365 applications appears as the "Dataverse" service plan in the Apps section of the Microsoft 365 admin center.
This new service plan allows select Microsoft 365 applications to take advantage of Dataverse as a platform for storing application data and use the underlying business logic tier as part of extending application capabilities. This extension also helps these applications to use Dataverse instances within the default environment. However, if you need to create a Dataverse instance within production or sandbox environments (other than the default environment), you're still required to have a premium Power Apps or Power Automate license.
These limited capabilities of Dataverse are only available through select Microsoft 365 licenses and can't be used to run any custom Power Apps applications or Power Automate flows, or run any Power Virtual Agent bots, or use any other data that doesn't belong to the Microsoft 365 applications that take advantage of these capabilities.
These limited capabilities aren't the common set included with every Office application. They can be different based on the Microsoft 365 applications that use these capabilities. For the complete list of various limited capabilities, customers should refer to the service description of these Microsoft 365 applications that contain these Dataverse plans. These limited capabilities of Dataverse don't entitle the licensed user to run standalone Power Apps or Power Automate, or any other Microsoft Power Platform applications that use Dataverse.
Review the Microsoft Project Service description for more details on the limited use of Dataverse that comes with Project.
For now, the Dataverse service plan is included for Project. This list will evolve as more Office applications take advantage of Dataverse and Microsoft Power Platform.
No, the capabilities of Dataverse included with select Microsoft 365 licenses don't allow customers to create custom apps with Power Apps or use the premium connectors with Power Automate. The capabilities included with this license entitle Microsoft 365 applications to use Dataverse for the purpose of enhancing the capabilities of the base Microsoft 365 application where Dataverse is included.
The service plan for Dataverse is shown to provide visibility to customers that Dataverse is being used to store and manage customer data related to the Microsoft 365 application that's using Dataverse. Additionally, this was communicated to all customers so that customers can prepare for this change and update any internal training or user documentation that they might need.
Dataverse functionality appears as the Common Data Service plan in the Apps section of the Microsoft 365 admin center. Turning off the service plan will result in the Microsoft 365 features being disabled for the users of such a license. For example, when this capability is turned off, any Office application reading data from Dataverse will fail to load for the user.
Users who have any Microsoft Power Platform or Dynamics 365 license are always synced into the Dataverse environments. However, for Office licenses where Dataverse service plans are included, users aren't automatically synced into Dataverse until the Office application is accessed by the user. After this occurs, the user can get access to Dataverse entities and records based on the additional security roles and privileges that the administrator assigned to this user. Such users, who just have the Office license, aren't automatically assigned any other security roles or privileges, other than the Maker role privilege in the default environment. As a security best practice, the administrator needs to ensure that security roles and privileges are assigned based on functional roles and needs only, and not automatically assigned based on the user being synced or present in Dataverse.
If you want to build skills and learn more about Power Apps, Power Automate, and Dataverse, the Power Apps Community Plan is the right plan for you. The Power Apps Community Plan gives you a free development environment for individual use to learn with full functionality of Power Apps. More information: Power Apps Community Plan.
Power Apps is the platform to customize and extend applications in Dynamics 365, such as Dynamics 365 Sales and Customer Service, in context of the use rights.
Dynamics 365 Applications can be customized using Power Apps and Power Automate capabilities.
More information: Dynamics 365 Licensing Guide.
Note
Can you tell us about your documentation language preferences? Take a short survey.
The survey will take about seven minutes. No personal data is collected (privacy statement).
IT Consultant


