Showing posts with label Apple. Show all posts

Wednesday, April 28, 2021

How to get old versions of macOS

 How to get old versions of macOS

As per reference: 

https://support.apple.com/en-ca/HT211683

How to get old versions of macOS

If your Mac isn't compatible with the latest macOS, you might still be able to upgrade to an earlier macOS, such as macOS Catalina, Mojave, High Sierra, Sierra, or El Capitan.

To get the latest features and maintain the security, stability, compatibility, and performance of your Mac, it's important to keep your software up to date. Apple recommends that you always use the latest macOS that is compatible with your Mac.

Learn how to upgrade to macOS Big Sur, the latest version of macOS.

Check compatibility

If a macOS installer can't be used on your Mac, the installer will let you know. For example, it might say that it's too old to be opened on this version of macOS, or that your Mac doesn't have enough free storage space for the installation.

To confirm compatibility before downloading, check the minimum requirements for macOS Catalina, Mojave, High Sierra, Sierra, El Capitan, or Yosemite. You can also find compatibility information on the product-ID page for MacBook Pro, MacBook Air, MacBook, iMac, Mac mini, or Mac Pro.


Make a backup

Before installing, it’s a good idea to back up your Mac. Time Machine makes it simple, and other backup methods are also available. Learn how to back up your Mac.


Download macOS

It takes time to download and install macOS, so make sure that you're plugged into AC power and have a reliable internet connection.

Safari uses these links to find the old installers in the App Store. After downloading from the App Store, the installer opens automatically.

Safari downloads the following older installers as a disk image named InstallOS.dmg or InstallMacOSX.dmg. Open the disk image, then open the .pkg installer inside the disk image. It installs an app named Install [Version Name]. Open that app from your Applications folder to begin installing the operating system.


Install macOS

Follow the onscreen instructions in the installer. It might be easiest to begin installation in the evening so that it can complete overnight, if needed.

If the installer asks for permission to install a helper tool, enter the administrator name and password that you use to log in to your Mac, then click Add Helper.

Please allow installation to complete without putting your Mac to sleep or closing its lid. Your Mac might restart, show a progress bar, or show a blank screen several times as it installs macOS and related firmware updates.


Learn more

You might also be able to use macOS Recovery to reinstall the macOS you're using now, upgrade to the latest compatible macOS, or install the macOS that came with your Mac.

Published Date: 


IT Consultant 

www.inCOREporation.com


How to create a bootable installer for macOS

 How to create a bootable installer for macOS

As from the reference: 

https://support.apple.com/en-us/HT201372


You can use an external drive or secondary volume as a startup disk from which to install the Mac operating system.

These advanced steps are primarily for system administrators and others who are familiar with the command line. You don't need a bootable installer to upgrade macOS or reinstall macOS, but it can be useful when you want to install on multiple computers without downloading the installer each time.

What you need to create a bootable installer

  • A USB flash drive or other secondary volume formatted as Mac OS Extended, with at least 14GB of available storage
  • A downloaded installer for macOS Big Sur, Catalina, Mojave, High Sierra, or El Capitan

Download macOS

  • Download: macOS Big Sur, macOS Catalina, macOS Mojave, or macOS High Sierra 
    These download to your Applications folder as an app named Install macOS [version name]. If the installer opens after downloading, quit it without continuing installation. To get the correct installer, download from a Mac that is using macOS Sierra 10.12.5 or later, or El Capitan 10.11.6. Enterprise administrators, please download from Apple, not a locally hosted software-update server. 
  • Download: OS X El Capitan
    This downloads as a disk image named InstallMacOSX.dmg. On a Mac that is compatible with El Capitan, open the disk image and run the installer within, named InstallMacOSX.pkg. It installs an app named Install OS X El Capitan into your Applications folder. You will create the bootable installer from this app, not from the disk image or .pkg installer.

Use the 'createinstallmedia' command in Terminal

  1. Connect the USB flash drive or other volume that you're using for the bootable installer. 
  2. Open Terminal, which is in the Utilities folder of your Applications folder.
  3. Type or paste one of the following commands in Terminal. These assume that the installer is in your Applications folder, and MyVolume is the name of the USB flash drive or other volume you're using. If it has a different name, replace MyVolume in these commands with the name of your volume.

Big Sur:*

sudo /Applications/Install\ macOS\ Big\ Sur.app/Contents/Resources/createinstallmedia --volume /Volumes/MyVolume

Catalina:*

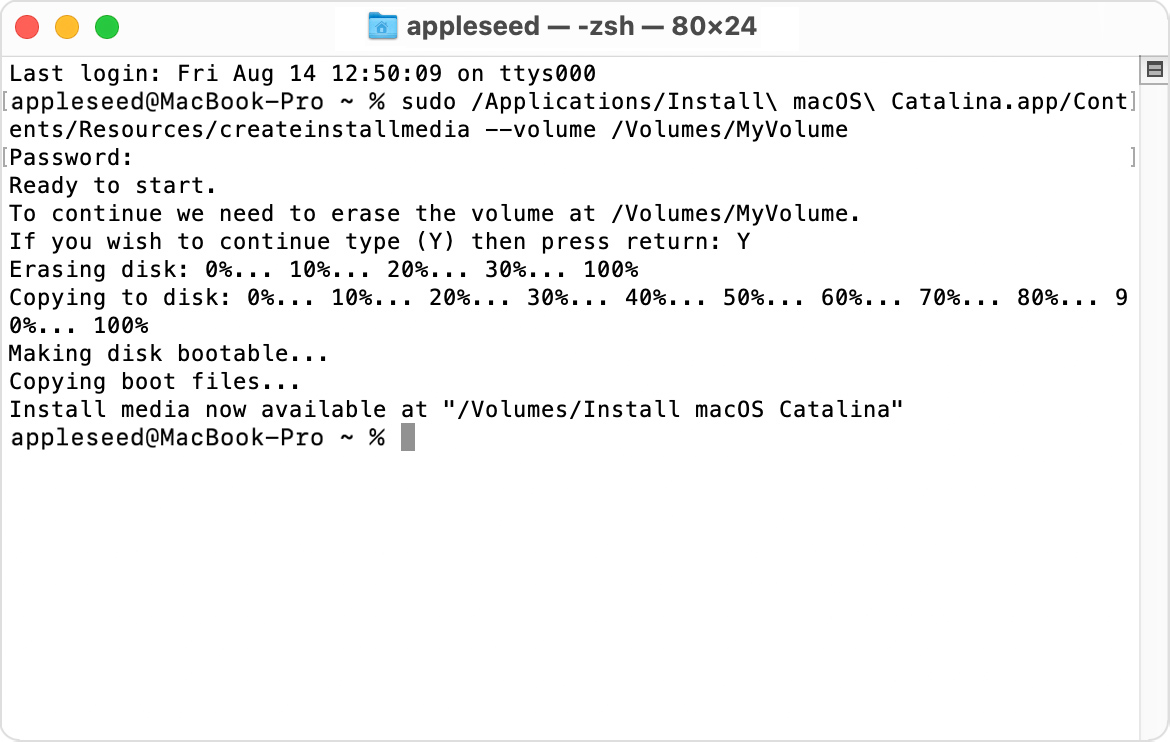
sudo /Applications/Install\ macOS\ Catalina.app/Contents/Resources/createinstallmedia --volume /Volumes/MyVolume

Mojave:*

sudo /Applications/Install\ macOS\ Mojave.app/Contents/Resources/createinstallmedia --volume /Volumes/MyVolume

High Sierra:*

sudo /Applications/Install\ macOS\ High\ Sierra.app/Contents/Resources/createinstallmedia --volume /Volumes/MyVolume

El Capitan:

sudo /Applications/Install\ OS\ X\ El\ Capitan.app/Contents/Resources/createinstallmedia --volume /Volumes/MyVolume --applicationpath /Applications/Install\ OS\ X\ El\ Capitan.app

* If your Mac is using macOS Sierra or earlier, include the --applicationpath argument and installer path, similar to the way this is done in the command for El Capitan.


After typing the command:

  1. Press Return to enter the command.
  2. When prompted, type your administrator password and press Return again. Terminal doesn't show any characters as you type your password.
  3. When prompted, type Y to confirm that you want to erase the volume, then press Return. Terminal shows the progress as the volume is erased.
  4. After the volume is erased, you may see an alert that Terminal would like to access files on a removable volume. Click OK to allow the copy to proceed. 
  5. When Terminal says that it's done, the volume will have the same name as the installer you downloaded, such as Install macOS Big Sur. You can now quit Terminal and eject the volume.


Use the bootable installer

Apple silicon

  1. Plug the bootable installer into a Mac that is connected to the internet and compatible with the version of macOS you're installing.
  2. Turn on your Mac and continue to hold the power button until you see the startup options window, which shows your bootable volumes.
  3. Select the volume containing the bootable installer, then click Continue.
  4. When the macOS installer opens, follow the onscreen instructions.

Intel processor

  1. Plug the bootable installer into a Mac that is connected to the internet and compatible with the version of macOS you're installing.
  2. Press and hold the Option (Alt) ⌥ key immediately after turning on or restarting your Mac.
  3. Release the Option key when you see a dark screen showing your bootable volumes.
  4. Select the volume containing the bootable installer. Then click the up arrow or press Return. 
    If you can't start up from the bootable installer, make sure that the External Boot setting in Startup Security Utility is set to allow booting from external media.
  5. Choose your language, if prompted.
  6. Select Install macOS (or Install OS X) from the Utilities window, then click Continue and follow the onscreen instructions.


Learn more

A bootable installer doesn't download macOS from the internet, but it does require an internet connection to get firmware and other information specific to the Mac model.

For information about the createinstallmedia command and the arguments you can use with it, make sure that the macOS installer is in your Applications folder, then enter the appropriate path in Terminal:

/Applications/Install\ macOS\ Big\ Sur.app/Contents/Resources/createinstallmedia
/Applications/Install\ macOS\ Catalina.app/Contents/Resources/createinstallmedia
/Applications/Install\ macOS\ Mojave.app/Contents/Resources/createinstallmedia
/Applications/Install\ macOS\ High\ Sierra.app/Contents/Resources/createinstallmedia
/Applications/Install\ OS\ X\ El\ Capitan.app/Contents/Resources/createinstallmedia
Published Date: 


IT Consultant

www.inCOREporation.com

Sunday, June 28, 2020

How to create a bootable installer for macOS


How to create a bootable installer for macOS


According to : 


How to create a bootable installer for macOS

You can use an external drive or secondary volume as a startup disk from which to install the Mac operating system.
These advanced steps are primarily for system administrators and others who are familiar with the command line. You don't need a bootable installer to upgrade macOS or reinstall macOS, but it can be useful when you want to install on multiple computers without downloading the installer each time.

Download macOS

Find the appropriate download link in the upgrade instructions for each macOS version:
macOS Catalina, macOS Mojave, or macOS High SierraInstallers for each of these macOS versions download directly to your Applications folder as an app named Install macOS Catalina, Install macOS Mojave, or Install macOS High Sierra. If the installer opens after downloading, quit it without continuing installation. Important: To get the correct installer, download from a Mac that is using macOS Sierra 10.12.5 or later, or El Capitan 10.11.6. Enterprise administrators, please download from Apple, not a locally hosted software-update server. 
OS X El Capitan
El Capitan downloads as a disk image. On a Mac that is compatible with El Capitan, open the disk image and run the installer within, named InstallMacOSX.pkg. It installs an app named Install OS X El Capitan into your Applications folder. You will create the bootable installer from this app, not from the disk image or .pkg installer.

Use the 'createinstallmedia' command in Terminal

  1. Connect the USB flash drive or other volume that you're using for the bootable installer. Make sure that it has at least 12GB of available storage and is formatted as Mac OS Extended.
  2. Open Terminal, which is in the Utilities folder of your Applications folder.
  3. Type or paste one of the following commands in Terminal. These assume that the installer is still in your Applications folder, and MyVolume is the name of the USB flash drive or other volume you're using. If it has a different name, replace MyVolume in these commands with the name of your volume.

    Catalina:*
    sudo /Applications/Install\ macOS\ Catalina.app/Contents/Resources/createinstallmedia --volume /Volumes/MyVolume
    

    Mojave:*
    sudo /Applications/Install\ macOS\ Mojave.app/Contents/Resources/createinstallmedia --volume /Volumes/MyVolume
    

    High Sierra:*
    sudo /Applications/Install\ macOS\ High\ Sierra.app/Contents/Resources/createinstallmedia --volume /Volumes/MyVolume
    

    El Capitan:
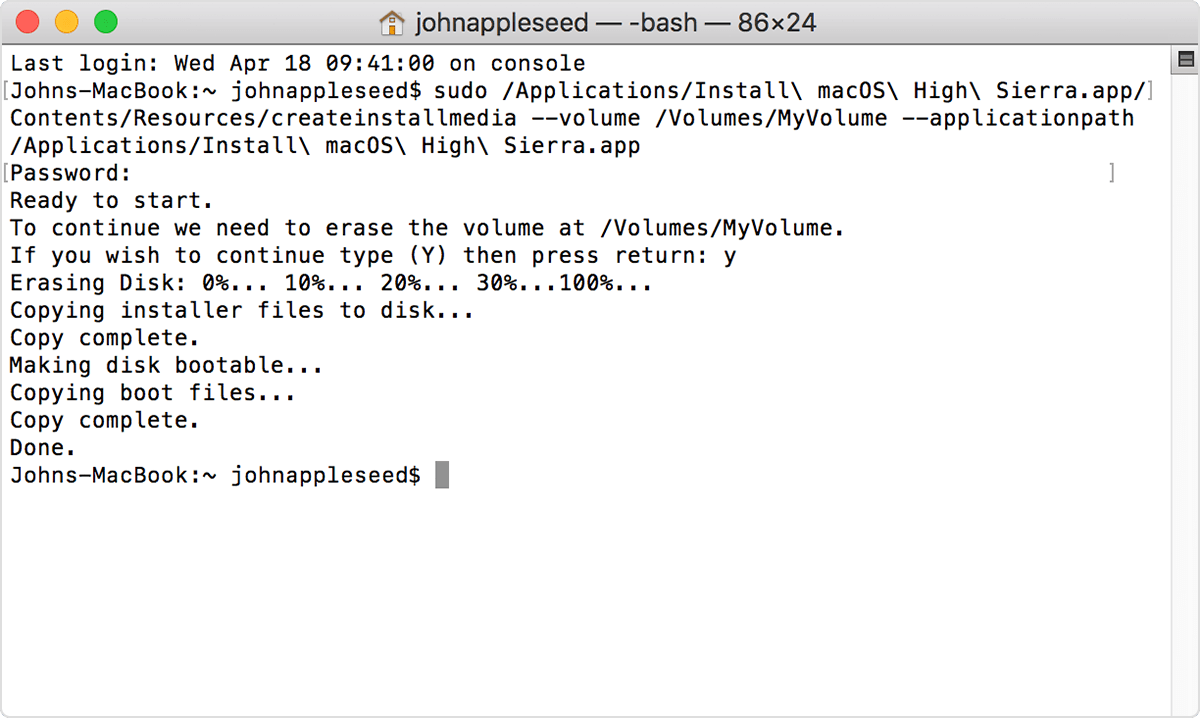
    sudo /Applications/Install\ OS\ X\ El\ Capitan.app/Contents/Resources/createinstallmedia --volume /Volumes/MyVolume --applicationpath /Applications/Install\ OS\ X\ El\ Capitan.app
    
  4. Press Return after typing the command.
  5. When prompted, type your administrator password and press Return again. Terminal doesn't show any characters as you type your password.
  6. When prompted, type Y to confirm that you want to erase the volume, then press Return. Terminal shows the progress as the bootable installer is created.  
  7. When Terminal says that it's done, the volume will have the same name as the installer you downloaded, such as Install macOS Catalina. You can now quit Terminal and eject the volume.
* If your Mac is using macOS Sierra or earlier, include the --applicationpath argument, similar to the way this argument is used in the command for El Capitan.

Use the bootable installer

After creating the bootable installer, follow these steps to use it:
  1. Plug the bootable installer into a compatible Mac.
  2. Use Startup Manager or Startup Disk preferences to select the bootable installer as the startup disk, then start up from it. Your Mac will start up to macOS Recovery.
    Learn about selecting a startup disk, including what to do if your Mac doesn't start up from it.
  3. Choose your language, if prompted.
  4. A bootable installer doesn't download macOS from the Internet, but it does require the Internet to get information specific to your Mac model, such as firmware updates. If you need to connect to a Wi-Fi network, use the Wi-Fi menu  in the menu bar. 
  5. Select Install macOS (or Install OS X) from the Utilities window, then click Continue and follow the onscreen instructions.

Learn more

For more information about the createinstallmedia command and the arguments that you can use with it, make sure that the macOS installer is in your Applications folder, then enter this path in Terminal:
Catalina:
/Applications/Install\ macOS\ Catalina.app/Contents/Resources/createinstallmedia
Mojave:
/Applications/Install\ macOS\ Mojave.app/Contents/Resources/createinstallmedia
High Sierra:
/Applications/Install\ macOS\ High\ Sierra.app/Contents/Resources/createinstallmedia
El Capitan:
/Applications/Install\ OS\ X\ El\ Capitan.app/Contents/Resources/createinstallmedia
Published Date: 


IT Consultant

Friday, June 7, 2019

Uninstall Office for Mac

Uninstall Office for Mac

according to https://support.office.com/en-US/article/uninstall-office-for-mac-eefa1199-5b58-43af-8a3d-b73dc1a8cae3

You can easily uninstall Office for Mac apps such as Word, Excel, PowerPoint, OneNote, and Outlook using these instructions. You must be signed in as an administrator on the Mac or provide an administrator name and password to complete these steps.
You must be signed in as an administrator on the Mac or provide an administrator name and password to complete these steps.

Remove Office for Mac applications

  1. Open Finder > Applications.
  2. Command COMMAND +click to select all of the Office for Mac applications.
  3. Ctrl+click an application you selected and click Move to Trash.
    Move the Office apps to the trash

Remove files from your user Library folder

  1. In Finder, press COMMAND +Shift+g.
  2. In the window that opens, enter ~/Library and then click Go.
  3. Open the Containers folder and ctrl+click each of these folders and Move to Trash. Note that some of these folders may not be present.
    • com.microsoft.errorreporting
    • com.microsoft.Excel
    • com.microsoft.netlib.shipassertprocess
    • com.microsoft.Office365ServiceV2
    • com.microsoft.Outlook
    • com.microsoft.Powerpoint
    • com.microsoft.RMS-XPCService
    • com.microsoft.Word
    • com.microsoft.onenote.mac
  4. Warning: Outlook data will be removed when you move the three folders listed in this step to Trash. You should back up these folders before you delete them.
    Click the back arrow to go back to the Library folder and open Group Containers. Ctrl+click each of these folders if present, and Move to Trash.
    • UBF8T346G9.ms
    • UBF8T346G9.Office
    • UBF8T346G9.OfficeOsfWebHost

Remove from Dock and restart

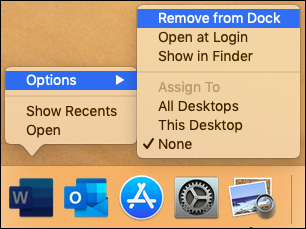
  1. If you put any of the Office applications in your Dock, go to each one and ctrl + click > Options > Remove from Dock.
    Remove from dock
  2. Restart your Mac to complete the uninstall.


Sunday, February 17, 2019

APPLE ID Using app-specific passwords

APPLE ID Using app-specific passwords
ACCORDING TO

https://support.apple.com/en-us/HT204397

Using app-specific passwords
App-specific passwords allow you to sign in to your account securely when you use third-party apps with your Apple ID.
App-specific passwords are single-use passwords for your Apple ID that let you sign in to your account and securely access the information you store in iCloud from a third-party app. For example, use app-specific passwords with Microsoft Outlook, Mozilla Thunderbird, or other mail, contacts, and calendar services not provided by Apple. App-specific passwords maintain a high level of security and help ensure your Apple ID password won’t be collected or stored by any third-party apps you use.
To generate and use app-specific passwords, your Apple ID must be protected with two-factor authentication.
You also need an app-specific password for your devices that use Mac OS X Lion 10.7.5 and earlier or iOS 5 and earlier. If you don’t have devices that can be updated to iOS 9 or OS X El Capitan, you can set up two-step verification and generate app-specific passwords.

How to generate an app-specific password

  1. Sign in to your Apple ID account page.
  2. In the Security section, click Generate Password below App-Specific Passwords.
  3. Follow the steps on your screen.
After you generate your app-specific password, enter or paste it into the password field of the app as you would normally.

How to manage app-specific passwords

You can have up to 25 active app-specific passwords at any given time. If you need to, you can revoke passwords individually or all at once.
  1. Sign in to your Apple ID account page.
  2. In the Security section, click Edit.
  3. In the App Specific Passwords section, click View History.
  4. Click   next to a password you want to delete, or Revoke All.
After you revoke a password, the app using that password will be signed out of your account until you generate a new password and sign in again.
Any time you change or reset your primary Apple ID password, all of your app-specific passwords are revoked automatically to protect the security of your account. You'll need to generate new app-specific passwords for any apps that you want to continue using.
Information about products not manufactured by Apple, or independent websites not controlled or tested by Apple, is provided without recommendation or endorsement. Apple assumes no responsibility with regard to the selection, performance, or use of third-party websites or products. Apple makes no representations regarding third-party website accuracy or reliability. Risks are inherent in the use of the Internet. Contact the vendor for additional information. Other company and product names may be trademarks of their respective owners.
Published Date: 


MOBILE APP DEVELOPMENT BY

WWW.INCOREPORATION.COM

Thursday, March 8, 2018

Enroll previously used Apple Mobile devices to DEP and MDM Jamf

Enroll Apple devices to DEP and MDM (Jamf)

IT Consultant inCOREporation.com
Using an iPad in this example

When the organization own iPads before DEP environment
Need iOS 11 and up to use DEP
Have to remove device from icloud at icloud.com, find devices, remove, remove.
Using Apple Configurator 2 (Organization already connected to DEP server)
Prepare the device, Create Wifi Profile only, save locally mobileconfig
deploy.apple.com
Device Enrollment Program
Manage servers to see (Move DEP devices to MDM)
Manage devices (Enter serial number, can find in Apple Configurator)
Manage servers to see (Devices moved to MDM from DEP)

Back to Apple Configurator 2 to drag local mobileconfig Wifi profile into the Device (in Apple Configurator)

Ready for MDM (Jamf)
login.jamfcloud.com
DEP
token 
devices 
DEP enrolment happens during the "first time setup"
assign a blueprint to the device (Need a Blueprint before)
then wipe the device.

and that will make the device show up in Jamf Now -> Devices


Do i always have to use Apple Configurator? or is it just for iPads the organization already had before DEP?


App Icons on iPhone, iPad and Apple Watch

App Icons on iPhone, iPad and Apple Watch


Technical Q&A QA1686

App Icons on iPhone, iPad and Apple Watch

Q:  What icons need to be included in an iOS Application, Apple Watch Application, iMessage Application, or Sticker Pack Application?

A: Below are guidelines for handling icon files for iPhone-only apps, iPad-only apps, universal apps, Apple Watch apps, and iMessage extensions. If you are building an iMessage Application or Sticker Pack Application, you must include icons for both the containing application and the iMessage extension.
If you don't provide artwork for one of the listed optional icons, the system will automatically scale one of your existing icon images to an appropriate size. It is strongly recommended that your application include artwork for all the icons listed, at the specific sizes needed.
Prior to iOS 3.2, icon images for iPhone applications were required to follow a strict naming convention. These legacy names are still listed in the tables below along with example names for the more recent icons. Except for iTunesArtwork, icon images included in your app can have arbitrary names.
iOS ignores the PPI (Pixels Per Inch) of icon images. You may author your icon images at any PPI but their width and height, as measured in pixels, must match the values in the tables below.

Icons for iPhone-only Applications

iPhone-only applications use the following icons. Items marked with "Required" must be included.
Table 1  iPhone-only application icon requirements.
Image Size (px)
File Name
Used For
App Store
Ad Hoc
512x512
iTunesArtwork
App list in iTunes
Do not include
Optional but recommended
1024x1024
iTunesArtwork@2x
App list in iTunes on devices with retina display
Do not include
Optional but recommended
120x120
Icon-60@2x.png
Home screen on iPhone/iPod Touch with retina display
Required
Required
180x180
Icon-60@3x.png
Home screen on iPhone with retina HD display
Optional but recommended
76x76
Icon-76.png
Home screen on iPad
Optional but recommended
152x152
Icon-76@2x.png
Home screen on iPad with retina display
Optional but recommended
167x167
Icon-83.5@2x.png
Home screen on iPad Pro
Optional but recommended
40x40
Icon-Small-40.png
Spotlight
Optional but recommended
80x80
Icon-Small-40@2x.png
Spotlight on devices with retina display
Optional but recommended
120x120
Icon-Small-40@3x.png
Spotlight on devices with retina HD display
Optional but recommended
29x29
Icon-Small.png
Settings
Recommended if you have a Settings bundle, optional otherwise
58x58
Icon-Small@2x.png
Settings on devices with retina display
Recommended if you have a Settings bundle, optional otherwise
87x87
Icon-Small@3x.png
Settings on devices with retina HD display
Recommended if you have a Settings bundle, optional otherwise
In addition to the above icons, iPhone-only applications with a deployment target of iOS 6.1 or earlier use the following icons. Items marked with "Required" must be included if the application's deployment target is iOS 6.1 or earlier.
Table 2  iPhone-only application icon requirements (iOS 6.1 and earlier).
Image Size (px)
File Name
Used For
App Store
Ad Hoc
57x57
Icon.png
Home screen on iPhone/iPod touch (iOS 6.1 and earlier)
Required
Required
114x114
Icon@2x.png
Home screen on iPhone/iPod Touch with retina display (iOS 6.1 and earlier)
Optional but recommended
72x72
Icon-72.png
Home screen on iPad (iOS 6.1 and earlier)
Optional but recommended
144x144
Icon-72@2x.png
Home screen on iPad with retina display (iOS 6.1 and earlier)
Optional but recommended
29x29
Icon-Small.png
Spotlight on iPhone/iPod Touch (iOS 6.1 and earlier), and Settings on all devices
Recommended if you have a Settings bundle, otherwise optional but recommended
58x58
Icon-Small@2x.png
Spotlight on iPhone/iPod Touch with retina display (iOS 6.1 and earlier), and Settings on all devices with retina display
Recommended if you have a Settings bundle, otherwise optional but recommended
50x50
Icon-Small-50.png
Spotlight on iPad (iOS 6.1 and earlier)
Optional but recommended
100x100
Icon-Small-50@2x.png
Spotlight on iPad with retina display (iOS 6.1 and earlier)
Optional but recommended
You can include distinct images for the iPhone and iPad icons in categories where the required sizes are equivalent, for example, Settings.

Icons for iPad-only Applications

iPad-only applications use the following icons. Items marked with "Required" must be included.
Table 3  iPad-only application icon requirements.
Image Size (px)
File Name
Used For
App Store
Ad Hoc
512x512
iTunesArtwork
Ad Hoc iTunes
Do not include
Optional but recommended
1024x1024
iTunesArtwork@2x
Ad Hoc iTunes on devices with retina display
Do not include
Optional but recommended
76x76
Icon-76.png
Home screen on iPad
Required
Required
152x152
Icon-76@2x.png
Home screen on iPad with retina display
Optional but recommended
167x167
Icon-83.5@2x.png
Home screen on iPad Pro
Optional but recommended
40x40
Icon-Small-40.png
Spotlight
Optional but recommended
80x80
Icon-Small-40@2x.png
Spotlight on devices with retina display
Optional but recommended
29x29
Icon-Small.png
Settings
Recommended if you have a Settings bundle, otherwise optional but recommended
58x58
Icon-Small@2x.png
Settings on devices with retina display
Recommended if you have a Settings bundle, otherwise optional but recommended
In addition to the above icons, iPad-only applications with a deployment target of iOS 6.1 or earlier use the following icons. Items marked with "Required" must be included if the application's deployment target is iOS 6.1 or earlier.
Table 4  iPad-only application icon requirements (iOS 6.1 and earlier).
Image Size (px)
File Name
Used For
App Store
Ad Hoc
72x72
Icon-72.png
Home screen on iPad (iOS 6.1 and earlier)
Required
Required
144x144
Icon-72@2x.png
Home screen on iPad with retina display (iOS 6.1 and earlier)
Optional but recommended
50x50
Icon-Small-50.png
Spotlight on iPad (iOS 6.1 and earlier)
Optional but recommended
100x100
Icon-Small-50@2x.png
Spotlight on iPad with retina display (iOS 6.1 and earlier)
Optional but recommended

Icons for Universal Applications

Universal applications use the following icons. Items marked with "Required" must be included.
Table 5  Universal application icon requirements.
Image Size (px)
File Name
Used For
App Store
Ad Hoc
512x512
iTunesArtwork
App list in iTunes
Do not include
Optional but recommended
1024x1024
iTunesArtwork@2x
App list in iTunes for devices with retina display
Do not include
Optional but recommended
120x120
Icon-60@2x.png
Home screen on iPhone/iPod Touch with retina display
Required
Required
180x180
Icon-60@3x.png
Home screen on iPhone with retina HD display
Optional but recommended
76x76
Icon-76.png
Home screen on iPad
Required
Required
152x152
Icon-76@2x.png
Home screen on iPad with retina display
Optional but recommended
167x167
Icon-83.5@2x.png
Home screen on iPad Pro
Optional but recommended
40x40
Icon-Small-40.png
Spotlight
Optional but recommended
80x80
Icon-Small-40@2x.png
Spotlight on devices with retina display
Optional but recommended
120x120
Icon-Small-40@3x.png
Spotlight on devices with retina HD display
Optional but recommended
29x29
Icon-Small.png
Settings
Recommended if you have a Settings bundle, optional otherwise
58x58
Icon-Small@2x.png
Settings on devices with retina display
Recommended if you have a Settings bundle, optional otherwise
87x87
Icon-Small@3x.png
Settings on devices with retina HD display
Recommended if you have a Settings bundle, optional otherwise
In addition to the above icons, universal applications with a deployment target of iOS 6.1 or earlier use the following icons. Items marked with "Required" must be included if the application's deployment target is iOS 6.1 or earlier.
Table 6  Universal application icon requirements (iOS 6.1 and earlier).
Image Size (px)
File Name
Used For
App Store
Ad Hoc
57x57
Icon.png
Home screen on iPhone/iPod touch (iOS 6.1 and earlier)
Required
Required
114x114
Icon@2x.png
Home screen on iPhone/iPod Touch with retina display (iOS 6.1 and earlier)
Optional but recommended
72x72
Icon-72.png
Home screen on iPad (iOS 6.1 and earlier)
Required
Required
144x144
Icon-72@2x.png
Home screen on iPad with retina display (iOS 6.1 and earlier)
Optional but recommended
29x29
Icon-Small.png
Spotlight on iPhone/iPod Touch (iOS 6.1 and earlier), and Settings on all devices
Recommended if you have a Settings bundle, otherwise optional but recommended
58x58
Icon-Small@2x.png
Spotlight on iPhone/iPod Touch with retina display (iOS 6.1 and earlier), and Settings on all devices with retina display
Recommended if you have a Settings bundle, otherwise optional but recommended
50x50
Icon-Small-50.png
Spotlight on iPad (iOS 6.1 and earlier)
Optional but recommended
100x100
Icon-Small-50@2x.png
Spotlight on iPad with retina display (iOS 6.1 and earlier)
Optional but recommended
You can include distinct images for the iPhone and iPad icons in categories where the required sizes are equivalent, for example, Settings.

Icons for Watch Applications

Watch applications use the following icons. Items marked with "Required" must be included.
Table 7  Watch application icon requirements.
Image Size (px)
File Name
Used For
App Store
Ad Hoc
80x80
AppIcon40x40@2x.png
Home screen on Apple Watch (38mm/42mm), Long-Look notification on Apple Watch (38mm)
Required
Required
88x88
AppIcon44x44@2x.png
Long-Look notification on Apple Watch (42mm)
Required
Required
172x172
AppIcon86x86@2x.png
Short-Look notification on Apple Watch (38mm)
Required
Required
196x196
AppIcon98x98@2x.png
Short-Look notification on Apple Watch (42mm)
Required
Required
48x48
AppIcon24x24@2x.png
Notification center on Apple Watch (38mm)
Required
Required
55x55
AppIcon27.5x27.5@2x.png
Notification center on Apple Watch (42mm)
Required
Required
58x58
AppIcon29x29@2x.png
Settings in the Apple Watch companion app on iPhone
Required
Required
87x87
AppIcon29x29@3x.png
Settings in the Apple Watch companion app on iPhone 6 Plus
Required
Required

Icons for iMessage Extensions

iMessage extensions and Sticker Pack extensions use the following icons. Items marked with "Required" must be included.
Table 8  iMessage extension and Sticker Pack extension icon requirements.
Image Size (px)
File Name
Used For
App Store
Ad Hoc
1024x768
Messages1024x768.png
Messages App Store
Required
Required
120x90
Messages60x45@2x.png
Messages app drawer on iPhone/iPod Touch with retina display
Required
Required
180x135
Messages60x45@3x.png
Messages app drawer on iPhone with retina HD display
Required
Required
134x100
Messages67x50@2x.png
Messages app drawer on iPad with retina display
Required
Required
148x110
Messages74x55@2x.png
Messages app drawer on iPad Pro
Required
Required
54x40
Messages27x20@2x.png
Breadcrumb icons in the chat transcript on devices with retina display.
Required
Required
81x60
Messages27x20@3x.png
Breadcrumb icons in the chat transcript on iPhone with retina HD display
Required
Required
64x48
Messages32x24@2x.png
Messages app management screen, message bubble branding on devices with retina display
Required
Required
96x72
Messages32x24@3x.png
Messages app management screen, message bubble branding on iPhone with retina HD display
Required
Required

Adding Icons to an iOS Application

Asset catalogs are the preferred way to manage your application's icons. New projects are configured to use asset catalogs by default. If you have an older project, see Migrating an iOS App Icon Set to learn how to move existing app icons and launch images into an asset catalog. If you prefer not to use asset catalogs, or if you must support iOS 4.3, you can manually configure your application's icons by editing the information property list for your application. See Configuring Icons Without an Asset Catalog.

Adding Icon Images to an Asset Catalog

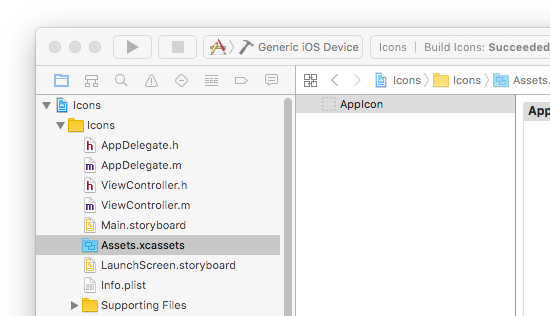
  1. Select the asset catalog in the project navigator. It is named Assets.xcassets for new projects, or Images.xcassets for migrated projects, by default.
  2. From the set outline view (left column), select the app icon set. For new or migrated projects it will be named 'AppIcon'. You may need to create an icon set by clicking the (+) button in the bottom left corner of the editor and choosing App Icons and Launch Images > New iOS App Icon from the context menu.
Figure 1  The AppIcon set selected in the asset catalog.
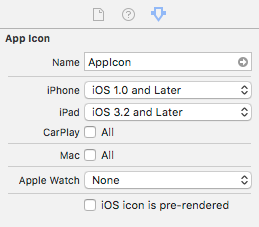
The set will only contain image wells for icons that are relevant depending upon the project's configuration at the time the asset catalog was created. If an image well is missing, expand the attributes inspector and select the appropriate options from the pull-down menus under the App Icon section, depending upon the project's deployment target and supported devices.
Figure 2  Enable the necessary image wells under the App Icon section of the attributes inspector.
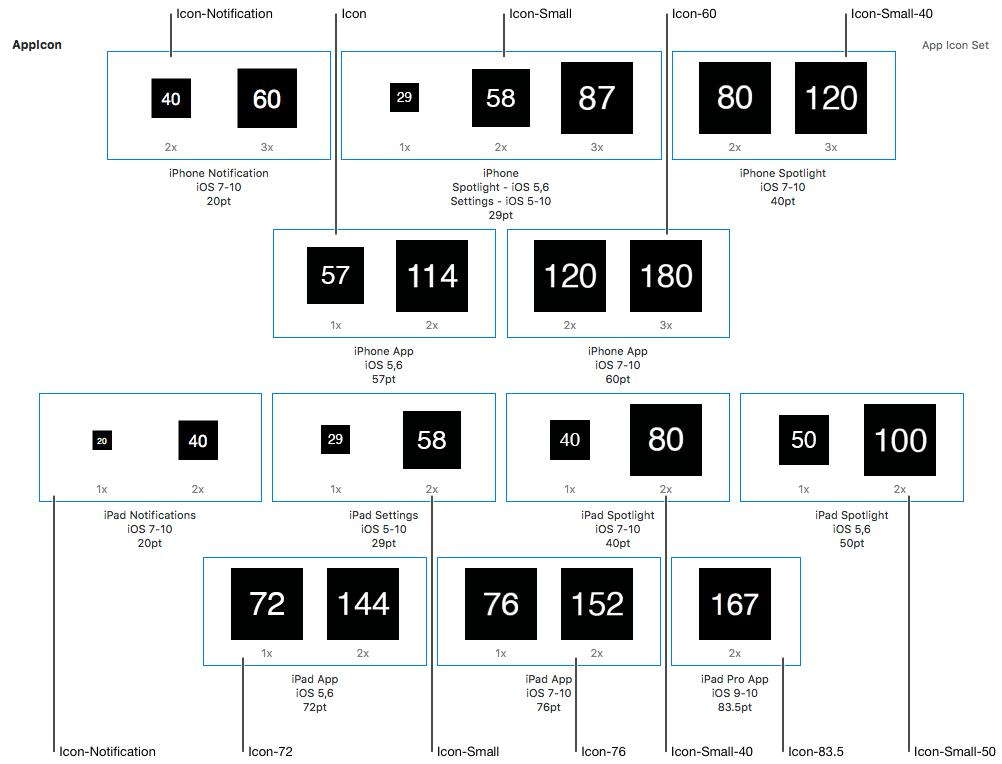
  1. Drag images from the Finder onto each image well to configure the associated icon.
Figure 3  Complete icon set for a universal application with a deployment target less than iOS 7.0
Asset catalogs create a copy of images added to them. If you had previously added the images as resources to your project you can safely remove them.
  1. Configure your application to use the new icon set.
    1. Select the project in the project navigator.
    2. Select the application target from the list in the left column of the project editor.
    3. Switch to the General pane at the top of the project editor.
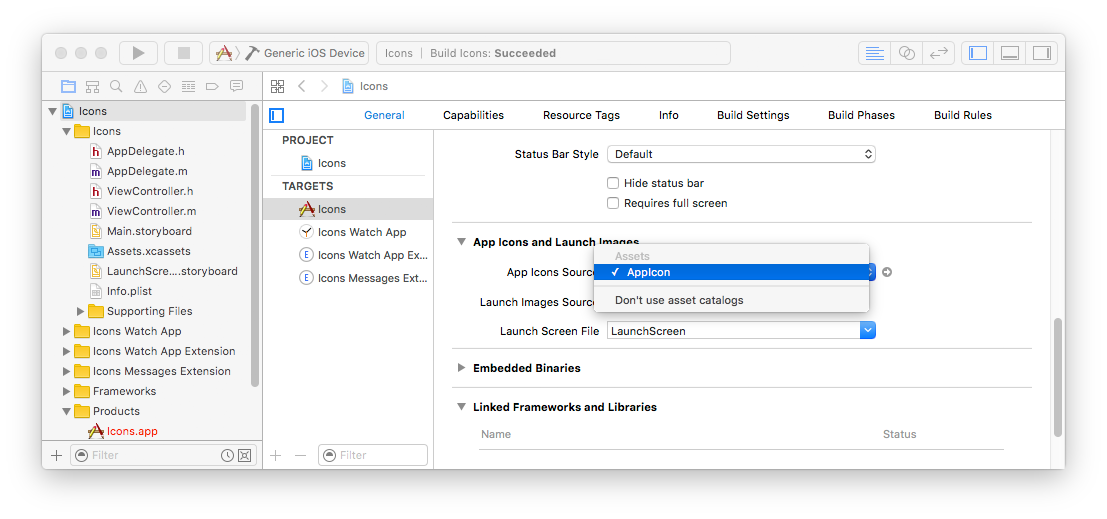
    4. Select the app icon set from the App Icons Source popup menu under the App Icons And Launch Images section.
Figure 4  Selecting the icon set for the application's target.

Migrating an iOS App Icon Set

Simplify image management by moving existing app icons into an asset catalog.
  1. In the project navigator, select your target.
  2. Open the General pane, and scroll to the App Icons and Launch Images section.
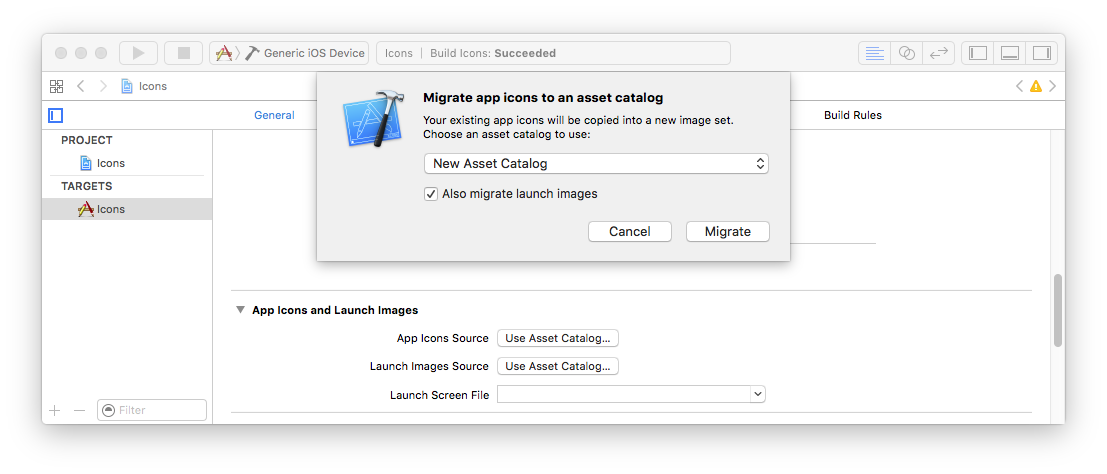
  3. Click the Use Asset Catalog button next to the App Icons Source label.
Art/qa1686_assetcatalog_ios_migration.png
  1. Configure any options in the dialog. To choose a different asset catalog or to create a new one, click on the pop-up menu. Choose an existing asset catalog or choose New Asset Catalog to create a new one. The menu is shown when there is at least one asset catalog in the project.
  2. Click the Migrate button. If there is no asset catalog or if you selected New Asset Catalog from the pop-up menu, you will be prompted to create one. Canceling creation of the new asset catalog will cancel the migration.
The icons are migrated to the new or existing asset catalog.

Configuring Icons Without an Asset Catalog

  1. Follow the steps in the Xcode Help to add each icon image to your project as a resource.
  2. Locate the target's information property list in the project navigator. By default it will be named Info.plist. Command click on it and choose Open As > Source Code from the context menu.
As of iOS 5.0, icons are specified by including the CFBundleIcons key. Older applications may have previously specified their icons by including the CFBundleIconFiles key. This key should be removed if it is still present (don't forget to remove any device specific variants too). All applications should migrate to the CFBundleIcons key to specify their icons.
The value for the CFBundleIcons key is a dictionary with two child keys: CFBundlePrimaryIcon and UINewsstandIcon. The UINewsstandIcon key is for newsstand apps and can otherwise be omitted. The value for the CFBundlePrimaryIcon key is a dictionary that identifies the icon images associated with the bundle. It may contain two child keys: CFBundleIconFiles and UIPrerenderedIcon. The value for the UIPrerenderedIcon key is a boolean that specifies whether the images already incorporate a shine effect. The value for CFBundleIconFiles key is an array of strings, each identifying an image in the bundle.
Listing 1  Example configuration for a universal app.
<key>CFBundleIcons</key>
<dict>
    <key>CFBundlePrimaryIcon</key>
    <dict>
        <key>CFBundleIconFiles</key>
        <array>
            <string>Icon-Small</string>
            <string>Icon-Small-40</string>
            <string>Icon-Small-50</string>
            <string>Icon</string>
            <string>Icon-60</string>
            <string>Icon-72</string>
        </array>
    </dict>
</dict>
<key>CFBundleIcons~ipad</key>
<dict>
    <key>CFBundlePrimaryIcon</key>
    <dict>
        <key>CFBundleIconFiles</key>
        <array>
            <string>Icon-Small</string>
            <string>Icon-Small-40</string>
            <string>Icon-Small-50</string>
            <string>Icon-72</string>
            <string>Icon-76</string>
            <string>Icon-83.5</string>
        </array>
    </dict>
</dict>
If your application supports iOS 4.3 you must also include the CFBundleIconFiles key to specify the application's icon images. The value for this key is an array of strings, each identifying an image in the bundle. If you have included images for the iPad-specific icons, you may either list them under the CFBundleIconFiles key, or you may list them under the device specific CFBundleIconFiles~ipadkey. iPad-only applications should list their icon images under the CFBundleIconFiles key.
Listing 2  Example configuration for a universal app with deployment target of iOS 4.3.
<key>CFBundleIconFiles</key>
<array>
    <string>Icon-Small</string>
    <string>Icon-Small-40</string>
    <string>Icon-Small-50</string>
    <string>Icon</string>
    <string>Icon-60</string>
    <string>Icon-72</string>
</array>
<key>CFBundleIconFiles~ipad</key>
<array>
    <string>Icon-Small</string>
    <string>Icon-Small-40</string>
    <string>Icon-Small-50</string>
    <string>Icon-72</string>
    <string>Icon-76</string>
    <string>Icon-167</string>
</array>

Adding Icons to a Watch Application

Asset catalogs are the preferred way to manage your Watch application's icons. New projects are configured to use asset catalogs by default.

Adding Icon Images to an Asset Catalog

  1. Select the asset catalog in the project navigator. It is named Images.xcassets by default.
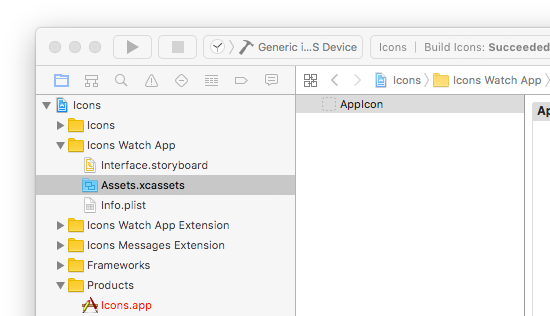
  2. From the left column of the editor, select the icon set. For new it will be named 'AppIcon'. You may need to create an icon set by clicking the (+) button in the bottom left corner of the editor and choosing 'New App Icon' from the context menu.
Figure 5  The AppIcon set selected in the asset catalog.
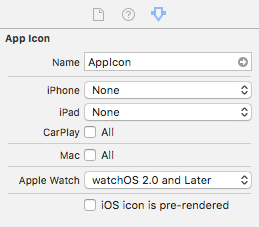
By default, the set will only contain image wells for watch icons. If image wells for iOS app icons are present, expand the attributes inspector and select the appropriate options from the pull-down menus under the App Icon section.
Figure 6  Enable only the Apple Watch image wells under the App Icon pane of the settings inspector.
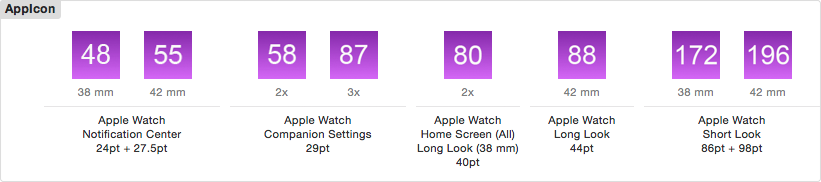
  1. Drag images from the Finder onto each image well to configure the associated icon.
Figure 7  Complete icon set for a Watch application.
Asset catalogs create a copy of images added to them. If you had previously added the images as resources to your project you can safely remove them.
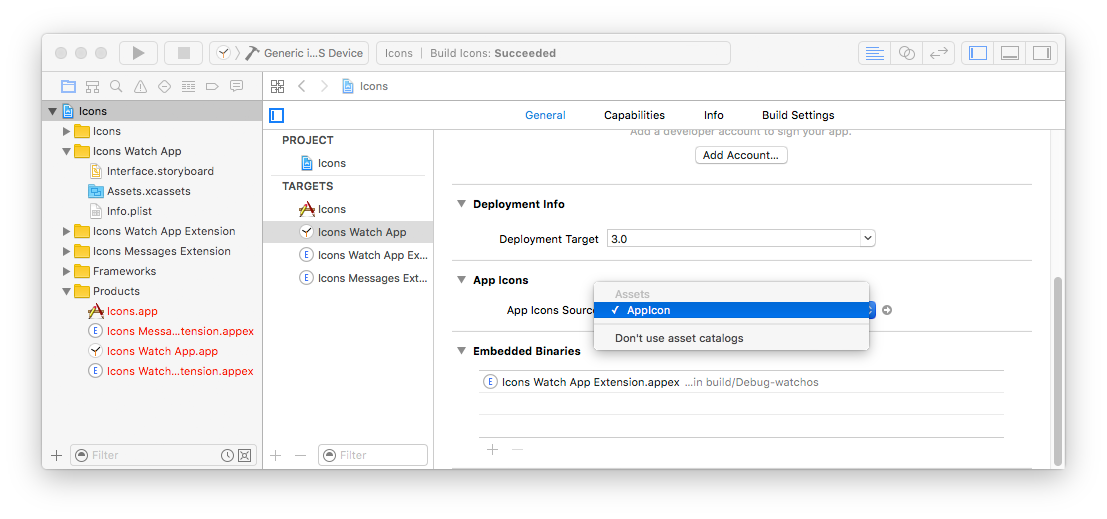
  1. Configure the Watch application to use the new icon set.
    1. Select the project in the project navigator.
    2. Select the Watch App target from the list in the left column of the project editor.
    3. Switch to the General pane at the top of the project editor.
    4. Select the icon set from the App Icons Source popup menu under the App Icons section.
Figure 8  Selecting the icon set for the Watch application's target.

Adding Icons to an iMessage Extension

Asset catalogs are the preferred way to manage iMessage extension and Sticker Pack extension icons. New projects are configured to use asset catalogs by default.

Adding Icon Images to an Asset Catalog

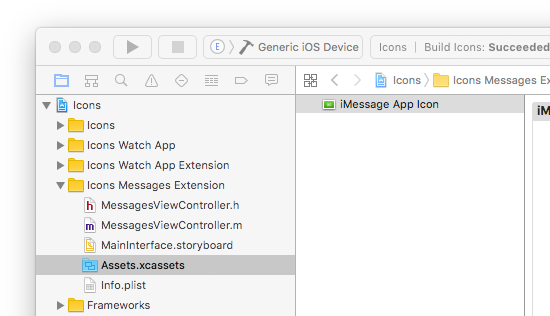
  1. Select the asset catalog in the project navigator. It is named Assets.xcassets by default.
  2. From the set outline view (left column), select the app icon set. It is named 'iMessage App Icon' by default. You may need to create an icon set by clicking the (+) button in the bottom left corner of the editor and choosing App Icons and Launch Images > New Messages Extension Icon from the context menu.
Figure 9  The iMessage extension Icon set selected in the asset catalog.
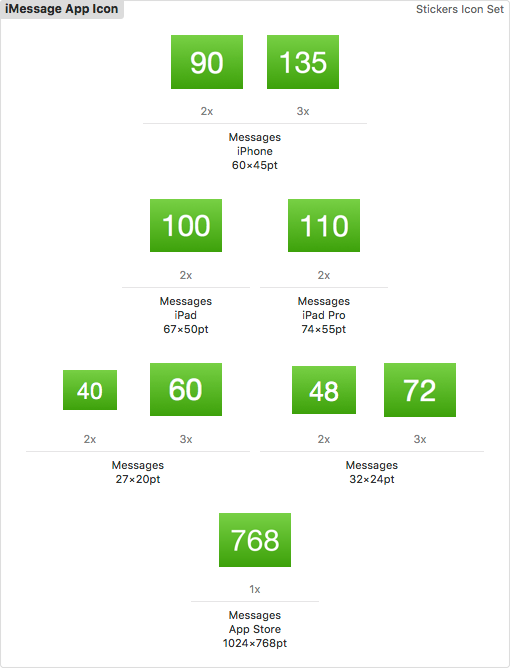
  1. Drag images from the Finder onto each image well to configure the associated icon.
Figure 10  Complete icon set for an iMessage extension. Sizes shown in each image are the height in pixels.
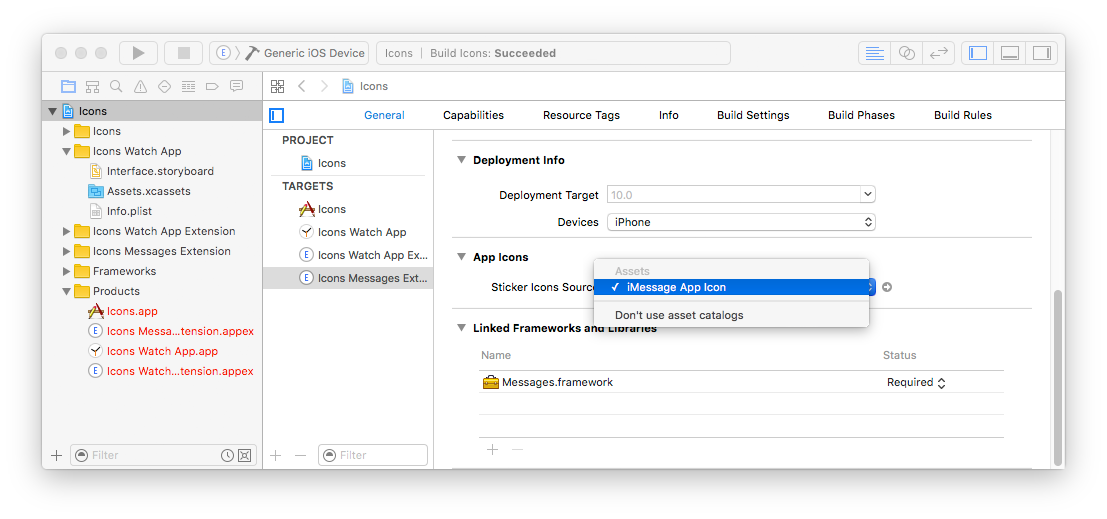
  1. Configure the extension to use the new icon set.
    1. Select the project in the project navigator.
    2. Select the iMessage extension or Sticker Pack extension target from the list in the left column of the project editor.
    3. Switch to the General pane at the top of the project editor.
    4. Select the icon set from the Sticker Icons Source popup menu under the App Icons section.
Figure 11  Selecting the icon set for an iMessage extension's target.

Troubleshooting

This section describes common problems and how to fix them.

[Asset Catalogs] Remove icon related keys from the information property list

If a target is using asset catalogs to manage its icons then its information property list should not include any icon related keys; they will be added at build time by the asset catalog compiler.
  1. Open the information property list for the target. It can be found under the Info tab in the project editor or in the project navigator where it will likely be named either Info.plist or<ProductName>-Info.plist.
  2. Remove the following keys, including device specific variations.
    • “Icon file” (CFBundleIconFile)
    • “Icon files” (CFBundleIconFiles)
    • CFBundleIcons

[Asset Catalogs] Verify that the asset catalog is associated with the target

If a target is using asset catalogs to manage its icons, verify that the asset catalog file is associated with the target and that the correct image set is selected for the target's App Icons Source.
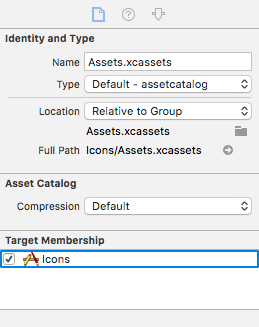
  1. Select the asset catalog in the project navigator.
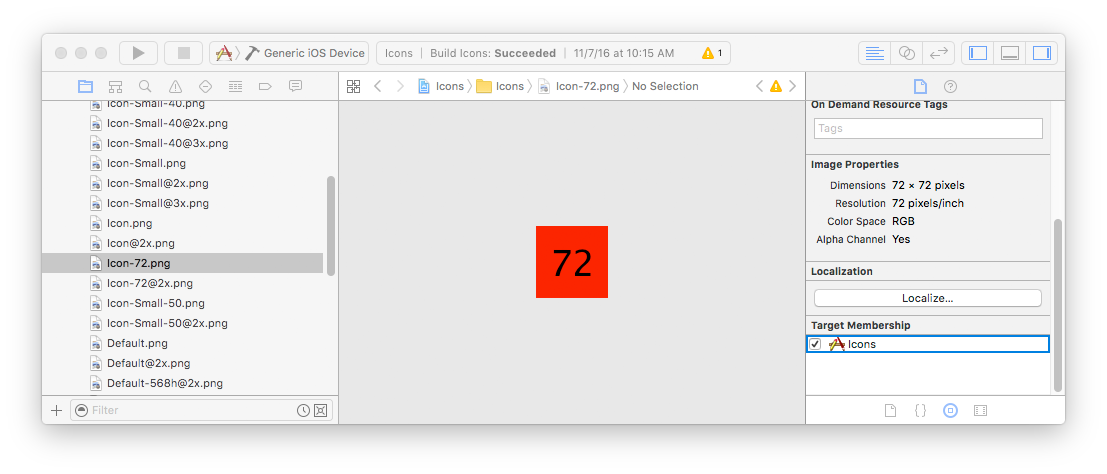
  2. In the utility panel, check the box next to the target under the Target Membership section as shown in Figure 12.
Figure 12  Associating an asset catalog with a build target
  1. Select the project in the project navigator.
  2. Select the target from the list in the left column of the project editor.
  3. Switch to the General pane at the top of the project editor.
  4. Verify that the name of the icon set is selected in the App Icons Source popup menu under the App Icons and Launch Images section as shown in Figure 4.

[Manual] Verify that all icon images are associated with the target

If a target is not using asset catalogs to manage its icons, verify that each of the icon images are associated with the target. Images that are not associated with the target are not copied into the target's bundle when it is built.
  1. Select the icon image in the project navigator.
  2. In the utility panel, check the box next to the target under the Target Membership pane as shown in Figure 13.
Figure 13  Associating an image with a build target

[Manual] Verify that the CFBundleIcons key is present in the information property list

If a target is not using asset catalogs to manage its icons, the information property list must contain the CFBundleIcons key to specify the application's icon images. See Configuring Icons Without an Asset Catalog.

[Manual] Verify that all images referenced by the CFBundleIcons key are present

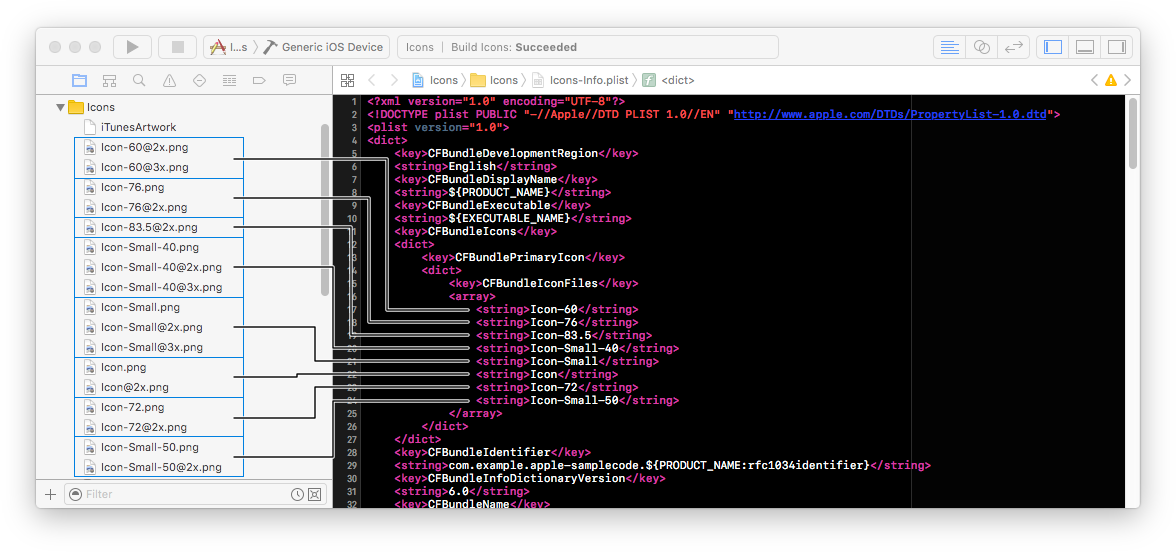
If a target is not using asset catalogs to manage its icons, each of the entries under the CFBundleIcons key in the information property must reference at least one image in the app bundle. Remember that if you include filename extensions in the information property list, you must specify the names of all icon image files (including the high-resolution variants) explicitly.
Figure 14  There must be a matching image for each entry in the CFBundleIcons key.

Verify that all icon images are in PNG format, use a supported color model, and are the correct sizes

All icon images must be in PNG format and use a supported color model. Images that do not use the RGB color model may appear correctly in Xcode but will fail to load on the device. You can use the Preview application to inspect the format, color model, and size of an image.
  1. Open the image in Preview
    • For an image inside of an asset catalog: Select the asset catalog in the project navigator, choose the image set containing the icons, select the image and choose File > Open with External Editor.
    • For an image not inside of an asset catalog: Select the image in the project navigator and choose File > Open with External Editor.
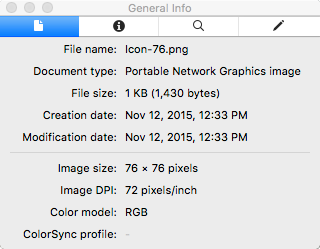
  2. From the Preview menubar, choose Tools > Show Inspector.
  3. The Inspector window opens
    • The value of the Document Type field shows the image format. It should be Portal Network Graphics image.
    • The value of the Image Size field shows the image size. It should match the size shown in the tabes above.
    • The value of the Color Model field shows the image size. It should be RGB.
Figure 15  The Preview inspector window.
If the Document Type is not a Portal Network Graphics image, use Preview to export a copy of the image in PNG format.
  1. From the Preview menubar, choose File > Export.
  2. Select PNG from the Format menu at the bottom of the save dialog.
  3. Click the Save button.
  4. Import the saved image into your Xcode project, replacing the original image.
Repeat the above for all icon images.

Validation Errors

There are multiple icon-related problems that will result in your application failing validation by Xcode or iTunes Connect. The underlying issue depends upon the error.

ITMS-90022/ITMS-90023: Missing required icon file

You have not included an image for one or more of the required icons, based on your application's supported devices and deployment target.
Refer to the tables above for the list of required icons. Verify that each of your icon images matches the size listed in the table.
If your application was recently migrated to use asset catalogs to manage its icons, verify that you have removed all icon-related keys from your application's information property list.
If your application is not using asset catalogs to manage its icons, verify that the CFBundleIcons key is present in your application's information property list, and all listed images are present in your application bundle.

ITMS-90032: Invalid Image Path

Your application's information property list references one or more icon images that were not included in the compiled bundle.
If your application is using asset catalogs to manage its icons, verify that you have removed all icon-related keys from your application's information property list.
If your application is not using asset catalogs to manage its icons, verify that all images referenced by the CFBundleIcons key in the application's information property list are present and are associated with the application target.

ITMS-90033: Invalid Image

One or more of your application's icon images is not a valid PNG file. Verify that all icon images are in PNG format, use a supported color model, and are the correct sizes.

ITMS-90647: Invalid (Messages) Image Asset

One or more of the icons in your iMessage extension or Sticker Pack extension contains transparent areas. Icons for iMessage extensions and Sticker Pack extensions must be opaque.
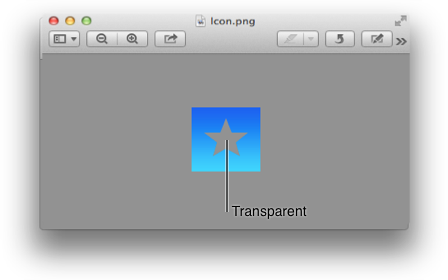
You can use the Preview app to check your image for transparent areas, which will appear dark grey as shown in Figure 17. Use your preferred graphics editing software to fill in the transparent areas with the desired background color.

ITMS-90649: Missing (Messages) App Icon

You have not included an image for one or more of the required icons in your iMessage extension or Sticker Pack extension, or one of your icons is not the correct size. Refer to the tables above for the list of required icons. Verify that each of your icon images matches the size listed in the table.
Icons for iMessage extensions and Sticker Pack Extensions must be added to the asset catalog associated with the iMessage extension or Sticker Pack extension target. See Adding Icons to an iMessage Extension.

Other Errors

Icons don't appear on the device

If the project is using asset catalogs to manage its icons, verify that the asset catalog is associated with the target.
If the project is not using asset catalogs to manage its icons, verify that all images referenced by the CFBundleIcons key in the application's information property list are present are associated with the application target, and are in a supported format.

A previous version of the icon appears on the device

Your testing device or simulator may have a partially outdated build. That is, Xcode failed to copy a modified resource to the app bundle it installed on the device as part of the build & run process. To force Xcode to copy the most recent resources from your project directory:
  1. Remove the app from your testing device or simulator.
  2. Clean the build directory. Hold down the Option key and choose Product > Clean Build Folder, then Product > Build from the Xcode menu bar
  3. Build and run your app.
If your project is using asset catalogs then you must replace the modified image in the asset catalog. Asset catalogs do not track files on disk, opting instead to make a copy of the image at the time it is added to the asset catalog.

Messages App Icon Is Missing On iPad

Verify that you have included icons for all of the sizes listed in Table 8 in the iMessage extension or Sticker Pack extension target. See Adding Icons to an iMessage Extension.
In addition, open the information property list for the iMessage extension or Sticker Pack extension and remove all icon-related keys.

Icon has a black border

Your icon artwork includes rounded corners or transparent areas. iOS will automatically apply a mask that rounds the corners to each icon it displays on the Home screen. Do not inset your icon artwork and make sure your icon has 90° corners so it looks good after the mask is applied.
Figure 16  When iOS displays an app icon on the Home screen of a device, it automatically applies a mask that rounds the corners.

Icon has a black background in the App Store

The Large App Icon you uploaded to iTunes Connect includes transparent areas. The iTunes Connect Developer Guide lists the complete requirements for the Large App Icon, including that it must be opaque.
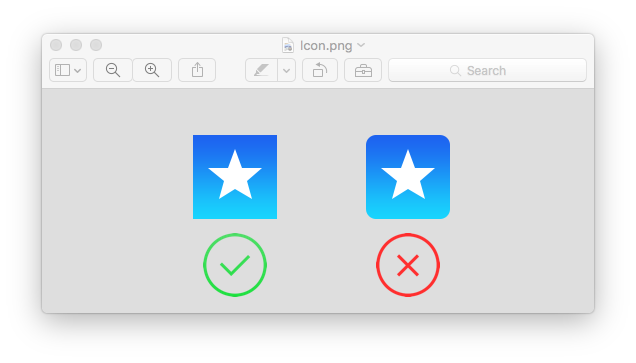
You can use the Preview app to check your image for transparent areas, which will appear dark grey as shown in Figure 17. Use your preferred graphics editing software to fill in the transparent areas with the desired background color.
Figure 17  Preview's dark grey canvas background is visible through transparent areas in an image.

The wrong icon appears in the App Store

The application bundle includes additional images which are being detected as valid icon images.
You may encounter this issue if your icon images deviate from the naming convention shown in the above tables. If your application bundle also contains one or more images that match the naming convention in the tables above, these images may be detected as valid icon images by the App Store. This may occur regardless of whether those images are included in the asset catalog or are referenced by the application's information property list. The solution is to rename or remove the images.
You may encounter this issue when building an app using a third party development environment or if your project was created using a template project provided by a third party. Both will usually include a default set of icon images. If you fail to remove these images or replace all of them with your own artwork, the App Store may display them in the search results for your app. Like the iOS home screen, the icons displayed in the search results depend upon the current device. It is possible that the incorrect icon is shown in the search results on certain devices but not others.
The solution is to delete any instances of the template-provided icons that remain in your project and remove any references to the deleted files from the information property list. Due to the wide variety of ways in which iOS versions have allowed developers to specify app icons in the information property list, you may find it simpler and less error prone to remove all icon related keys from the information property list and then reconfigure your app's icons using the steps presented in Adding Icons to an iOS Application. See Start Over.

Start Over

If the none of the above solutions resolve the problem, follow the steps below to remove all the icons and icon related configuration from the application. Then follow the steps in Adding Icons to an iOS Application to re-configure the proper icons for the application.

Remove the Icon Set From Your Asset Catalog

  1. Select the asset catalog in the project navigator. It is named Assets.xcassets or Images.xcassets by default.
  2. From the set outline view (left column), control click the icon set and choose Remove Selected Items from the context menu. By default the icon set will be named 'AppIcon'.

Remove Icon Images From Your Project

Using the Xcode project navigator, remove any icon images from your project that were previously added to your project as resources. Icon images usually have a file name beginning with 'Icon' or 'AppIcon'.

Remove Icon Related Keys From The Information Property List

  1. Open the information property list for your application. It can be found under the Info tab in the project editor or in the navigator where it will likely be named either YourApp-Info.plist orInfo.plist.
  2. Remove the following keys, including device specific variations.
    • “Icon file” (CFBundleIconFile)
    • “Icon files” (CFBundleIconFiles)
    • CFBundleIcons

Clean The Project

To remove any cached icons, clean your target. Choose Product > Clean from the menu bar.
Finally, follow the steps in Adding Icons to an iOS Application to re-configure the proper icons for the application.

Additional Resources

For additional information, see the App Icons section in the iOS App Programming Guide.
For information about designing your application's icons, see the App Icon section of the iOS Human Interface Guidelines.
For an example project with properly configured icons, see the Application Icons and Launch Images for iOS sample code.


Document Revision History


DateNotes
2016-12-20
Updated for Xcode 8, Apple Watch and Messages extensions.
2014-12-01
Added iPhone 6 Plus icons. Further expanded the troubleshooting section.
 
Added iPhone 6 Plus icons. Further expanded the troubleshooting section.
 
Added iPhone 6 Plus icons. Further expanded the troubleshooting section.
2014-05-19
Added troubleshooting steps for incorrect icons appearing in the App Store search results.
2014-02-03
Updated for Xcode 5 and iOS 7.
2013-07-18
Added icon information for iPad with retina display.
2011-07-14
After iOS 4.3, order doesn't matter in the icon arrangement. Added links to related references.
2010-07-14
Fixed outdated "Add Icon files in Info.plist" section.
2010-07-12
Updated for iOS 4 requirements.
2010-04-09
New document that explains how the icon files in an application bundle are used on iPhone, iPad and Apple Watch.


Featured Posts

Exchange Online Limits - Office 365 Distribution group limits

Exchange Online Limits - Office 365 Distribution group limits What are Exchange Online Limits What are Office 365 Distribution group limi...