Showing posts with label SQL. Show all posts

Monday, January 23, 2023

Robocopy to replicate SQL backups

 Robocopy to replicate SQL backups


robocopyFullBackups.bat

ROBOCOPY \\192.168.1.10\SQLSRV01 D:\Backups\SQLSRV01\SQLSRV01 *.bak /S /XO /MT:16 /log:"C:\Robocopy\robocopyLogs\theFullLog.log"

ROBOCOPY \\192.168.1.10\SQLSRV01-other D:\Backups\SQLSRV01\SQLSRV01 *.bak /S /XO /MT:16 /log:"C:\Robocopy\robocopyLogs\theFullLog.log"


robocopyDiffBackups.bat

ROBOCOPY \\192.168.1.10\SQLSRV01 D:\Backups\SQLSRV01\SQLSRV01 *.dif /S /XO /MT:16 /log:"C:\Robocopy\robocopyLogs\theDiferentialLog.log"

ROBOCOPY \\192.168.1.10\SQLSRV01-other D:\Backups\SQLSRV01\SQLSRV01 *.dif /S /XO /MT:16 /log:"C:\Robocopy\robocopyLogs\theDifLog.log"


robocopyTrnBackups.bat

ROBOCOPY \\192.168.1.10\SQLSRV01 D:\Backups\SQLSRV01\SQLSRV01 *.trn /S /XO /MT:16 /log:"C:\Robocopy\robocopyLogs\theTransLog.log"

ROBOCOPY \\192.168.1.10\SQLSRV01-other D:\Backups\SQLSRV01\SQLSRV01 *.trn /S /XO /MT:16 /log:"C:\Robocopy\robocopyLogs\theTransLog.log"


robocopy


robocopy
Article
10/04/2022
9 minutes to read
18 contributors
Copies file data from one location to another.

Syntax
cmd

Copy
robocopy <source> <destination> [<file>[ ...]] [<options>]
For example, to copy a file named yearly-report.mov from c:\reports to a file share \\marketing\videos while enabling multi-threading for higher performance (with the /mt parameter) and the ability to restart the transfer in case it's interrupted (with the /z parameter), type:

dos

Copy
robocopy c:\reports '\\marketing\videos' yearly-report.mov /mt /z
Parameters
Parameter Description
<source> Specifies the path to the source directory.
<destination> Specifies the path to the destination directory.
<file> Specifies the file or files to be copied. Wildcard characters (* or ?) are supported. If you don't specify this parameter, *.* is used as the default value.
<options> Specifies the options to use with the robocopy command, including copy, file, retry, logging, and job options.
Copy options
Option Description
/s Copies subdirectories. This option automatically excludes empty directories.
/e Copies subdirectories. This option automatically includes empty directories.
/lev:<n> Copies only the top n levels of the source directory tree.
/z Copies files in restartable mode. In restartable mode, should a file copy be interrupted, Robocopy can pick up where it left off rather than recopying the entire file.
/b Copies files in backup mode. Backup mode allows Robocopy to override file and folder permission settings (ACLs). This allows you to copy files you might otherwise not have access to, assuming it's being run under an account with sufficient privileges.
/zb Copies files in restartable mode. If file access is denied, switches to backup mode.
/j Copies using unbuffered I/O (recommended for large files).
/efsraw Copies all encrypted files in EFS RAW mode.
/copy:<copyflags> Specifies which file properties to copy. The valid values for this option are:
D - Data
A - Attributes
T - Time stamps
S - NTFS access control list (ACL)
O - Owner information
U - Auditing information
The default value for this option is DAT (data, attributes, and time stamps).
/dcopy:<copyflags> Specifies what to copy in directories. The valid values for this option are:
D - Data
A - Attributes
T - Time stamps
The default value for this option is DA (data and attributes).
/sec Copies files with security (equivalent to /copy:DATS).
/copyall Copies all file information (equivalent to /copy:DATSOU).
/nocopy Copies no file information (useful with /purge).
/secfix Fixes file security on all files, even skipped ones.
/timfix Fixes file times on all files, even skipped ones.
/purge Deletes destination files and directories that no longer exist in the source. Using this option with the /e option and a destination directory, allows the destination directory security settings to not be overwritten.
/mir Mirrors a directory tree (equivalent to /e plus /purge). Using this option with the /e option and a destination directory, overwrites the destination directory security settings.
/mov Moves files, and deletes them from the source after they are copied.
/move Moves files and directories, and deletes them from the source after they are copied.
/a+:[RASHCNET] Adds the specified attributes to copied files. The valid values for this option are:
R - Read only
A - Archive
S - System
H - Hidden
C - Compressed
N - Not content indexed
E - Encrypted
T - Temporary
/a-:[RASHCNET] Removes the specified attributes from copied files. The valid values for this option are:
R - Read only
A - Archive
S - System
H - Hidden
C - Compressed
N - Not content indexed
E - Encrypted
T - Temporary
/create Creates a directory tree and zero-length files only.
/fat Creates destination files by using 8.3 character-length FAT file names only.
/256 Turns off support for paths longer than 256 characters.
/mon:<n> Monitors the source, and runs again when more than n changes are detected.
/mot:<m> Monitors the source, and runs again in m minutes, if changes are detected.
/mt[:n] Creates multi-threaded copies with n threads. n must be an integer between 1 and 128. The default value for n is 8. For better performance, redirect your output using /log option.
The /mt parameter can't be used with the /ipg and /efsraw parameters.

/rh:hhmm-hhmm Specifies run times when new copies may be started.
/pf Checks run times on a per-file (not per-pass) basis.
/ipg:n Specifies the inter-packet gap to free bandwidth on slow lines.
/sj Copies junctions (soft-links) to the destination path instead of link targets.
/sl Don't follow symbolic links and instead create a copy of the link.
/nodcopy Copies no directory info (the default /dcopy:DA is done).
/nooffload Copies files without using the Windows Copy Offload mechanism.
/compress Requests network compression during file transfer, if applicable.
 Note

The /mt parameter was introduced in Windows Server 2008 R2 and its functionality applies to current versions of Windows Server.

 Important

When using the /secfix copy option, specify the type of security information you want to copy, using one of these additional copy options:

/copyall
/copy:o
/copy:s
/copy:u
/sec
File selection options
Option Description
/a Copies only files for which the Archive attribute is set.
/m Copies only files for which the Archive attribute is set, and resets the Archive attribute.
/ia:[RASHCNETO] Includes only files for which any of the specified attributes are set. The valid values for this option are:
R - Read only
A - Archive
S - System
H - Hidden
C - Compressed
N - Not content indexed
E - Encrypted
T - Temporary
O - Offline
/xa:[RASHCNETO] Excludes files for which any of the specified attributes are set. The valid values for this option are:
R - Read only
A - Archive
S - System
H - Hidden
C - Compressed
N - Not content indexed
E - Encrypted
T - Temporary
O - Offline
/xf <filename>[ ...] Excludes files that match the specified names or paths. Wildcard characters (* and ?) are supported.
/xd <directory>[ ...] Excludes directories that match the specified names and paths.
/xc Excludes existing files with the same timestamp, but different file sizes.
/xn Source directory files newer than the destination are excluded from the copy.
/xo Source directory files older than the destination are excluded from the copy.
/xx Excludes extra files and directories present in the destination but not the source. Excluding extra files will not delete files from the destination.
/xl Excludes "lonely" files and directories present in the source but not the destination. Excluding lonely files prevents any new files from being added to the destination.
/im Include modified files (differing change times).
/is Includes the same files. Same files are identical in name, size, times, and all attributes.
/it Includes "tweaked" files. Tweaked files have the same name, size, and times, but different attributes.
/max:<n> Specifies the maximum file size (to exclude files bigger than n bytes).
/min:<n> Specifies the minimum file size (to exclude files smaller than n bytes).
/maxage:<n> Specifies the maximum file age (to exclude files older than n days or date).
/minage:<n> Specifies the minimum file age (exclude files newer than n days or date).
/maxlad:<n> Specifies the maximum last access date (excludes files unused since n).
/minlad:<n> Specifies the minimum last access date (excludes files used since n) If n is less than 1900, n specifies the number of days. Otherwise, n specifies a date in the format YYYYMMDD.
/xj Excludes junction points, which are normally included by default.
/fft Assumes FAT file times (two-second precision).
/dst Compensates for one-hour DST time differences.
/xjd Excludes junction points for directories.
/xjf Excludes junction points for files.
Retry options
Option Description
/r:<n> Specifies the number of retries on failed copies. The default value of n is 1,000,000 (one million retries).
/w:<n> Specifies the wait time between retries, in seconds. The default value of n is 30 (wait time 30 seconds).
/reg Saves the values specified in the /r and /w options as default settings in the registry.
/tbd Specifies that the system will wait for share names to be defined (retry error 67).
Logging options
Option Description
/l Specifies that files are to be listed only (and not copied, deleted, or time stamped).
/x Reports all extra files, not just those that are selected.
/v Produces verbose output, and shows all skipped files.
/ts Includes source file time stamps in the output.
/fp Includes the full path names of the files in the output.
/bytes Prints sizes, as bytes.
/ns Specifies that file sizes are not to be logged.
/nc Specifies that file classes are not to be logged.
/nfl Specifies that file names are not to be logged.
/ndl Specifies that directory names are not to be logged.
/np Specifies that the progress of the copying operation (the number of files or directories copied so far) will not be displayed.
/eta Shows the estimated time of arrival (ETA) of the copied files.
/log:<logfile> Writes the status output to the log file (overwrites the existing log file).
/log+:<logfile> Writes the status output to the log file (appends the output to the existing log file).
/unicode Displays the status output as Unicode text.
/unilog:<logfile> Writes the status output to the log file as Unicode text (overwrites the existing log file).
/unilog+:<logfile> Writes the status output to the log file as Unicode text (appends the output to the existing log file).
/tee Writes the status output to the console window, and to the log file.
/njh Specifies that there is no job header.
/njs Specifies that there is no job summary.
Job options
Option Description
/job:<jobname> Specifies that parameters are to be derived from the named job file. To run /job:jobname, you must first run the /save:jobname parameter to create the job file.
/save:<jobname> Specifies that parameters are to be saved to the named job file. This must be ran before running /job:jobname. All copy, retry, and logging options must be specified before this parameter.
/quit Quits after processing command line (to view parameters).
/nosd Indicates that no source directory is specified.
/nodd Indicates that no destination directory is specified.
/if Includes the specified files.
Exit (return) codes
Value Description
0 No files were copied. No failure was encountered. No files were mismatched. The files already exist in the destination directory; therefore, the copy operation was skipped.
1 All files were copied successfully.
2 There are some additional files in the destination directory that are not present in the source directory. No files were copied.
3 Some files were copied. Additional files were present. No failure was encountered.
5 Some files were copied. Some files were mismatched. No failure was encountered.
6 Additional files and mismatched files exist. No files were copied and no failures were encountered. This means that the files already exist in the destination directory.
7 Files were copied, a file mismatch was present, and additional files were present.
8 Several files did not copy.
 Note

Any value equal to or greater than 8 indicates that there was at least one failure during the copy operation.

Additional References
Command-Line Syntax Key
Recommended content
icacls
Reference article for the icacls command, which displays or modifies discretionary access control lists (DACL) on specified files, and applies stored DACLs to files in specified directories.
takeown
Reference article for the takeown command, which enables an administrator to recover access to a file that was previously denied.
Get-SmbConnection (SmbShare)
Use this topic to help manage Windows and Windows Server technologies with Windows PowerShell.
Close-SmbSession (SmbShare)
Use this topic to help manage Windows and Windows Server technologies with Windows PowerShell.


Wednesday, July 31, 2019

TRAINING Microsoft SQL Server Visual Studio

Training Microsoft SQL Server Visual Studio

Training Microsoft SQL SQL Server Visual Studio

In summary
SQL ASP.NET C# HTML CSS JAVASCRIPT JQUERY JSON AJAX

Installation
SQL server Express
SQL Server Developper
SSMS
Updates

Visual Studio
Extensions (Github etc)
Panels layouts
Update SQL via VS Tools NuGet Package manager

SQL Server Database first steps

SQL Server SSMS
Create new Database
Create new table
id int primary key
name
title
Save and refresh
edit top 200 rows
fill some values
New Query

SQL CLAUSES(1)

Database select where or and between order by asc desc
use trainingDB
go
--1. this is a comment: select all columns from table
select * from Table_1
execute
--2. select name and title from table
select name,title from Table_1
execute
select sql code go to debug step into

select * from Table_1
where id=2 or id=3

select name,title from Table_1
where name='mary'
order by title

select name,title from Table_1
where name='mary'
order by id desc

useful tool from Query menu Include actual execution plan

select name,title from Table_1
where name='mary' and title='vice president'
order by id desc

Between
select name,title,[momeny earned] from Table_1
where [money earned] between 170000 and 260000
order by [money earned] desc

Alias
use trainingDB
go
select name as 'Firstname',
title as 'Employee title',
[money earned] as Salary
from Table_1
where [money earned] not between 170000 and 250000
order by title asc, Salary desc

Alias compute column
--0. In English: Show the name, title, salary, tax amount
-- and take home pay for all people who are earning between
-- 100,000 and 200,000 take home pay, and display the
-- results sorted by take home pay, from highest to lowest.
--1. aliasing computed columns

use trainingBD
go
select name as 'Firstname',
 title as 'Employee Title',
 [money earned] as Salary,
 [money earned]*0.33 as 'Tax Amount',
 [money earned]*0.66 as 'Take Home Pay'
from Table_1

where [Money earned]*0.66 between 100000 and 200000
order by 'Take Home Pay' desc, 'Employee Title'

--2. write down the order of execution
--3. from, where, select, order by

Query Designer
fun


Visual Studio

First web page connected to database
File > New > Web site (C#, ASP.NET)
Solutions explorer
Website > web.config > add > Web form
Build  > Build solution
Google Chrome
localhost:53066.Default.aspx
View page source

Design view
Toolbox window
Drag Gridview to top of Default.aspx page shows our first control
Gridview tasks > Add Data source
Connect to SQL Server database
@are parameters of column query
ex:
select * from [Table_1] where ([money earned] <= money_earned)    Value was set to 10000
order by [money earned] desc

data type in SQL was money, but VS data type is decimal
GridView tasks > Enable Sorting
Verify in Google Chrome
Toggle to Source view
Opening and closing tags like HTML


back to SSMS create new Table FOR "GROUP BY" exercise

[[[[[[[ IF ERRORS ]]]]]]]]

https://blog.sqlauthority.com/2018/03/03/sql-server-automatically-saved-settings-file-newsettings-vssettings-cannot-found/
SQL SERVER – The Automatically Saved Settings file NewSettings.vssettings Cannot be Found


SQL
1Comment
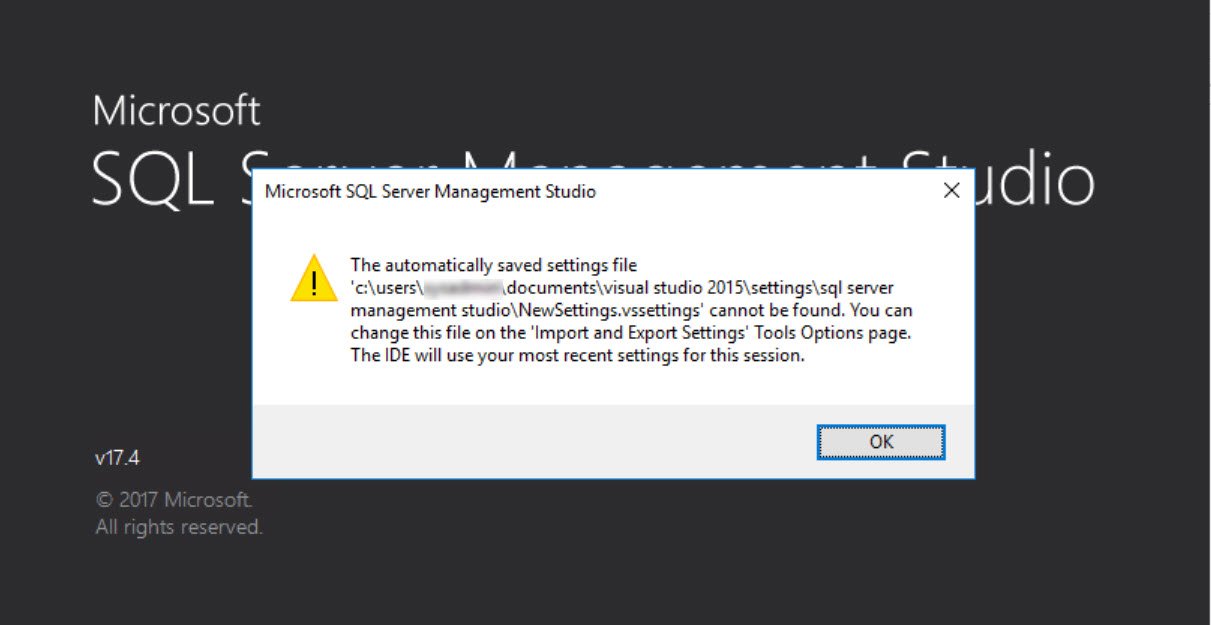
After cleaning up some data from my user profile, when I launched SQL Server Management Studio 17.4, I got an error. related to automatically saved settings.
SQL SERVER - The Automatically Saved Settings file NewSettings.vssettings Cannot be Found ssms-vssetting-err-01
Here is the text of the message.
The automatically saved settings file ‘c:\users\<UserName>\documents\visual studio 2015\settings\sql server management studio\NewSettings.vssettings’ cannot be found. You can change this file on the ‘Import and Export Settings’ Tools Options page. The IDE will use your most recent settings for this session.
Solarwinds
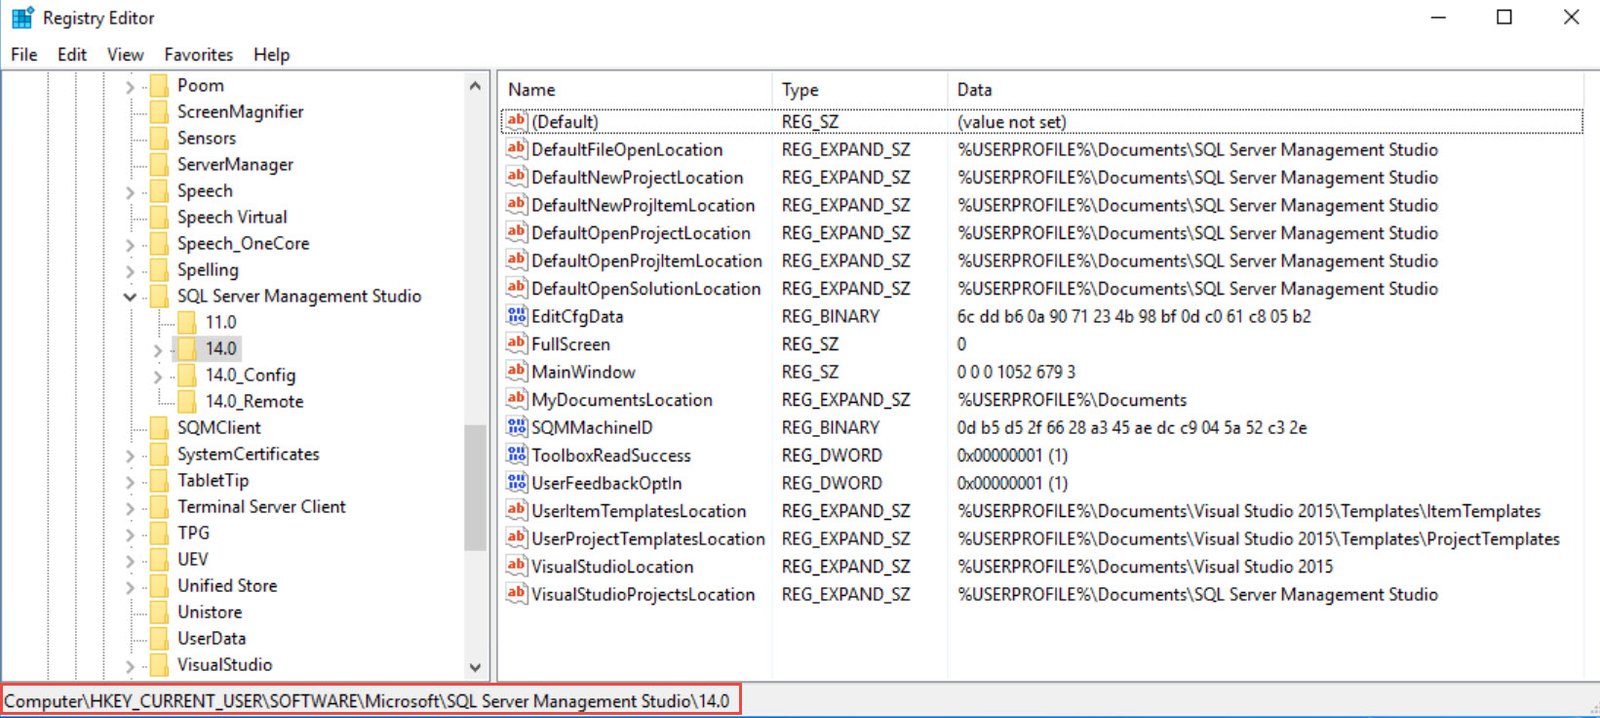
Once I clicked OK, I was able to get SSMS working and error never appeared. I was curious to know the cause of the error.  After capturing Process Monitor I was able to find the location from where SSMS picks the value of the settings file.
Most of the settings are stored in
HKEY_CURRENT_USER\SOFTWARE\Microsoft\SQL Server Management Studio\14.0
SQL SERVER - The Automatically Saved Settings file NewSettings.vssettings Cannot be Found ssms-vssetting-err-02
I noticed that I get this error first time when I rename “sql server management studio” folder to “sql server management studio_1” in windows explorer. When I opened SSMS, the folder got created automatically and hence no error appeared again.
Sometimes, you may get an error about network location so you need to find the key which is pointing to a network location and fix that.


[[[[[[[ IF ERROR ]]]]]]]]

microsoft sql server management studio error table saving changes is not permitted
OR

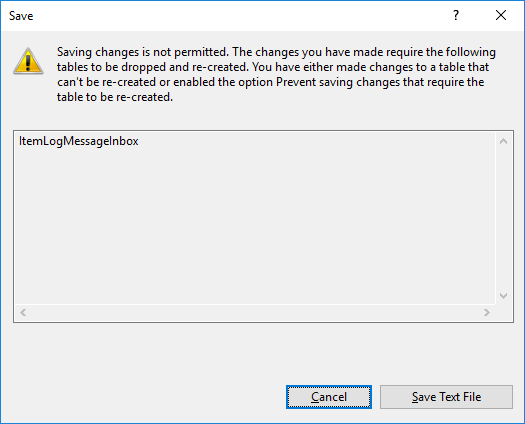
SQL Server Management Console: Saving changes is not permitted.
The full warning message would be:
Saving changes is not permitted. The changes that you have made require the following tables to be dropped and re-created. You have either made changes to a table that can’t be re-created or enabled the option Prevent saving changes that require the table to be re-created.
SQL Server Management Console: Saving changes is not permitted
This behavior is very simple to solve and is well documented here: Error message when you try to save a table in SQL Server: “Saving changes is not permitted”. Once again, this is just for helping me not always to look at this “problem” again. My Blog is the first place I look, it is my personal notes.

Cause


This problem occurs when the Prevent saving changes that require the table re-creation option is enabled, and you make one or more of the following changes to the table:
  • You change the Allow Nulls setting for a column.
  • You reorder columns in the table.
  • You change the column data type.
  • You add a new column.
When you change a table so that you alter the metadata structure of the table, and then you save the table, the table must be re-created based on these changes. This may result in the loss of metadata and in a direct loss of data during the re-creation of the table. If you enable the Prevent saving changes that require the table re-creation option in the Designer section of the SQL Server Management Studio (SSMS) Options window, you receive the error message: Saving changes is not permitted. The changes that you have made require the following tables to be dropped and re-created.

Solution


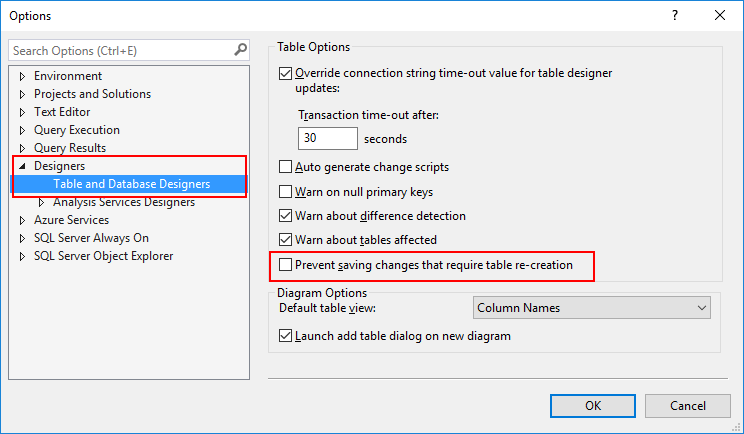
To change the Prevent saving changes that require the table re-creation option, follow these steps:
  • Open SQL Server Management Studio (SSMS).
  • On the Tools menu, click Options.
  • In the navigation pane of the Options window, click Designers.
  • Uncheck (clear) the Prevent saving changes that require the table re-creation check box, and then click OK.
SQL Server Management Console: Saving changes is not permitted fixed
END ERRORS


OK let's continue

BACK TO
SQL CLAUSES(2)

Summarize Blocks of Records with 

GROUP BY

SSMS
Create new table
id column properties > identity specification
set primary key > increment 1 seed 1
dept name nvarchar(50) not null
sales person nvarchar(50) not null
sales amount money not null
on Table_2
Edit Top 200 Rows
put in some values
New Query
*TIP*: start with select [dept name] from Table_2 in order to see columns form that table

select [dept name] as 'DeptName' ,
SUM([sales amount]) as 'TotalSales'
from Table_2
GROUP BY [dept name]
ORDER BY [TotalSales] desc

HAVING


--1. choosing grouped records with the having clause 
--2. In English: pick out the department where the sales 
-- are above or equal to 800,000 
use mydbase 
go 
select [dept name], 
SUM([sales amount]) as TotalSales 
from Table_2 
group by [dept name] 
having SUM([sales amount])>=800000 
--3. clause execution steps: from, group by, having, select 


SALECT INTO

Table_3 doesn't exist
select * into Table_3 from Table_2

--1. copying from one table to another
--2. In English: Put the department average sales in a
--3. new table named table4

select [dept name] as Department,
sum([sales amount])/count([Sales Person]) as Average
into table4
from table_2
group by [dept name]

drop table Table_4

--4. line below gets rid of the table from the database drop table table4
--5. line below runs once the table is copied out, but before
-- it's dropped again select * from table4

Verifying expensive operations (insert and sort) from the Query menu Include Actual Execution Plan


BACK TO VISUAL STUDIO

create new project asp.net empty
right click the site >  add webform  (renamedit to defaultapp1)
from Design view
from toolbox search add gridview and
2 text boxes > renamed it txtDeptName and SalesAmount
edit source html before <asp
Launch in browser and close it
back to Design view
Set Toolbox property to AutoPostBack="True"
Can set in HTML too
sent to server for processing and result back to form element
Design view set Database gridview data source
table 2 source control ...
add both
auto format
enable sorting

HTML source code example

<%@ Page Language="C#" AutoEventWireup="true" CodeBehind="defaultapp1.aspx.cs" Inherits="WebApplication1.defaultapp1" %>
<!DOCTYPE html>
<html xmlns="http://www.w3.org/1999/xhtml">
<head runat="server">
    <title></title>
</head>
<body>
    <form id="form1" runat="server">
        <div>
            <asp:GridView ID="GridView1" runat="server" AllowSorting="True" AutoGenerateColumns="False" BackColor="LightGoldenrodYellow" BorderColor="Tan" BorderWidth="1px" CellPadding="2" DataKeyNames="id" DataSourceID="SqlDataSource1" ForeColor="Black" GridLines="None">
                <AlternatingRowStyle BackColor="PaleGoldenrod" />
                <Columns>
                    <asp:BoundField DataField="id" HeaderText="id" InsertVisible="False" ReadOnly="True" SortExpression="id" />
                    <asp:BoundField DataField="dept name" HeaderText="dept name" SortExpression="dept name" />
                    <asp:BoundField DataField="sales person" HeaderText="sales person" SortExpression="sales person" />
                    <asp:BoundField DataField="sales amount" HeaderText="sales amount" SortExpression="sales amount" />
                </Columns>
                <FooterStyle BackColor="Tan" />
                <HeaderStyle BackColor="Tan" Font-Bold="True" />
                <PagerStyle BackColor="PaleGoldenrod" ForeColor="DarkSlateBlue" HorizontalAlign="Center" />
                <SelectedRowStyle BackColor="DarkSlateBlue" ForeColor="GhostWhite" />
                <SortedAscendingCellStyle BackColor="#FAFAE7" />
                <SortedAscendingHeaderStyle BackColor="#DAC09E" />
                <SortedDescendingCellStyle BackColor="#E1DB9C" />
                <SortedDescendingHeaderStyle BackColor="#C2A47B" />
            </asp:GridView>
            <asp:SqlDataSource ID="SqlDataSource1" runat="server" ConnectionString="<%$ ConnectionStrings:SurpriseDBConnectionString %>" SelectCommand="SELECT * FROM [Table_2] WHERE (([dept name] = @dept_name) AND ([sales amount] &lt;= @sales_amount))">
                <SelectParameters>
                    <asp:ControlParameter ControlID="txtDeptName" Name="dept_name" PropertyName="Text" Type="String" />
                    <asp:ControlParameter ControlID="txtSalesAmount" DefaultValue="" Name="sales_amount" PropertyName="Text" Type="Decimal" />
                </SelectParameters>
            </asp:SqlDataSource>
        </div>
        Dept. Name: <asp:TextBox ID="txtDeptName" runat="server" AutoPostBack="True"></asp:TextBox>
        <p>
           Sales Amount: <asp:TextBox ID="txtSalesAmount" runat="server" AutoPostBack="True"></asp:TextBox>
        </p>
    </form>
</body>
</html>


SQL 

CREATE TABLE 

INSERT INTO


use SurpriseDB
go
create table Employees 
(
 id int not null,
 name nvarchar(50) not null,
 [date enrolled] date not null,
 [money earned] money not null,
)

insert into Employees 
values 
 ('1','John','10/12/2017','267'),
 ('2','Mary','10/12/2014','267'),
 ('3','Jose','1/23/2015','267'),
 ('4','Mike',GetDate(),'267')

select * from Employees


UPDATE

USE SurpriseDB
GO
UPDATE Employees 
SET [money earned]=75000
WHERE [id]=2
select * from Employees


USE SurpriseDB
GO
UPDATE Employees 
SET [money earned]=85000,
[date enrolled]='06/11/2011',
[modified date]=GetDate() 
WHERE id=2
select * from Employees


ASP.NET Page Updating and Deleting

UPDATE
DELETE

VISUAL STUDIO

Under same Project WebApplication1
Add Web Form defaultapp2
Design view
GridView to page
Connect database
New connection
Yes
Tick all columns
Advanced
GENERATE INSERT, UPDATE, DELETE (needs a primary key on the table)
didn't select Optimistic concurrency... but good to know it's there
Enable sorting on each
Open in browser
Can edit delete and select
back in VS Deisgn from gridview Edit Columns
choose selected fields > date started > CONVERT THIS INTO A TEMPLATEFIELD
same with salary and date modified ok
gridview > edit templates
each
ItemTemplate > Label1 > DataBindings
Date Started > Change format

Check source code


NORMALIZATION 

Improve table structure

1RST NORMAL FORM NORMALIZATION

1- Atomic

Atomic
NO Repeating records
NEED Composite Primary key (that is unique)

Fix: select distinct * into UniqueParts from Parts
Select both columns set primary key

find and create a composite primary key 

use SurpriseDB
go
create table parts
(
 [part] nvarchar(50) not null,
 [brand] nvarchar(50) not null,
 [price] money not null,
 [tax] money not null
)
insert into parts
values
 ('tire','company x','100','15'),
 ('wipers','company x','40','15'),
 ('tire','company y','110','15'),
 ('tire','company x','90','15'),
 ('tire','company y','110','15'),
 ('wipers','company x','40','15'),
 ('tire','company y','110','15'),
 ('wipers','company y','50','15'),
 ('wipers','company x','40','15')
select distinct * from parts
select distinct * into UniqueParts from parts
select distinct * from UniqueParts


2ND NORMAL FORM 

2- Partial Dependency (NO)
Don't waste space
Depend ONLY on the primary key

In 2nd normal form, we may separate a big table into two smaller tables. We do this in order to ensure that the columns depend only on ALL the components of a key.

If a column in a table does not depend on every member of a key field, then 2nd form says this column must be moved into a different table.

Fix: Check code below to find composite primary key
Select both columns set primary key


select part,price,tax into PartPriceTax from UniqueParts
select * from PartPriceTax

select distinct * into PartPriceTaxUnique from PartPriceTax
select * from PartPriceTaxUnique


3RD NORMAL FORM 

3-Transitive Dependency (NO)
Don't waste space
Depend ONLY on the primary key

Fix: Check code below to find primary key
Select part column to be primary key

select part,price into PartPrice from PartPriceTaxUniqueselect * from PartPrice

Featured Posts

Exchange Online Limits - Office 365 Distribution group limits

Exchange Online Limits - Office 365 Distribution group limits What are Exchange Online Limits What are Office 365 Distribution group limi...