Showing posts with label Mac. Show all posts

Wednesday, April 28, 2021

How to get old versions of macOS

 How to get old versions of macOS

As per reference: 

https://support.apple.com/en-ca/HT211683

How to get old versions of macOS

If your Mac isn't compatible with the latest macOS, you might still be able to upgrade to an earlier macOS, such as macOS Catalina, Mojave, High Sierra, Sierra, or El Capitan.

To get the latest features and maintain the security, stability, compatibility, and performance of your Mac, it's important to keep your software up to date. Apple recommends that you always use the latest macOS that is compatible with your Mac.

Learn how to upgrade to macOS Big Sur, the latest version of macOS.

Check compatibility

If a macOS installer can't be used on your Mac, the installer will let you know. For example, it might say that it's too old to be opened on this version of macOS, or that your Mac doesn't have enough free storage space for the installation.

To confirm compatibility before downloading, check the minimum requirements for macOS Catalina, Mojave, High Sierra, Sierra, El Capitan, or Yosemite. You can also find compatibility information on the product-ID page for MacBook Pro, MacBook Air, MacBook, iMac, Mac mini, or Mac Pro.


Make a backup

Before installing, it’s a good idea to back up your Mac. Time Machine makes it simple, and other backup methods are also available. Learn how to back up your Mac.


Download macOS

It takes time to download and install macOS, so make sure that you're plugged into AC power and have a reliable internet connection.

Safari uses these links to find the old installers in the App Store. After downloading from the App Store, the installer opens automatically.

Safari downloads the following older installers as a disk image named InstallOS.dmg or InstallMacOSX.dmg. Open the disk image, then open the .pkg installer inside the disk image. It installs an app named Install [Version Name]. Open that app from your Applications folder to begin installing the operating system.


Install macOS

Follow the onscreen instructions in the installer. It might be easiest to begin installation in the evening so that it can complete overnight, if needed.

If the installer asks for permission to install a helper tool, enter the administrator name and password that you use to log in to your Mac, then click Add Helper.

Please allow installation to complete without putting your Mac to sleep or closing its lid. Your Mac might restart, show a progress bar, or show a blank screen several times as it installs macOS and related firmware updates.


Learn more

You might also be able to use macOS Recovery to reinstall the macOS you're using now, upgrade to the latest compatible macOS, or install the macOS that came with your Mac.

Published Date: 


IT Consultant 

www.inCOREporation.com


How to create a bootable installer for macOS

 How to create a bootable installer for macOS

As from the reference: 

https://support.apple.com/en-us/HT201372


You can use an external drive or secondary volume as a startup disk from which to install the Mac operating system.

These advanced steps are primarily for system administrators and others who are familiar with the command line. You don't need a bootable installer to upgrade macOS or reinstall macOS, but it can be useful when you want to install on multiple computers without downloading the installer each time.

What you need to create a bootable installer

  • A USB flash drive or other secondary volume formatted as Mac OS Extended, with at least 14GB of available storage
  • A downloaded installer for macOS Big Sur, Catalina, Mojave, High Sierra, or El Capitan

Download macOS

  • Download: macOS Big Sur, macOS Catalina, macOS Mojave, or macOS High Sierra 
    These download to your Applications folder as an app named Install macOS [version name]. If the installer opens after downloading, quit it without continuing installation. To get the correct installer, download from a Mac that is using macOS Sierra 10.12.5 or later, or El Capitan 10.11.6. Enterprise administrators, please download from Apple, not a locally hosted software-update server. 
  • Download: OS X El Capitan
    This downloads as a disk image named InstallMacOSX.dmg. On a Mac that is compatible with El Capitan, open the disk image and run the installer within, named InstallMacOSX.pkg. It installs an app named Install OS X El Capitan into your Applications folder. You will create the bootable installer from this app, not from the disk image or .pkg installer.

Use the 'createinstallmedia' command in Terminal

  1. Connect the USB flash drive or other volume that you're using for the bootable installer. 
  2. Open Terminal, which is in the Utilities folder of your Applications folder.
  3. Type or paste one of the following commands in Terminal. These assume that the installer is in your Applications folder, and MyVolume is the name of the USB flash drive or other volume you're using. If it has a different name, replace MyVolume in these commands with the name of your volume.

Big Sur:*

sudo /Applications/Install\ macOS\ Big\ Sur.app/Contents/Resources/createinstallmedia --volume /Volumes/MyVolume

Catalina:*

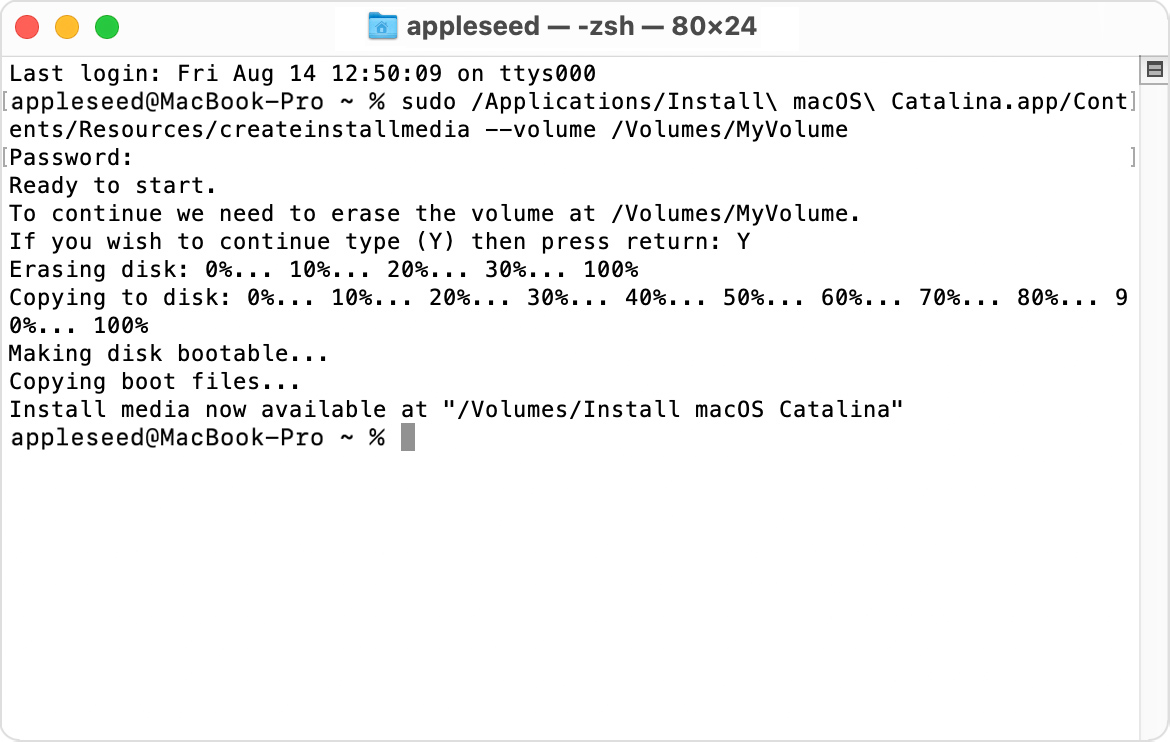
sudo /Applications/Install\ macOS\ Catalina.app/Contents/Resources/createinstallmedia --volume /Volumes/MyVolume

Mojave:*

sudo /Applications/Install\ macOS\ Mojave.app/Contents/Resources/createinstallmedia --volume /Volumes/MyVolume

High Sierra:*

sudo /Applications/Install\ macOS\ High\ Sierra.app/Contents/Resources/createinstallmedia --volume /Volumes/MyVolume

El Capitan:

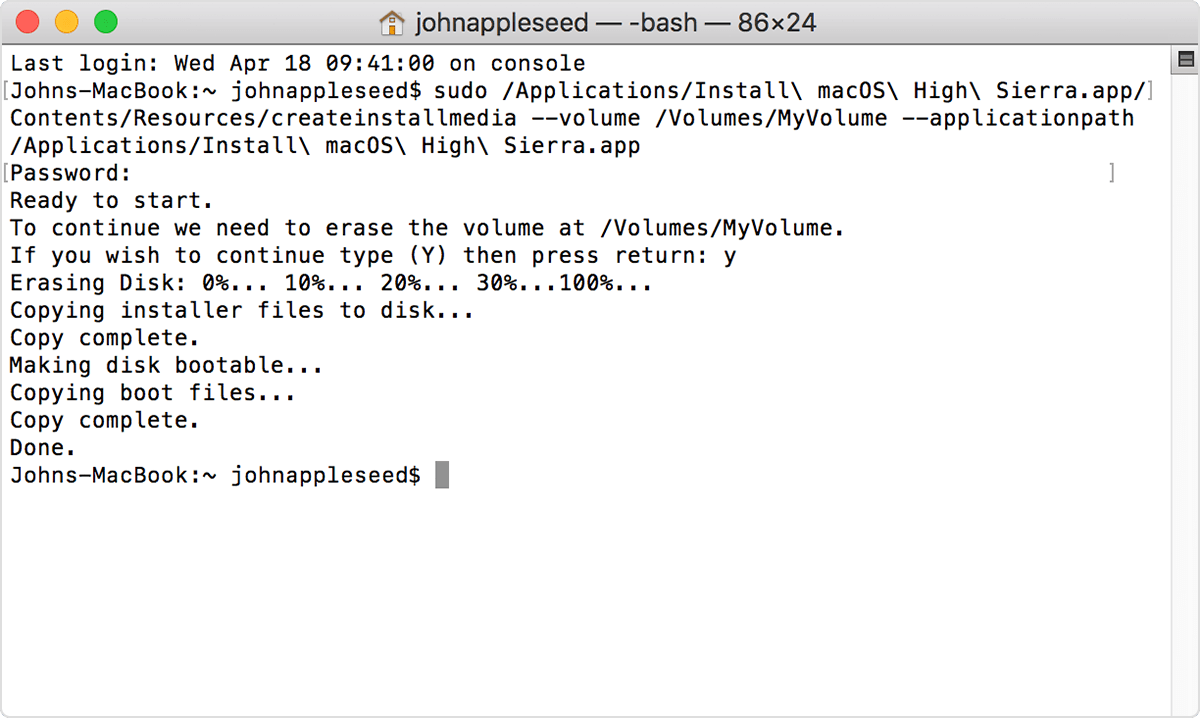
sudo /Applications/Install\ OS\ X\ El\ Capitan.app/Contents/Resources/createinstallmedia --volume /Volumes/MyVolume --applicationpath /Applications/Install\ OS\ X\ El\ Capitan.app

* If your Mac is using macOS Sierra or earlier, include the --applicationpath argument and installer path, similar to the way this is done in the command for El Capitan.


After typing the command:

  1. Press Return to enter the command.
  2. When prompted, type your administrator password and press Return again. Terminal doesn't show any characters as you type your password.
  3. When prompted, type Y to confirm that you want to erase the volume, then press Return. Terminal shows the progress as the volume is erased.
  4. After the volume is erased, you may see an alert that Terminal would like to access files on a removable volume. Click OK to allow the copy to proceed. 
  5. When Terminal says that it's done, the volume will have the same name as the installer you downloaded, such as Install macOS Big Sur. You can now quit Terminal and eject the volume.


Use the bootable installer

Apple silicon

  1. Plug the bootable installer into a Mac that is connected to the internet and compatible with the version of macOS you're installing.
  2. Turn on your Mac and continue to hold the power button until you see the startup options window, which shows your bootable volumes.
  3. Select the volume containing the bootable installer, then click Continue.
  4. When the macOS installer opens, follow the onscreen instructions.

Intel processor

  1. Plug the bootable installer into a Mac that is connected to the internet and compatible with the version of macOS you're installing.
  2. Press and hold the Option (Alt) ⌥ key immediately after turning on or restarting your Mac.
  3. Release the Option key when you see a dark screen showing your bootable volumes.
  4. Select the volume containing the bootable installer. Then click the up arrow or press Return. 
    If you can't start up from the bootable installer, make sure that the External Boot setting in Startup Security Utility is set to allow booting from external media.
  5. Choose your language, if prompted.
  6. Select Install macOS (or Install OS X) from the Utilities window, then click Continue and follow the onscreen instructions.


Learn more

A bootable installer doesn't download macOS from the internet, but it does require an internet connection to get firmware and other information specific to the Mac model.

For information about the createinstallmedia command and the arguments you can use with it, make sure that the macOS installer is in your Applications folder, then enter the appropriate path in Terminal:

/Applications/Install\ macOS\ Big\ Sur.app/Contents/Resources/createinstallmedia
/Applications/Install\ macOS\ Catalina.app/Contents/Resources/createinstallmedia
/Applications/Install\ macOS\ Mojave.app/Contents/Resources/createinstallmedia
/Applications/Install\ macOS\ High\ Sierra.app/Contents/Resources/createinstallmedia
/Applications/Install\ OS\ X\ El\ Capitan.app/Contents/Resources/createinstallmedia
Published Date: 


IT Consultant

www.inCOREporation.com

Sunday, June 28, 2020

How to create a bootable installer for macOS


How to create a bootable installer for macOS


According to : 


How to create a bootable installer for macOS

You can use an external drive or secondary volume as a startup disk from which to install the Mac operating system.
These advanced steps are primarily for system administrators and others who are familiar with the command line. You don't need a bootable installer to upgrade macOS or reinstall macOS, but it can be useful when you want to install on multiple computers without downloading the installer each time.

Download macOS

Find the appropriate download link in the upgrade instructions for each macOS version:
macOS Catalina, macOS Mojave, or macOS High SierraInstallers for each of these macOS versions download directly to your Applications folder as an app named Install macOS Catalina, Install macOS Mojave, or Install macOS High Sierra. If the installer opens after downloading, quit it without continuing installation. Important: To get the correct installer, download from a Mac that is using macOS Sierra 10.12.5 or later, or El Capitan 10.11.6. Enterprise administrators, please download from Apple, not a locally hosted software-update server. 
OS X El Capitan
El Capitan downloads as a disk image. On a Mac that is compatible with El Capitan, open the disk image and run the installer within, named InstallMacOSX.pkg. It installs an app named Install OS X El Capitan into your Applications folder. You will create the bootable installer from this app, not from the disk image or .pkg installer.

Use the 'createinstallmedia' command in Terminal

  1. Connect the USB flash drive or other volume that you're using for the bootable installer. Make sure that it has at least 12GB of available storage and is formatted as Mac OS Extended.
  2. Open Terminal, which is in the Utilities folder of your Applications folder.
  3. Type or paste one of the following commands in Terminal. These assume that the installer is still in your Applications folder, and MyVolume is the name of the USB flash drive or other volume you're using. If it has a different name, replace MyVolume in these commands with the name of your volume.

    Catalina:*
    sudo /Applications/Install\ macOS\ Catalina.app/Contents/Resources/createinstallmedia --volume /Volumes/MyVolume
    

    Mojave:*
    sudo /Applications/Install\ macOS\ Mojave.app/Contents/Resources/createinstallmedia --volume /Volumes/MyVolume
    

    High Sierra:*
    sudo /Applications/Install\ macOS\ High\ Sierra.app/Contents/Resources/createinstallmedia --volume /Volumes/MyVolume
    

    El Capitan:
    sudo /Applications/Install\ OS\ X\ El\ Capitan.app/Contents/Resources/createinstallmedia --volume /Volumes/MyVolume --applicationpath /Applications/Install\ OS\ X\ El\ Capitan.app
    
  4. Press Return after typing the command.
  5. When prompted, type your administrator password and press Return again. Terminal doesn't show any characters as you type your password.
  6. When prompted, type Y to confirm that you want to erase the volume, then press Return. Terminal shows the progress as the bootable installer is created.  
  7. When Terminal says that it's done, the volume will have the same name as the installer you downloaded, such as Install macOS Catalina. You can now quit Terminal and eject the volume.
* If your Mac is using macOS Sierra or earlier, include the --applicationpath argument, similar to the way this argument is used in the command for El Capitan.

Use the bootable installer

After creating the bootable installer, follow these steps to use it:
  1. Plug the bootable installer into a compatible Mac.
  2. Use Startup Manager or Startup Disk preferences to select the bootable installer as the startup disk, then start up from it. Your Mac will start up to macOS Recovery.
    Learn about selecting a startup disk, including what to do if your Mac doesn't start up from it.
  3. Choose your language, if prompted.
  4. A bootable installer doesn't download macOS from the Internet, but it does require the Internet to get information specific to your Mac model, such as firmware updates. If you need to connect to a Wi-Fi network, use the Wi-Fi menu  in the menu bar. 
  5. Select Install macOS (or Install OS X) from the Utilities window, then click Continue and follow the onscreen instructions.

Learn more

For more information about the createinstallmedia command and the arguments that you can use with it, make sure that the macOS installer is in your Applications folder, then enter this path in Terminal:
Catalina:
/Applications/Install\ macOS\ Catalina.app/Contents/Resources/createinstallmedia
Mojave:
/Applications/Install\ macOS\ Mojave.app/Contents/Resources/createinstallmedia
High Sierra:
/Applications/Install\ macOS\ High\ Sierra.app/Contents/Resources/createinstallmedia
El Capitan:
/Applications/Install\ OS\ X\ El\ Capitan.app/Contents/Resources/createinstallmedia
Published Date: 


IT Consultant

Friday, June 7, 2019

Uninstall Office for Mac

Uninstall Office for Mac

according to https://support.office.com/en-US/article/uninstall-office-for-mac-eefa1199-5b58-43af-8a3d-b73dc1a8cae3

You can easily uninstall Office for Mac apps such as Word, Excel, PowerPoint, OneNote, and Outlook using these instructions. You must be signed in as an administrator on the Mac or provide an administrator name and password to complete these steps.
You must be signed in as an administrator on the Mac or provide an administrator name and password to complete these steps.

Remove Office for Mac applications

  1. Open Finder > Applications.
  2. Command COMMAND +click to select all of the Office for Mac applications.
  3. Ctrl+click an application you selected and click Move to Trash.
    Move the Office apps to the trash

Remove files from your user Library folder

  1. In Finder, press COMMAND +Shift+g.
  2. In the window that opens, enter ~/Library and then click Go.
  3. Open the Containers folder and ctrl+click each of these folders and Move to Trash. Note that some of these folders may not be present.
    • com.microsoft.errorreporting
    • com.microsoft.Excel
    • com.microsoft.netlib.shipassertprocess
    • com.microsoft.Office365ServiceV2
    • com.microsoft.Outlook
    • com.microsoft.Powerpoint
    • com.microsoft.RMS-XPCService
    • com.microsoft.Word
    • com.microsoft.onenote.mac
  4. Warning: Outlook data will be removed when you move the three folders listed in this step to Trash. You should back up these folders before you delete them.
    Click the back arrow to go back to the Library folder and open Group Containers. Ctrl+click each of these folders if present, and Move to Trash.
    • UBF8T346G9.ms
    • UBF8T346G9.Office
    • UBF8T346G9.OfficeOsfWebHost

Remove from Dock and restart

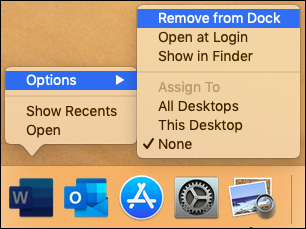
  1. If you put any of the Office applications in your Dock, go to each one and ctrl + click > Options > Remove from Dock.
    Remove from dock
  2. Restart your Mac to complete the uninstall.


Thursday, August 9, 2018

Create a Bootable USB Flash Drive for Windows on MAC OS X

Create a Bootable USB Flash Drive for Windows on MAC OS X

Open Terminal on Mac

Run diskutil list


Insert USB of sufficient size
Run diskutil list

again to identify USB Volume disk2 in most cases


Run diskutil unmountDisk /dev/disk2

Run sudo dd if=/drag the file in this terminal space/ and the path of the ISO file/ will appear here.ISO of=/dev/disk2 bs=1m

Enter Mac OS X user's password

Let it run it will take some time, took me 32 minutes to complete a 6 GB ISO file from a flash drive disk and great system.

Password:
5725+1 records in
5725+1 records out
6003804160 bytes transferred in 1921.754709 secs (3124126 bytes/sec)


Once complete, run
diskutil eject /dev/disk2

You should get this result: 
Disk /dev/disk2 ejected


www.inCOREporation.com


Tuesday, January 9, 2018

Mac continually prompted to install Java again

After I updated to macOS Sierra (10.12), El Capitan (OS X 10.11) or Yosemite (OS X 10.10), why am I continually prompted to install Java again?


According to https://www.java.com/en/download/faq/yosemite_java.xml

This article applies to:
  • Platform(s): Mac OS X

SYMPTOMS


Even after upgrading to the latest version of Java, while running some applications on macOS Sierra (10.12), El Capitan (OS X 10.11), or Yosemite (OS X 10.10), users see a dialog box prompting to download Java.

macOS Sierra 10.12 or Yosemite (OS X 10.10) message: 

To open "application" you need to install the legacy Java SE 6 runtime.


El Capitan (OS X 10.11) message:

To use the "java" command-line tool you need to install a JDK


CAUSE


This is most commonly because an application requires the legacy Java 6 provided by Apple. For the solution to this issue, see http://support.apple.com/kb/DL1572.


You might also be interested in:


Troubleshooting

Going through 
https://forums.macg.co/threads/popup-pour-utiliser-les-outils-de-ligne-de-commande-java.1272915/


SOLUTION 

GO TO
apple.com 
GO TO support
search

dl1572
download and install


Tuesday, October 18, 2016

Mac Mail Mailbox .mbox file location

On Mac using Mail
the Mailbox .mbox file location is found under

(From Finder menu, under Go + option)

~/Library/Mail/V2

http://incoreporation.com       https://ca.incoreporation.com       http://wwebservices.ca 

Mac outlook 2016 mailbox file location

The Mac Outlook 2016 mailbox file location is found under

Outlook 2016 for Mac stores messages and other items, such as calendar events, contacts, tasks, and notes, as a SQLite database in the 
/Users/username/Library/Group Containers/UBF8T346G9.Office/Outlook/Outlook 15 Profiles folder. 
If you turn on Time Machine, it automatically makes copies of every file on your computer on a regular basis. If a file gets damaged or lost, you can use Time Machine to browse through the backups and recover the copy of the file.
You can exclude Outlook data from your Time Machine backups by adding the previously mentioned folder to Time Machine's item exclusion list.

Outlook 2016 for Mac caches your mail items in a profile in your home folder at the following location:

~/Library/Group Containers/UBF8T346G9.Office/Outlook/Outlook 15 Profiles


Outlook for Mac 2011 caches your mail items in an identity in your home folder at the following location:
~/Documents/Microsoft User Data/Office 2011 Identities


http://incoreporation.com       https://ca.incoreporation.com       http://wwebservices.ca 

Featured Posts

Exchange Online Limits - Office 365 Distribution group limits

Exchange Online Limits - Office 365 Distribution group limits What are Exchange Online Limits What are Office 365 Distribution group limi...