Showing posts with label Office 365 for Business. Show all posts

Friday, October 18, 2019

Microsoft Digital Partner of Record (DPOR)

Microsoft Digital Partner of Record (DPOR)

https://support.microsoft.com/en-us/help/3045939/digital-partner-of-record-dpor

Digital Partner of Record associates servicing partners to a Microsoft cloud subscription. It is an on-line capability to attach a partner to a customer’s Microsoft on-line subscription. DPOR benefits the customer, the partner, and Microsoft. Partners can qualify for competencies and incentives by being the DPOR and enables them to help customers optimize their usage for desired business outcomes.
  • Partners must be added as the DPOR each time a new subscription is sold, regardless of whether their customer is new or existing.
  • Microsoft policy is that only the customer can designate a DPOR for their subscriptions.
If you are providing your customer with the key support and lifecycle services for their cloud subscription(s), make sure you are designated as their DPOR. Explore the resources on this site and work with your customers to attach you as their DPOR for each Microsoft Office 365, CRM Online, Dynamics 365, AX7, Microsoft Intune, EMS, and Azure subscription you actively manage.

Guide to attaching a DPOR

There are multiple ways to attach a partner of record to the Microsoft Azure subscription. Customer can add a partner either through the Azure Account Administrator page or Azure Subscription Administrator page.
Azure Account Administrator page or Azure Subscription Administrator page.

add a partner through Azure Subscription Administrator page

Additionally, partners can now initiate the DPOR attach process with the customer by generating a quick link. Here are the steps:
  1. Identify subscription GUID and the Virtual Organisation MPN partner ID that need to be associated
  2. Enter both IDs into the below URL format
  3. Email the URL to the subscription admin or subscription contributor
  4. Subscription Admin or Subscription Contributor click on the link and are brought to the following page
  5. The partner ID has already been entered and validated
  6. Subscription Admin or Subscription Contributor click “save partner”
  7. DPOR has been added
    Syntax
    https://portal.azure.com/#blade/Microsoft_Azure_Billing/PartnerInformationBlade/subscriptionId/SUBSCRIPTION GUID/partnerId/PARTNERID
    Example
    https://portal.azure.com/#blade/Microsoft_Azure_Billing/PartnerInformationBlade/subscriptionId/c0220e11-29ff-4d19-8d99-123456789012/partnerId/123456
As part of the Partner Initiated – Quick Link method, a sample email that the partner can send to the customer has been prepared. A full Word version is available under the Customer Guide to Attaching a Digital Partner of Record for Azure.

Partner Association

Partner Association allows recognition for work being done by partners who are not the DPOR:
  • Transacting partners reported in Microsoft internal sales systems
  • Partners who are granted Delegated Admin Privileges (DAP) by customers

Partner Association Guide for Partners

This deck provides an overview of Partner Association capabilities, including Digital Partner of Record, for Microsoft Office 365, CRM Online, Intune, EMS, and Azure and step-by-step guidance you can use to help your customers add you as a partner for their cloud subscriptions. Download the Partner Association Guide for Partners

Offer Delegated Administration

Partners who are certified to offer delegated administration can request their customers to authorize them as a delegated administrator. With Delegated Admin Privileges (DAP), partners can administer an organization’s account on behalf of a client, and can perform tasks such as adding users, resetting passwords, and adding domains. To get customer approval for DAP, partners first need to send them an offer for delegated administration. This can be included with a trial invitation or purchase offer, or can be offered to the customer at a later time.
There are ongoing enhancements to this process, with a sharp focus on partner experience. Learn more by watching the MPN 101 DPOR call with Leah Childress, on-demand or by visiting aka.ms/digitalpor.
If you have questions, register for the next MPN 101 call about Partner Association.

Additional support

If your customers have any problems or questions about this process and the ability to assign, maintain, and change and remove their Partner of Record:
  • For Office 365, CRM Online, Dynamics 365, AX7, Intune or EMS, they can click the Support link on the left navigation pane of the Office 365 admin portal screen to get access to Technical and Billing support and to find support options and recommendations.
  • For Azure, please reach out to Support by using the following link http://azure.microsoft.com/support/options/

Contact Microsoft Partner Support
 
Are you a Microsoft Partner and need help from Microsoft Support? Get support from Microsoft’s own experts. They can help with partner program issues, presales assistance, issues with Microsoft products, billing questions, and more. Start here to view your Microsoft support options.


www.inCOREporation.com

Friday, June 7, 2019

Uninstall Office for Mac

Uninstall Office for Mac

according to https://support.office.com/en-US/article/uninstall-office-for-mac-eefa1199-5b58-43af-8a3d-b73dc1a8cae3

You can easily uninstall Office for Mac apps such as Word, Excel, PowerPoint, OneNote, and Outlook using these instructions. You must be signed in as an administrator on the Mac or provide an administrator name and password to complete these steps.
You must be signed in as an administrator on the Mac or provide an administrator name and password to complete these steps.

Remove Office for Mac applications

  1. Open Finder > Applications.
  2. Command COMMAND +click to select all of the Office for Mac applications.
  3. Ctrl+click an application you selected and click Move to Trash.
    Move the Office apps to the trash

Remove files from your user Library folder

  1. In Finder, press COMMAND +Shift+g.
  2. In the window that opens, enter ~/Library and then click Go.
  3. Open the Containers folder and ctrl+click each of these folders and Move to Trash. Note that some of these folders may not be present.
    • com.microsoft.errorreporting
    • com.microsoft.Excel
    • com.microsoft.netlib.shipassertprocess
    • com.microsoft.Office365ServiceV2
    • com.microsoft.Outlook
    • com.microsoft.Powerpoint
    • com.microsoft.RMS-XPCService
    • com.microsoft.Word
    • com.microsoft.onenote.mac
  4. Warning: Outlook data will be removed when you move the three folders listed in this step to Trash. You should back up these folders before you delete them.
    Click the back arrow to go back to the Library folder and open Group Containers. Ctrl+click each of these folders if present, and Move to Trash.
    • UBF8T346G9.ms
    • UBF8T346G9.Office
    • UBF8T346G9.OfficeOsfWebHost

Remove from Dock and restart

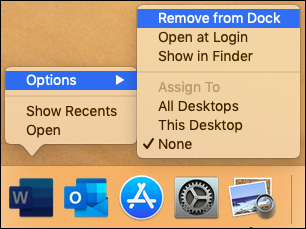
  1. If you put any of the Office applications in your Dock, go to each one and ctrl + click > Options > Remove from Dock.
    Remove from dock
  2. Restart your Mac to complete the uninstall.


Monday, March 19, 2018

Integrate your on-premises directories with Azure Active Directory

Integrate your on-premises directories with Azure Active Directory


https://docs.microsoft.com/en-us/azure/active-directory/connect/active-directory-aadconnect

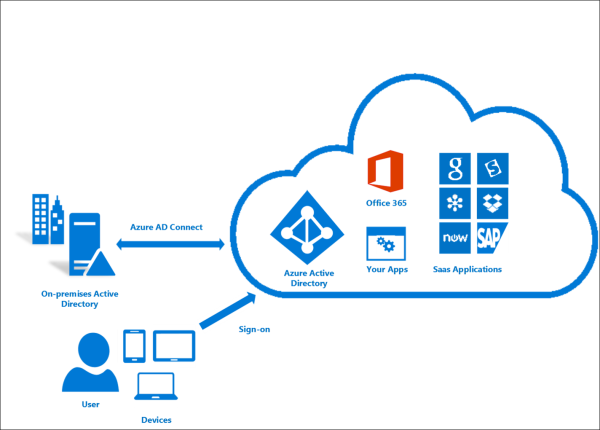
Azure AD Connect will integrate your on-premises directories with Azure Active Directory. This allows you to provide a common identity for your users for Office 365, Azure, and SaaS applications integrated with Azure AD. This topic will guide you through the planning, deployment, and operation steps. It is a collection of links to the topics related to this area.
What is Azure AD Connect

Why use Azure AD Connect

Integrating your on-premises directories with Azure AD makes your users more productive by providing a common identity for accessing both cloud and on-premises resources. Users and organizations can take advantage of the following:
  • Users can use a single identity to access on-premises applications and cloud services such as Office 365.
  • Single tool to provide an easy deployment experience for synchronization and sign-in.
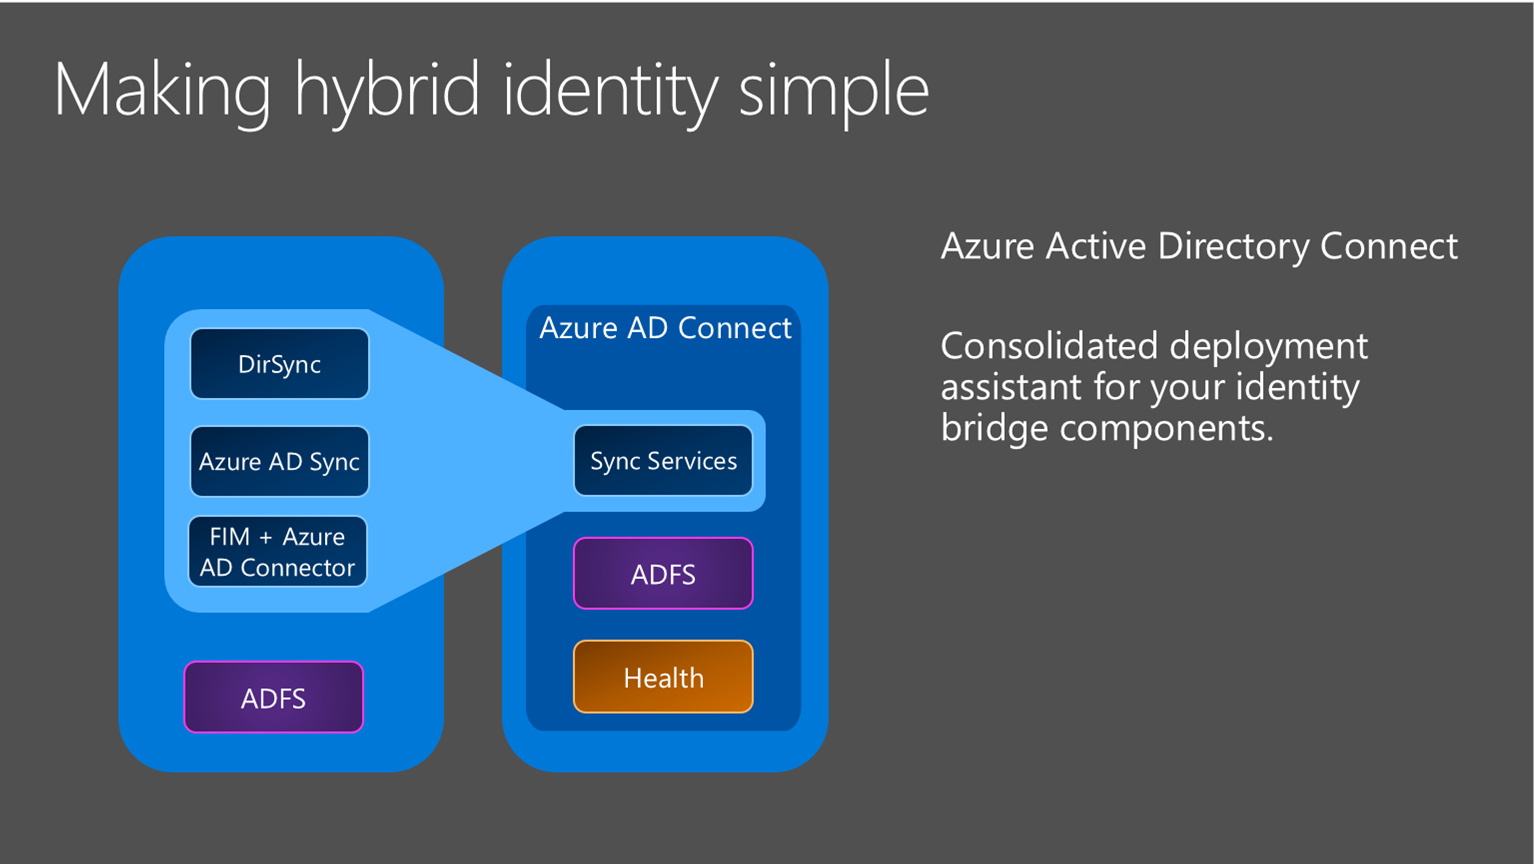
  • Provides the newest capabilities for your scenarios. Azure AD Connect replaces older versions of identity integration tools such as DirSync and Azure AD Sync. For more information, see Hybrid Identity directory integration tools comparison.

How Azure AD Connect works

Azure Active Directory Connect is made up of three primary components: the synchronization services, the optional Active Directory Federation Services component, and the monitoring component named Azure AD Connect Health.
Azure AD Connect Stack
  • Synchronization - This component is responsible for creating users, groups, and other objects. It is also responsible for making sure identity information for your on-premises users and groups is matching the cloud.
  • AD FS - Federation is an optional part of Azure AD Connect and can be used to configure a hybrid environment using an on-premises AD FS infrastructure. This can be used by organizations to address complex deployments, such as domain join SSO, enforcement of AD sign-in policy, and smart card or 3rd party MFA.
  • Health Monitoring - Azure AD Connect Health can provide robust monitoring and provide a central location in the Azure portal to view this activity. For additional information, see Azure Active Directory Connect Health.

Install Azure AD Connect

You can find the download for Azure AD Connect on Microsoft Download Center.
SolutionScenario
Before you start - Hardware and prerequisites
  • Steps to complete before you start to install Azure AD Connect.
  • Express settings
  • If you have a single forest AD then this is the recommended option to use.
  • User sign in with the same password using password synchronization.
  • Customized settings
  • Used when you have multiple forests. Supports many on-premises topologies.
  • Customize your sign-in option, such as ADFS for federation or use a 3rd party identity provider.
  • Customize synchronization features, such as filtering and writeback.
  • Upgrade from DirSync
  • Used when you have an existing DirSync server already running.
  • Upgrade from Azure AD Sync or Azure AD Connect
  • There are several different methods depending on your preference.
  • After installation you should verify it is working as expected and assign licenses to the users.

    Next steps to Install Azure AD Connect

    TopicLink
    Download Azure AD ConnectDownload Azure AD Connect
    Install using Express settingsExpress installation of Azure AD Connect
    Install using Customized settingsCustom installation of Azure AD Connect
    Upgrade from DirSyncUpgrade from Azure AD sync tool (DirSync)
    After installationVerify the installation and assign licenses

    Learn more about Install Azure AD Connect

    You also want to prepare for operational concerns. You might want to have a stand-by server so you easily can fall over if there is a disaster. If you plan to make frequent configuration changes, you should plan for a staging mode server.

    Configure sync features

    Azure AD Connect comes with several features you can optionally turn on or are enabled by default. Some features might sometimes require more configuration in certain scenarios and topologies.
    Filtering is used when you want to limit which objects are synchronized to Azure AD. By default all users, contacts, groups, and Windows 10 computers are synchronized. You can change the filtering based on domains, OUs, or attributes.
    Password synchronization synchronizes the password hash in Active Directory to Azure AD. The end-user can use the same password on-premises and in the cloud but only manage it in one location. Since it uses your on-premises Active Directory as the authority, you can also use your own password policy.
    Password writeback will allow your users to change and reset their passwords in the cloud and have your on-premises password policy applied.
    Device writeback will allow a device registered in Azure AD to be written back to on-premises Active Directory so it can be used for conditional access.
    The prevent accidental deletes feature is turned on by default and protects your cloud directory from numerous deletes at the same time. By default it allows 500 deletes per run. You can change this setting depending on your organization size.
    Automatic upgrade is enabled by default for express settings installations and ensures your Azure AD Connect is always up to date with the latest release.

    Next steps to configure sync features

    Customize Azure AD Connect sync

    Azure AD Connect sync comes with a default configuration that is intended to work for most customers and topologies. But there are always situations where the default configuration does not work and must be adjusted. It is supported to make changes as documented in this section and linked topics.
    If you have not worked with a synchronization topology before you want to start to understand the basics and the terms used as described in the technical concepts. Azure AD Connect is the evolution of MIIS2003, ILM2007, and FIM2010. Even if some things are identical, a lot has changed as well.
    The default configuration assumes there might be more than one forest in the configuration. In those topologies a user object might be represented as a contact in another forest. The user might also have a linked mailbox in another resource forest. The behavior of the default configuration is described in users and contacts.
    The configuration model in sync is called declarative provisioning. The advanced attribute flows are using functions to express attribute transformations. You can see and examine the entire configuration using tools which comes with Azure AD Connect. If you need to make configuration changes, make sure you follow the best practices so it is easier to adopt new releases.

    Next steps to customize Azure AD Connect sync

    Configure federation features

    Azure AD Connect provides several features that simplify federating with Azure AD using AD FS and managing your federation trust. Azure AD Connect supports AD FS on Windows Server 2012R2 or later.
    Update SSL certificate of AD FS farm even if you are not using Azure AD Connect to manage your federation trust.
    Add an AD FS server to your farm to expand the farm as required.
    Repair the trust with Azure AD in a few simple clicks.
    ADFS can be configured to support multiple domains. For example you might have multiple top domains you need to use for federation.
    if your ADFS server has not been configured to automatically update certificates from Azure AD or if you use a non-ADFS solution, then you will be notified when you have to update certificates.

    Next steps to configure federation features

    More information and references

    TopicLink
    Version historyVersion history
    Compare DirSync, Azure ADSync, and Azure AD ConnectDirectory integration tools comparison
    Non-ADFS compatibility list for Azure ADAzure AD federation compatibility list
    Configuring a SAML 2.0 IdpUsing a SAML 2.0 Identity Provider (IdP) for Single Sign On
    Attributes synchronizedAttributes synchronized
    Monitoring using Azure AD Connect HealthAzure AD Connect Health
    Frequently Asked QuestionsAzure AD Connect FAQ
    Additional Resources
    Ignite 2015 presentation on extending your on-premises directories to the cloud.


    IT Consultant inCOREporation.com

    Featured Posts

    Exchange Online Limits - Office 365 Distribution group limits

    Exchange Online Limits - Office 365 Distribution group limits What are Exchange Online Limits What are Office 365 Distribution group limi...