Monday, June 29, 2020

Video and Music Production

Video and Music Production

Studio One 4 + Notion 6


Video Audio Music Photos Wordpress themes etc... Content copyright provider subscription 


All ready to go music and audio - unlimited audio for $299 one time
https://audiio.com/

Sunday, June 28, 2020

How to create a bootable installer for macOS


How to create a bootable installer for macOS


According to : 


How to create a bootable installer for macOS

You can use an external drive or secondary volume as a startup disk from which to install the Mac operating system.
These advanced steps are primarily for system administrators and others who are familiar with the command line. You don't need a bootable installer to upgrade macOS or reinstall macOS, but it can be useful when you want to install on multiple computers without downloading the installer each time.

Download macOS

Find the appropriate download link in the upgrade instructions for each macOS version:
macOS CatalinamacOS Mojaveor macOS High SierraInstallers for each of these macOS versions download directly to your Applications folder as an app named Install macOS Catalina, Install macOS Mojave, or Install macOS High Sierra. If the installer opens after downloading, quit it without continuing installation. Important: To get the correct installer, download from a Mac that is using macOS Sierra 10.12.5 or later, or El Capitan 10.11.6. Enterprise administrators, please download from Apple, not a locally hosted software-update server. 
OS X El Capitan
El Capitan downloads as a disk image. On a Mac that is compatible with El Capitan, open the disk image and run the installer within, named InstallMacOSX.pkg. It installs an app named Install OS X El Capitan into your Applications folder. You will create the bootable installer from this app, not from the disk image or .pkg installer.

Use the 'createinstallmedia' command in Terminal

  1. Connect the USB flash drive or other volume that you're using for the bootable installer. Make sure that it has at least 12GB of available storage and is formatted as Mac OS Extended.
  2. Open Terminal, which is in the Utilities folder of your Applications folder.
  3. Type or paste one of the following commands in Terminal. These assume that the installer is still in your Applications folder, and MyVolume is the name of the USB flash drive or other volume you're using. If it has a different name, replace MyVolume in these commands with the name of your volume.

    Catalina:*
    sudo /Applications/Install\ macOS\ Catalina.app/Contents/Resources/createinstallmedia --volume /Volumes/MyVolume
    

    Mojave:*
    sudo /Applications/Install\ macOS\ Mojave.app/Contents/Resources/createinstallmedia --volume /Volumes/MyVolume
    

    High Sierra:*
    sudo /Applications/Install\ macOS\ High\ Sierra.app/Contents/Resources/createinstallmedia --volume /Volumes/MyVolume
    

    El Capitan:
    sudo /Applications/Install\ OS\ X\ El\ Capitan.app/Contents/Resources/createinstallmedia --volume /Volumes/MyVolume --applicationpath /Applications/Install\ OS\ X\ El\ Capitan.app
    
  4. Press Return after typing the command.
  5. When prompted, type your administrator password and press Return again. Terminal doesn't show any characters as you type your password.
  6. When prompted, type Y to confirm that you want to erase the volume, then press Return. Terminal shows the progress as the bootable installer is created.  
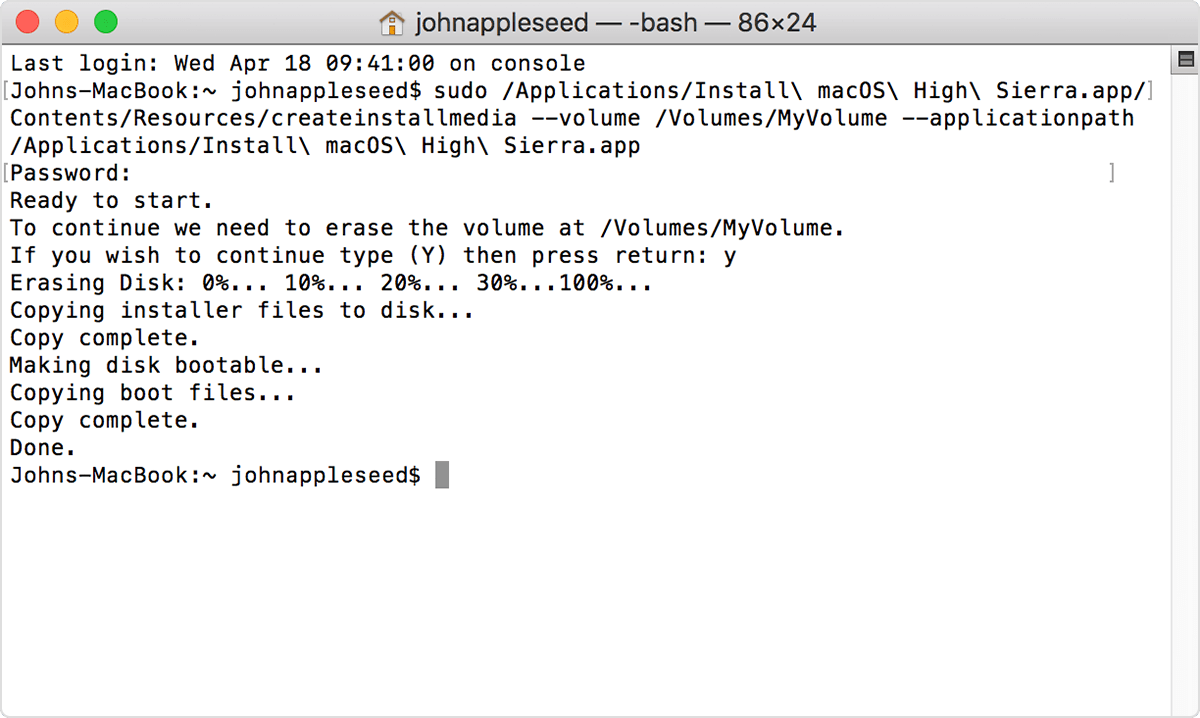
  7. When Terminal says that it's done, the volume will have the same name as the installer you downloaded, such as Install macOS Catalina. You can now quit Terminal and eject the volume.
* If your Mac is using macOS Sierra or earlier, include the --applicationpath argument, similar to the way this argument is used in the command for El Capitan.

Use the bootable installer

After creating the bootable installer, follow these steps to use it:
  1. Plug the bootable installer into a compatible Mac.
  2. Use Startup Manager or Startup Disk preferences to select the bootable installer as the startup disk, then start up from it. Your Mac will start up to macOS Recovery.
    Learn about selecting a startup disk, including what to do if your Mac doesn't start up from it.
  3. Choose your language, if prompted.
  4. A bootable installer doesn't download macOS from the Internet, but it does require the Internet to get information specific to your Mac model, such as firmware updates. If you need to connect to a Wi-Fi network, use the Wi-Fi menu  in the menu bar. 
  5. Select Install macOS (or Install OS X) from the Utilities window, then click Continue and follow the onscreen instructions.

Learn more

For more information about the createinstallmedia command and the arguments that you can use with it, make sure that the macOS installer is in your Applications folder, then enter this path in Terminal:
Catalina:
/Applications/Install\ macOS\ Catalina.app/Contents/Resources/createinstallmedia
Mojave:
/Applications/Install\ macOS\ Mojave.app/Contents/Resources/createinstallmedia
High Sierra:
/Applications/Install\ macOS\ High\ Sierra.app/Contents/Resources/createinstallmedia
El Capitan:
/Applications/Install\ OS\ X\ El\ Capitan.app/Contents/Resources/createinstallmedia
Published Date: 


IT Consultant

Monday, June 15, 2020

WWebServices.ca How to configure Business email client settings - Comment configurer les paramètres de messagerie professionnelle

WWebServices.ca 


Comment configurer les paramètres de messagerie professionnelle 

Depuis votre ordinateur, vous accédez à votre messagerie Web depuis http://webmail.votredomaine.com vers l'URL générale sécurisé https://webmail.mailhostbox.com/appsuite/

Saisissez votre nom d'utilisateur et votre mot de passe.


How to configure Business email settings


From your computer you access your webmail from either http://webmail.yourdomain.com to the secured general URL https://webmail.mailhostbox.com/appsuite/
Enter your username and password.


Incoming mail server Settings: Use SSL/TLS

IMAP
Hostname: us2.imap.mailhostbox.com  
port number: 993

POP
Hostname: us2.pop.mailhostbox.com  
port number: 995

Outgoing mail server Settings: Use STARTTLS

SMTP
Hostname: us2.smtp.mailhostbox.com.
Port no: 587

Username: complete email address
Password : ****

While setting up your account, make sure you have enabled "My Server Requires Authentication"

Do not enable "Log on using Secure Password Authentication"


WWebServices.ca


Comment configurer les paramètres de messagerie professionnelle sur iPhone 

How to configure Business email client IMAP settings on iPhone

( Android? How do I set up my email address as an IMAP-account on Android? click here


Êtes-vous intéressé à avoir votre propre production vidéo interactive comme un puissant outil de marketing?
Appelez ou textez au 1-888-901-7969 # 105

Are you interested in having your own interactive video production as a powerful marketing tool?
Call or text 1-888-901-7969 #105


Services Web WWebServices.ca Web Services


Maintenant voici comment...   
Now here's how...


Félicitation pour votre service email Affaire. Pensez grand et prospérez 
Congratulations for your Business email service. Think big and prosper

Pour toute assistance appelez ou textez 
1-888-901-7969 #105

For any assistance call or text
1-888-901-7969 #105


Pour votre comptabilité affaire, voulez-vous Quickbooks Online à un prix très compétitif? 

For your business accounting, do you want Quickbooks Online at a very competitive price?

Pour toute assistance appelez ou textez 
1-888-901-7969 #105

For any assistance call or text
1-888-901-7969 #105


IT Consultant
www.inCOREporation.com            Register your account now

Web Services
WWebServices.ca

Wednesday, June 10, 2020

Download Windows 10 Disc Image (ISO File)

Download Windows 10 Disc Image (ISO File)


Download Windows 10

https://www.microsoft.com/en-us/software-download/windows10
Update now

Create Windows 10 installation media


Example: Refurbish hotel computer. Fresh installation of Windows 10 Po  on


Overview - ThinkCentre M90z (type 0800) (MultiTouch)


with CPU supporting 64 bit

ThinkCentre M90z


IT Consultant 

Featured Posts

Exchange Online Limits - Office 365 Distribution group limits

Exchange Online Limits - Office 365 Distribution group limits What are Exchange Online Limits What are Office 365 Distribution group limi...