Friday, June 7, 2019

Uninstall Office for Mac

Uninstall Office for Mac

according to https://support.office.com/en-US/article/uninstall-office-for-mac-eefa1199-5b58-43af-8a3d-b73dc1a8cae3

You can easily uninstall Office for Mac apps such as Word, Excel, PowerPoint, OneNote, and Outlook using these instructions. You must be signed in as an administrator on the Mac or provide an administrator name and password to complete these steps.
You must be signed in as an administrator on the Mac or provide an administrator name and password to complete these steps.

Remove Office for Mac applications

  1. Open Finder > Applications.
  2. Command COMMAND +click to select all of the Office for Mac applications.
  3. Ctrl+click an application you selected and click Move to Trash.
    Move the Office apps to the trash

Remove files from your user Library folder

  1. In Finder, press COMMAND +Shift+g.
  2. In the window that opens, enter ~/Library and then click Go.
  3. Open the Containers folder and ctrl+click each of these folders and Move to Trash. Note that some of these folders may not be present.
    • com.microsoft.errorreporting
    • com.microsoft.Excel
    • com.microsoft.netlib.shipassertprocess
    • com.microsoft.Office365ServiceV2
    • com.microsoft.Outlook
    • com.microsoft.Powerpoint
    • com.microsoft.RMS-XPCService
    • com.microsoft.Word
    • com.microsoft.onenote.mac
  4. Warning: Outlook data will be removed when you move the three folders listed in this step to Trash. You should back up these folders before you delete them.
    Click the back arrow to go back to the Library folder and open Group Containers. Ctrl+click each of these folders if present, and Move to Trash.
    • UBF8T346G9.ms
    • UBF8T346G9.Office
    • UBF8T346G9.OfficeOsfWebHost

Remove from Dock and restart

  1. If you put any of the Office applications in your Dock, go to each one and ctrl + click > Options > Remove from Dock.
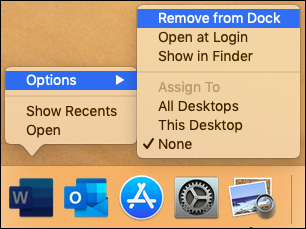
    Remove from dock
  2. Restart your Mac to complete the uninstall.


Sunday, June 2, 2019

Office 365 – Nonprofit Cloud Subscription Canada

Office 365 – Nonprofit Cloud Subscription Canada


As per:
https://www.techsoupcanada.ca/en/microsoft-cloud/product/office-365-%E2%80%93-nonprofit-cloud-subscription

Description:

Eligible nonprofits and charities can receive discounted subscriptions to Office 365 through TechSoup Canada. 
Click GET THIS OFFER to get started.
You don't need to add anything to your TechSoup Canada cart or go through the TechSoup Canada checkout process.

What Is Office 365?

Office 365 provides you and your staff with
  • The latest Office desktop applications for PC and Mac and apps for mobile devices (certain subscriptions only)
  • Cloud-based access to Office applications
  • Hosted email and calendars with Exchange Online
  • Instant messaging and web and video conferencing through Skype for Business
  • Access to your documents from anywhere with OneDrive for Business
  • More, depending on the subscription plan
See the Subscription Options tab for prices and subscription information.

How Can My Organization Benefit from Using Office 365?

Learn about Office Web Apps, hosted email, document sharing, and other benefits provided by Office 365 in this TechSoup article: What You Need to Know About Microsoft Office 365 Nonprofit.
You can also download a free Office 365 e-book to learn more about how nonprofits can use cloud services.

How Much Does Office 365 Cost?

There are both donated and discounted plans available, depending on your needs. See the Subscription Options tab for prices and subscription information.

What Are the System Requirements for Office 365?

See Microsoft's System requirements for Office page. The requirements are listed under "Office 365 plans for business, education, and government."

Subscription Options

Office 365 Nonprofit Business Essentials
free
  • Most suitable for small and mid-sized nonprofits with up to 300 users that do not need Office desktop applications
  • Provides cloud-based access to Office applications, email, instant messaging, HD video conferencing, and 1 TB personal file storage and sharing
  • Does not include Office desktop applications
Office 365 Nonprofit Business Premium

$3.70/user/month
  • Most suitable for small and mid-sized nonprofits with up to 300 users that need Office desktop applications
  • Office desktop applications for PC and Mac included, with apps for tablets and phones
  • Includes all features of Business Essentials plan plus additional features and services
Office 365 Nonprofit E1
free
  • Most suitable for small and mid-sized nonprofits with up to 300 users that do not need Office desktop applications
  • Provides cloud-based access to Office applications, email, instant messaging, HD video conferencing, and 1 TB personal file storage and sharing
  • Does not include Office desktop applications
Office 365 Nonprofit E3

$5.60/user/month
  • Most suitable for large nonprofits with more than 300 users that need Office desktop applications
  • Office desktop applications for PC and Mac included, with apps for tablets and phones
  • Includes all features of E1 plan plus data protection and other services
Office 365 Nonprofit E5

$18.50/user/month
  • Most suitable for large nonprofits with more than 300 users that need Office desktop applications
  • Office desktop applications for PC and Mac included, with apps for tablets and phones
  • Includes all features of E3 plan plus advanced security and other services


IT Consultant
www.inCOREporation.com

Saturday, May 18, 2019

Deploy Windows 10 with System Center 2012 R2 Configuration Manager

Deploy Windows 10 with System Center 2012 R2 Configuration Manager


Applies to
  • Windows 10 versions 1507, 1511
 Important
For instructions to deploy the most recent version of Windows 10 with Configuration Manager, see Scenarios to deploy enterprise operating systems with System Center Configuration Manager. Configuration Manager 2012 and 2012 R2 provide support for Windows 10 versions 1507 and 1511 only. Later versions of Windows 10 require an updated Configuration Manager release. For a list of Configuration Manager versions and the corresponding Windows 10 client versions that are supported, see Support for Windows 10 for System Center Configuration Manager.
If you have Microsoft System Center 2012 R2 Configuration Manager in your environment, you will most likely want to use it to deploy Windows 10. This topic will show you how to set up Configuration Manager for operating system deployment and how to integrate Configuration Manager with the Microsoft Deployment Toolkit (MDT).
For the purposes of this topic, we will use four machines: DC01, CM01, PC0003, and PC0004. DC01 is a domain controller and CM01 is a machine running Windows Server 2012 R2 standard. PC0003 and PC0004 are machines with Windows 7 SP1, on which Windows 10 will be deployed via both refresh and replace scenarios. In addition to these four ready-made machines, you could also include a few blank virtual machines to be used for bare-metal deployments. DC01, CM01, PC003, and PC0004 are all members of the domain contoso.com for the fictitious Contoso Corporation. For more details on the setup for this topic, please see Deploy Windows 10 with the Microsoft Deployment Toolkit.
figure 1
Figure 1. The machines used in this topic.

In this section

Components of Configuration Manager operating system deployment

Operating system deployment with Configuration Manager is part of the normal software distribution infrastructure, but there are additional components. For example, operating system deployment in Configuration Manager may use the State Migration Point role, which is not used by normal application deployment in Configuration Manager. This section describes the Configuration Manager components involved with the deployment of an operating system, such as Windows 10.
  • State migration point (SMP). The state migration point is used to store user state migration data during computer replace scenarios.
  • Distribution point (DP). The distribution point is used to store all packages in Configuration Manager, including the operating system deployment-related packages.
  • Software update point (SUP). The software update point, which is normally used to deploy updates to existing machines, also can be used to update an operating system as part of the deployment process. You also can use offline servicing to update the image directly on the Configuration Manager server.
  • Reporting services point. The reporting services point can be used to monitor the operating system deployment process.
  • Boot images. Boot images are the Windows Preinstallation Environment (Windows PE) images Configuration Manager uses to start the deployment.
  • Operating system images. The operating system image package contains only one file, the custom .wim image. This is typically the production deployment image.
  • Operating system installers. The operating system installers were originally added to create reference images using Configuration Manager. Instead, we recommend that you use MDT Lite Touch to create your reference images. For more information on how to create a reference image, see Create a Windows 10 reference image.
  • Drivers. Like MDT Lite Touch, Configuration Manager also provides a repository (catalog) of managed device drivers.
  • Task sequences. The task sequences in Configuration Manager look and feel pretty much like the sequences in MDT Lite Touch, and they are used for the same purpose. However, in Configuration Manager the task sequence is delivered to the clients as a policy via the Management Point (MP). MDT provides additional task sequence templates to Configuration Manager.
    Note Configuration Manager SP1 along with the Windows Assessment and Deployment Kit (ADK) for Windows 10 are required to support management and deployment of Windows 10.

See also


IT Consultant

Saturday, April 27, 2019

G Suite Reset your administrator password

G Suite Admin

Reset your administrator password


If you're an administrator of your organization's G Suite or Cloud Identity account and you forgot your password, or are having trouble signing in to your Google Account, here's what you can do to access your account.
Note: Users must sign in with their administrator’s account. You can use the account chooser to change accounts.

Reset your administrator password

  1. Open the sign in/recovery page and enter the username you use to sign in to your administrator account.
  2. Click Next.
    If you don't know your username, click Forgot email?. Then follow the instructions to access your account using your recovery email address or phone number.
    Tip: Click "Try another way" in the recovery flow if you can't answer some questions.
If you don't see recovery email or phone options, it could be for one of these reasons:
  • You didn't add this information to your admin account.
  • Your organization's Google account has more than 3 super admins or 500 users.

If email and phone options aren't available

  1. Ask another admin in your organization with Super Admin privileges to reset your password using the Google Admin console.
  2. If you can't ask another administrator for help, answer the questions about your Google Admin Account and your organization's Google account. You don't have to answer all the questions correctly to be able to verify your domain. Then, follow the instructions to verify your domain.
    Note: If you purchased your domain or chose a domain that’s free for one year when you signed up for G Suite, contact support using this form.
  3. If you don't see the questions about your account, this most likely means one of the following:
    • Your organization's Google account has more than 3 super admins or 500 users.
    • Google systems don't have enough information about your account to verify the correct answers to the questions.
    • You recently made too many attempts to answer some of the questions.
  4. Contact support using this form (G Suite only).
Important: If your admin account didn't have a recovery email address or phone number, make sure you add these recovery options to your account once you've signed in to the Admin console.

Related topics 


G Suite Admin console: Login Issues

GOOGLE SUPPORT FORM
https://support.google.com/a/contact/admin_no_access


IT Consultant
www.inCOREporation.com

Friday, April 26, 2019

Google G Suite Email sending limits

Google G Suite Email sending limits
(Gmail for business)
According  to: https://support.google.com/a/answer/166852

Email sending limits

To keep systems healthy and accounts safe, Google limits the number of email messages users can send per day and the number of recipients per message.
If your users exceed an email sending limit, they’ll see an error message, such as:
  • You have reached a limit for sending email.
  • You reached a Gmail sending limit.
  • You exceeded the maximum recipients.
After reaching one of these limits, a user can't send new messages for up to 24 hours. However, they can still access their G Suite account and receive incoming email. The user can also access their other Google services. After this suspension period, sending limits are automatically reset and the user can resume sending mail.

Sending limits

Sending limits can change without notice. Limits per day are applied over a rolling 24-hour period, not a set time of day.
Note: Sending limits are different if your organization uses the SMTP relay service to route outgoing mail through Google. See instead sending limits for the SMTP relay service.
Limit typeLimit
Messages per day
Daily sending limit*
2,000 (500 for trial accounts)
Messages auto-forwarded
Messages automatically forwarded to another account, not included in the daily sending limit
10,000
Auto-forward mail filters
Account filters that automatically forward mail
20
Recipients per message
Addresses in the To, Cc, and Bcc fields of a single email*
2,000 (500 external)
Recipients per message sent via SMTP (by POP or IMAP users) or theGmail API
Addresses in the To, Cc, and Bcc fields of a single email. Includes email sent using smtp-relay.gmail.com or smtp.gmail.com*
100
Total recipients per day
Email addresses (recipients) count each time a message is sent; 5 emails sent to 10 addresses count as 50 total recipients.*
10,000
External recipients per day
Email addresses outside your primary domain, including domain aliases and alternate domains
3,000
Unique recipients per day
Each email address (each unique recipient) counts only once per day:
  • 5 emails sent to 10 different addresses count as 10 unique recipients*
  • 5 emails sent to a single address count as 1 unique recipient*
3,000 (2,000 external, 500 external for trial accounts)
*Applies to internal and external recipients

What also counts towards a user's limits

  • Mail sent from a user's alternate address, or alias
  • Mail an assistant sends on your behalf (if you delegate mail to an assistant)
  • Mail sent from Gmail’s vacation responder

Gmail sending limits for mobile devices

When you use the Gmail for mobile app in Google Sync mode, the same sending limits apply as when you use Gmail in a web browser (described in the table above).
When you use the Gmail for mobile app in IMAP mode, the IMAP sending limits (described in the table above) apply.

Restore a suspended Gmail account

G Suite administrators can check the Users section of the Google Admin console to find details on which limits were reached. In some cases, an administrator can take action to restore access. For instructions, see Restore a suspended Gmail account.
Accounts that are detected as sending spam might be permanently restricted from sending email. See Google's Spam and abuse policy.

Additional sending limits for Google Groups during trials

If you are using Google Groups through a free trial account, you can only send group email to recipients inside your organization. To send group email to external recipients, you must end your trial and convert to a paid account.

Increase your limits by ending your free trial 

Some limits are specific to trial accounts. At the end of your free trial period, those limits will be automatically increased when your domain is cumulatively billed for at least USD $30 (or equivalent). If you purchased your domain from Google, the amount required to increase your sending limits is USD $30 plus the cost of your domain.
Important: Sending limits are not increased during your trial period. Your account must have started a subscription and ended the trial period before sending limits can be removed. In addition, any payments made during the trial period do not apply to the USD $30 (or equivalent) charge to remove trial-like limits. 
If you want to increase your limits sooner, you can end your free trial by completing the following steps:
  1. Add new users to reach the maximum account user limit (normally 10 for new accounts in trial, although it can vary under certain conditions). 
  2. Set up a billing account. 
  3. Select the option to start the paid service.
  4. Make a payment to lift the trial limits.
It can take up to 48 hours to upgrade the limits after you submit the payment.

Recommendations for sending bulk email

Here are some ways to avoid exceeding limits when sending a large amount of mail, such as for a marketing campaign:
  • Stagger mass communications over 2 days—Send messages to one group of recipients, wait 24 hours, and then send to another group.
  • Send mail to a group address—Send mail to many email addresses using a single group address. For example, contact all users in your organization by adding everyone in the domain to an email list. For more details, see Groups and Group policies and limits.
  • Use a Marketplace solution—Many third-party developers offer apps for sending bulk mailings. For ideas, go to the G Suite Marketplace.
    Note: Google does not offer technical support for Marketplace apps. Marketplace solutions are created by third-party developers for a general audience.
  • Build an App Engine solution—Developers can increase mail limits by building a customized application. See App Engine for mail.
  • Use a local mail server—If you have a local mail server, use it to send mail directly to recipients to avoid sending limits. This local server should also be added to your SPF record to stop the messages from being marked as spam.
  • Review bulk sending guidelines and best practices—Some email recipients might report bulk messages as spam. Therefore, you need to ensure that all recipients are willing to receive the emails. You can also check email settings for any incorrectly configured forwarding rules or filters. For details, see our bulk sending guidelines and best practices.


IT Consultant
www.inCOREporation.com

Tuesday, April 23, 2019

Nortel Phone Change Voicemail password & change language

Nortel Phone Change Voicemail password & change language
According to
https://www.youtube.com/watch?v=pq2LyLr7c1s


Nortel Phone Change Voicemail password
F983 (prog)
Enter admin password
Inbox + number + change + reset + release
Inbox is in password recovery mode
From end user phone F981 0000

Language
F983 ...
inbox... next next class service + change + language


Default admin passwords
2 digit numbers 120000
3 digit numbers 1020000
4 digit numbers 10020000

To reset admin password
F985 ext on screen press 9
password 73738767793 yes reset password


Nortel phone Change name on your extension


Change name on your extension with your Nortel phone

According to
https://www.digitcom.ca/training_video_tutorials-2/change-name-on-your-extension-with-your-nortel-phone/

change name # for next letter

Change name on your extension with your Nortel phone

Description:
This video covers how to change the display name associated with your extension

Step by Step Guide

This video covers how to change your name on your extension.
1. Choose one of the bigger phones in your office, enter your password by first press “FEATURE” then enter **266344 which is the default access code.

2. When asked to enter password, enter 266344, On the screen it should show “TERMINALS&SET”.

3. Press the top button on the right side. “SHOW SET” will show up on the screen

4. Enter the extension you would like to edit, for example 221.
5. In our example, the name on the phone is currently “Tony”. We want to change that to “Jim”. First press the top right button, the screen will show LINCE ACCESS.


6. Now press the bottom right button, CAPABILITIES will show up on the screen, and you need to keep pressing the same button, until the screen shows “NAME”.


7. Press “CHANGE”, enter the name you want with a dial pad. For example, for JIM, “J” would be number 5. Then move one space to the right by pressing arrow pointed to the right. Then letter “I” would be number 4. And you keep pressing the number 4, untill you see “I” appear on your screen. Then again, press the arrow to the right. And the “M”, number 6, and keep pressing untill you see the letter “M”.


8. After you entered the name, save the change by press the lower right button again on the phone.
9. Press the “release” button to end editing.

If you need help Changing name on your extension with your Nortel phone, please let us know


www.inCOREporation.com

Featured Posts

Exchange Online Limits - Office 365 Distribution group limits

Exchange Online Limits - Office 365 Distribution group limits What are Exchange Online Limits What are Office 365 Distribution group limi...