Training Microsoft SQL Server Visual Studio
Training Microsoft SQL SQL Server Visual Studio
In summarySQL ASP.NET C# HTML CSS JAVASCRIPT JQUERY JSON AJAX
Installation
SQL server Express
SQL Server Developper
SSMS
Updates
Visual Studio
Extensions (Github etc)
Panels layouts
Update SQL via VS Tools NuGet Package manager
SQL Server Database first steps
SQL Server SSMSCreate new Database
Create new table
id int primary key
name
title
Save and refresh
edit top 200 rows
fill some values
New Query
SQL CLAUSES(1)
Database select where or and between order by asc desc
use trainingDB
go
--1. this is a comment: select all columns from table
select * from Table_1
execute
--2. select name and title from table
select name,title from Table_1
execute
select sql code go to debug step into
select * from Table_1
where id=2 or id=3
select name,title from Table_1
where name='mary'
order by title
select name,title from Table_1
where name='mary'
order by id desc
useful tool from Query menu Include actual execution plan
select name,title from Table_1
where name='mary' and title='vice president'
order by id desc
Between
select name,title,[momeny earned] from Table_1
where [money earned] between 170000 and 260000
order by [money earned] desc
Alias
go
select name as 'Firstname',
title as 'Employee title',
[money earned] as Salary
from Table_1
where [money earned] not between 170000 and 250000
order by title asc, Salary desc
Alias compute column
--0. In English: Show the name, title, salary, tax amount
-- and take home pay for all people who are earning between
-- 100,000 and 200,000 take home pay, and display the
-- results sorted by take home pay, from highest to lowest.
--1. aliasing computed columns
use trainingBD
go
select name as 'Firstname',
title as 'Employee Title',
[money earned] as Salary,
[money earned]*0.33 as 'Tax Amount',
[money earned]*0.66 as 'Take Home Pay'
from Table_1
where [Money earned]*0.66 between 100000 and 200000
order by 'Take Home Pay' desc, 'Employee Title'
--2. write down the order of execution
--3. from, where, select, order by
Query Designer
fun
Visual Studio
First web page connected to databaseFile > New > Web site (C#, ASP.NET)
Solutions explorer
Website > web.config > add > Web form
Build > Build solution
Google Chrome
localhost:53066.Default.aspx
View page source
Design view
Toolbox window
Drag Gridview to top of Default.aspx page shows our first control
Gridview tasks > Add Data source
Connect to SQL Server database
@are parameters of column query
ex:
select * from [Table_1] where ([money earned] <= money_earned) Value was set to 10000
order by [money earned] desc
data type in SQL was money, but VS data type is decimal
GridView tasks > Enable Sorting
Verify in Google Chrome
Toggle to Source view
Opening and closing tags like HTML
back to SSMS create new Table FOR "GROUP BY" exercise
[[[[[[[ IF ERRORS ]]]]]]]]
https://blog.sqlauthority.com/2018/03/03/sql-server-automatically-saved-settings-file-newsettings-vssettings-cannot-found/SQL SERVER – The Automatically Saved Settings file NewSettings.vssettings Cannot be Found
After cleaning up some data from my user profile, when I launched SQL Server Management Studio 17.4, I got an error. related to automatically saved settings.
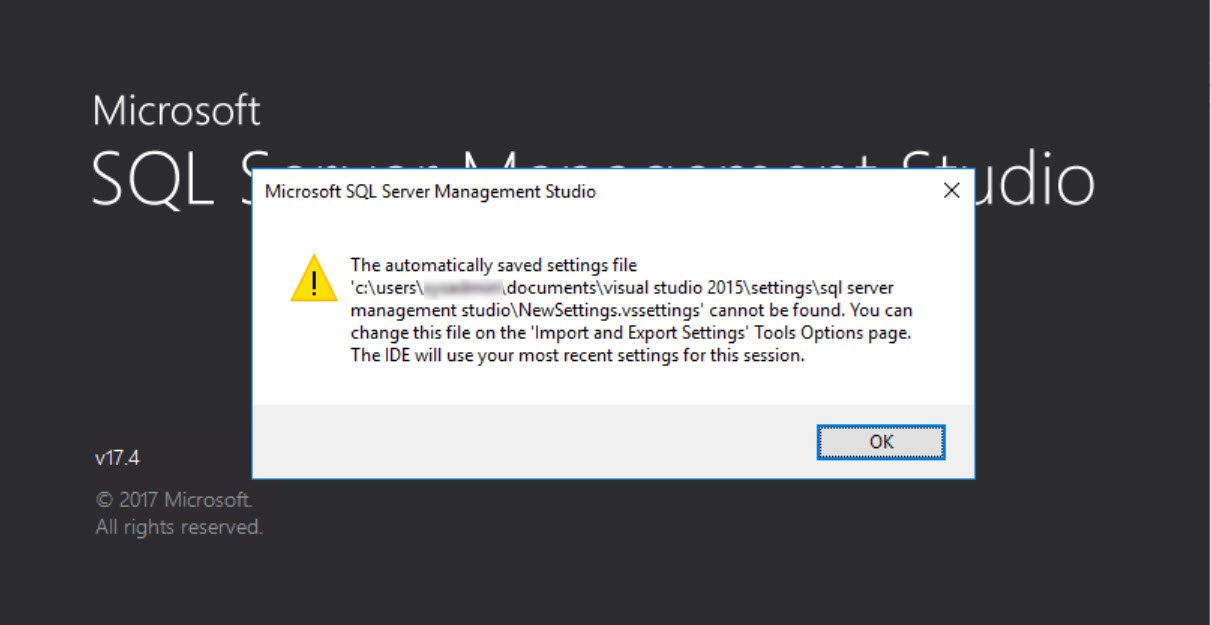
Here is the text of the message.
The automatically saved settings file ‘c:\users\<UserName>\documents\visual studio 2015\settings\sql server management studio\NewSettings.vssettings’ cannot be found. You can change this file on the ‘Import and Export Settings’ Tools Options page. The IDE will use your most recent settings for this session.

Once I clicked OK, I was able to get SSMS working and error never appeared. I was curious to know the cause of the error. After capturing Process Monitor I was able to find the location from where SSMS picks the value of the settings file.
Most of the settings are stored in
HKEY_CURRENT_USER\SOFTWARE\Microsoft\SQL Server Management Studio\14.0
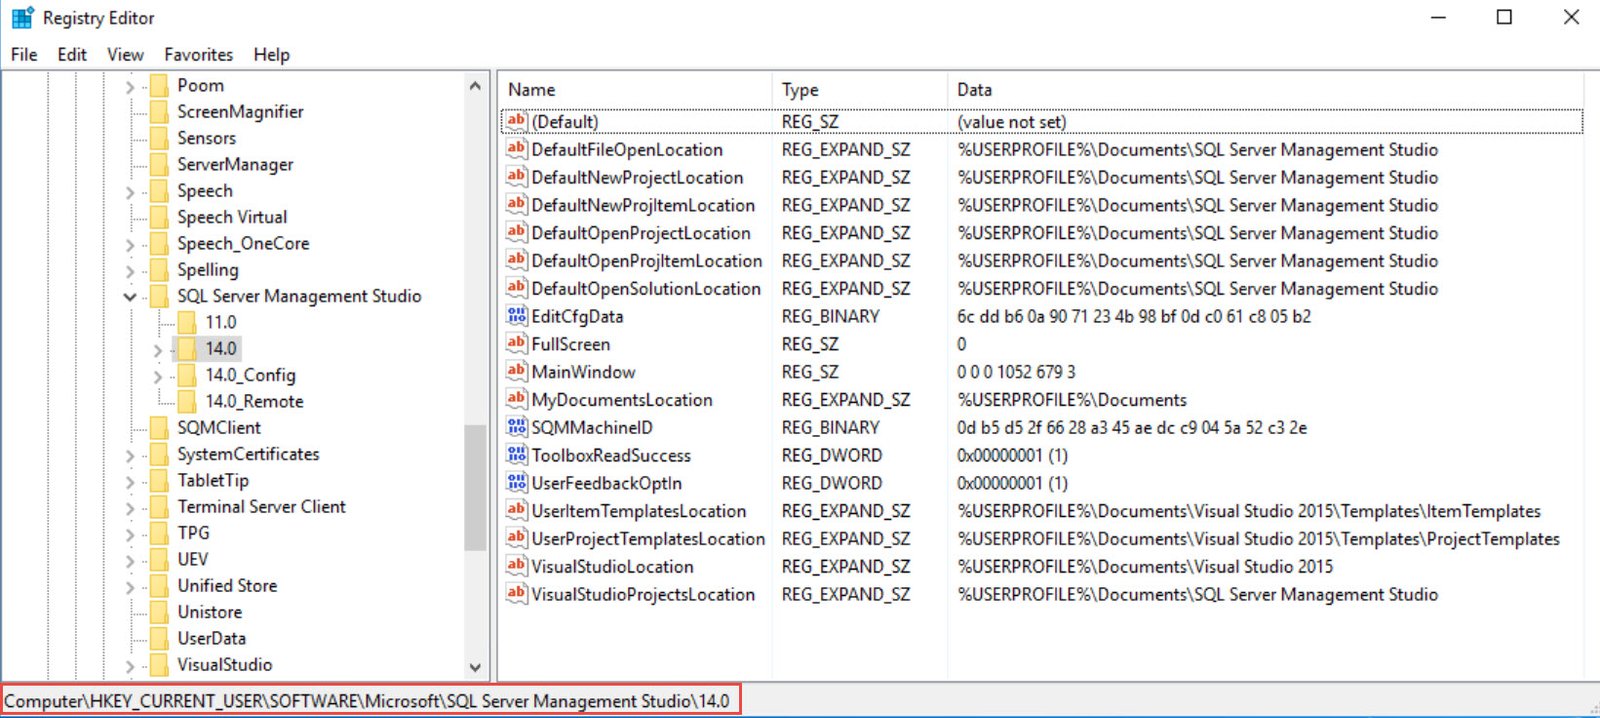
I noticed that I get this error first time when I rename “sql server management studio” folder to “sql server management studio_1” in windows explorer. When I opened SSMS, the folder got created automatically and hence no error appeared again.
Sometimes, you may get an error about network location so you need to find the key which is pointing to a network location and fix that.
[[[[[[[ IF ERROR ]]]]]]]]
microsoft sql server management studio error table saving changes is not permitted
OR
SQL Server Management Console: Saving changes is not permitted.
The full warning message would be:
Saving changes is not permitted. The changes that you have made require the following tables to be dropped and re-created. You have either made changes to a table that can’t be re-created or enabled the option Prevent saving changes that require the table to be re-created.
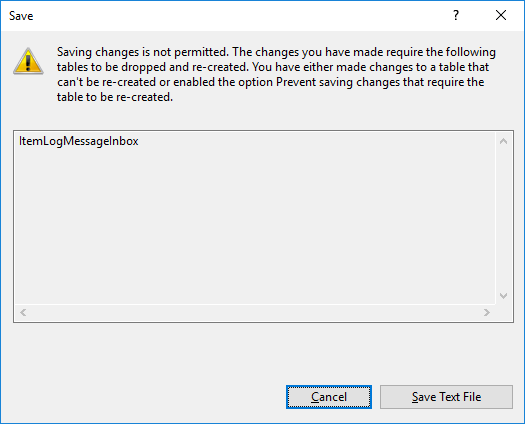
This behavior is very simple to solve and is well documented here: Error message when you try to save a table in SQL Server: “Saving changes is not permitted”. Once again, this is just for helping me not always to look at this “problem” again. My Blog is the first place I look, it is my personal notes.
Cause
This problem occurs when the Prevent saving changes that require the table re-creation option is enabled, and you make one or more of the following changes to the table:
- You change the Allow Nulls setting for a column.
- You reorder columns in the table.
- You change the column data type.
- You add a new column.
When you change a table so that you alter the metadata structure of the table, and then you save the table, the table must be re-created based on these changes. This may result in the loss of metadata and in a direct loss of data during the re-creation of the table. If you enable the Prevent saving changes that require the table re-creation option in the Designer section of the SQL Server Management Studio (SSMS) Options window, you receive the error message: Saving changes is not permitted. The changes that you have made require the following tables to be dropped and re-created.
Solution
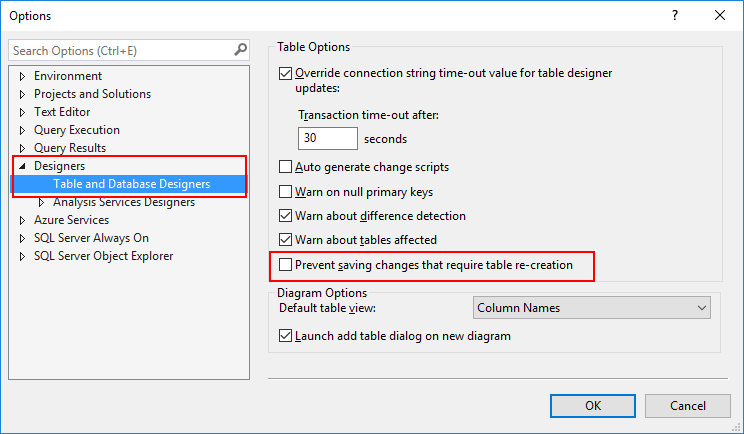
To change the Prevent saving changes that require the table re-creation option, follow these steps:
- Open SQL Server Management Studio (SSMS).
- On the Tools menu, click Options.
- In the navigation pane of the Options window, click Designers.
- Uncheck (clear) the Prevent saving changes that require the table re-creation check box, and then click OK.
END ERRORS
OK let's continue
BACK TO
SQL CLAUSES(2)
BACK TO
SQL CLAUSES(2)
Summarize Blocks of Records with
GROUP BY
SSMS
Create new table
id column properties > identity specification
set primary key > increment 1 seed 1
dept name nvarchar(50) not null
sales person nvarchar(50) not null
sales amount money not null
on Table_2
Edit Top 200 Rows
put in some values
New Query
*TIP*: start with select [dept name] from Table_2 in order to see columns form that table
select [dept name] as 'DeptName' ,
SUM([sales amount]) as 'TotalSales'
from Table_2
GROUP BY [dept name]
ORDER BY [TotalSales] desc
HAVING
--1. choosing grouped records with the having clause
--2. In English: pick out the department where the sales
-- are above or equal to 800,000
use mydbase
go
select [dept name],
SUM([sales amount]) as TotalSales
from Table_2
group by [dept name]
having SUM([sales amount])>=800000
--3. clause execution steps: from, group by, having, select
SALECT INTO
Table_3 doesn't exist
select * into Table_3 from Table_2
--1. copying from one table to another
--2. In English: Put the department average sales in a
--3. new table named table4
select [dept name] as Department,
sum([sales amount])/count([Sales Person]) as Average
into table4
from table_2
group by [dept name]
drop table Table_4
--4. line below gets rid of the table from the database drop table table4
--5. line below runs once the table is copied out, but before
-- it's dropped again select * from table4
Verifying expensive operations (insert and sort) from the Query menu Include Actual Execution Plan
select * into Table_3 from Table_2
--1. copying from one table to another
--2. In English: Put the department average sales in a
--3. new table named table4
select [dept name] as Department,
sum([sales amount])/count([Sales Person]) as Average
into table4
from table_2
group by [dept name]
drop table Table_4
--4. line below gets rid of the table from the database drop table table4
--5. line below runs once the table is copied out, but before
-- it's dropped again select * from table4
Verifying expensive operations (insert and sort) from the Query menu Include Actual Execution Plan
BACK TO VISUAL STUDIO
create new project asp.net emptyright click the site > add webform (renamedit to defaultapp1)
from Design view
from toolbox search add gridview and
2 text boxes > renamed it txtDeptName and SalesAmount
edit source html before <asp
Launch in browser and close it
back to Design view
Set Toolbox property to AutoPostBack="True"
Can set in HTML too
sent to server for processing and result back to form element
Design view set Database gridview data source
table 2 source control ...
add both
auto format
enable sorting
HTML source code example
<%@ Page Language="C#" AutoEventWireup="true" CodeBehind="defaultapp1.aspx.cs" Inherits="WebApplication1.defaultapp1" %>
<!DOCTYPE html>
<html xmlns="http://www.w3.org/1999/xhtml">
<head runat="server">
<title></title>
</head>
<body>
<form id="form1" runat="server">
<div>
<asp:GridView ID="GridView1" runat="server" AllowSorting="True" AutoGenerateColumns="False" BackColor="LightGoldenrodYellow" BorderColor="Tan" BorderWidth="1px" CellPadding="2" DataKeyNames="id" DataSourceID="SqlDataSource1" ForeColor="Black" GridLines="None">
<AlternatingRowStyle BackColor="PaleGoldenrod" />
<Columns>
<asp:BoundField DataField="id" HeaderText="id" InsertVisible="False" ReadOnly="True" SortExpression="id" />
<asp:BoundField DataField="dept name" HeaderText="dept name" SortExpression="dept name" />
<asp:BoundField DataField="sales person" HeaderText="sales person" SortExpression="sales person" />
<asp:BoundField DataField="sales amount" HeaderText="sales amount" SortExpression="sales amount" />
</Columns>
<FooterStyle BackColor="Tan" />
<HeaderStyle BackColor="Tan" Font-Bold="True" />
<PagerStyle BackColor="PaleGoldenrod" ForeColor="DarkSlateBlue" HorizontalAlign="Center" />
<SelectedRowStyle BackColor="DarkSlateBlue" ForeColor="GhostWhite" />
<SortedAscendingCellStyle BackColor="#FAFAE7" />
<SortedAscendingHeaderStyle BackColor="#DAC09E" />
<SortedDescendingCellStyle BackColor="#E1DB9C" />
<SortedDescendingHeaderStyle BackColor="#C2A47B" />
</asp:GridView>
<asp:SqlDataSource ID="SqlDataSource1" runat="server" ConnectionString="<%$ ConnectionStrings:SurpriseDBConnectionString %>" SelectCommand="SELECT * FROM [Table_2] WHERE (([dept name] = @dept_name) AND ([sales amount] <= @sales_amount))">
<SelectParameters>
<asp:ControlParameter ControlID="txtDeptName" Name="dept_name" PropertyName="Text" Type="String" />
<asp:ControlParameter ControlID="txtSalesAmount" DefaultValue="" Name="sales_amount" PropertyName="Text" Type="Decimal" />
</SelectParameters>
</asp:SqlDataSource>
</div>
Dept. Name: <asp:TextBox ID="txtDeptName" runat="server" AutoPostBack="True"></asp:TextBox>
<p>
Sales Amount: <asp:TextBox ID="txtSalesAmount" runat="server" AutoPostBack="True"></asp:TextBox>
</p>
</form>
</body>
</html>
SQL
CREATE TABLE
INSERT INTO
use SurpriseDB
go
create table Employees
(
id int not null,
name nvarchar(50) not null,
[date enrolled] date not null,
[money earned] money not null,
)
insert into Employees
values
('1','John','10/12/2017','267'),
('2','Mary','10/12/2014','267'),
('3','Jose','1/23/2015','267'),
('4','Mike',GetDate(),'267')
select * from Employees
UPDATE
USE SurpriseDBGO
UPDATE Employees
SET [money earned]=75000
WHERE [id]=2
select * from Employees
USE SurpriseDB
GO
UPDATE Employees
SET [money earned]=85000,
[date enrolled]='06/11/2011',
[modified date]=GetDate()
WHERE id=2
select * from Employees
ASP.NET Page Updating and Deleting
UPDATE
DELETE
VISUAL STUDIO
Under same Project WebApplication1Add Web Form defaultapp2
Design view
GridView to page
Connect database
New connection
Yes
Tick all columns
Advanced
GENERATE INSERT, UPDATE, DELETE (needs a primary key on the table)
didn't select Optimistic concurrency... but good to know it's there
Enable sorting on each
Open in browser
Can edit delete and select
back in VS Deisgn from gridview Edit Columns
choose selected fields > date started > CONVERT THIS INTO A TEMPLATEFIELD
same with salary and date modified ok
gridview > edit templates
each
ItemTemplate > Label1 > DataBindings
Date Started > Change format
Check source code
NORMALIZATION
Improve table structure
1RST NORMAL FORM NORMALIZATION
1- AtomicAtomic
NO Repeating records
NEED Composite Primary key (that is unique)
Fix: select distinct * into UniqueParts from Parts
Select both columns set primary key
find and create a composite primary key
use SurpriseDB
go
create table parts
(
[part] nvarchar(50) not null,
[brand] nvarchar(50) not null,
[price] money not null,
[tax] money not null
)
insert into parts
values
('tire','company x','100','15'),
('wipers','company x','40','15'),
('tire','company y','110','15'),
('tire','company x','90','15'),
('tire','company y','110','15'),
('wipers','company x','40','15'),
('tire','company y','110','15'),
('wipers','company y','50','15'),
('wipers','company x','40','15')
select distinct * from parts
select distinct * into UniqueParts from parts
select distinct * from UniqueParts
2ND NORMAL FORM
2- Partial Dependency (NO)Don't waste space
Depend ONLY on the primary key
In 2nd normal form, we may separate a big table into two smaller tables. We do this in order to ensure that the columns depend only on ALL the components of a key.
If a column in a table does not depend on every member of a key field, then 2nd form says this column must be moved into a different table.
Fix: Check code below to find composite primary key
Select both columns set primary key
select part,price,tax into PartPriceTax from UniqueParts
select * from PartPriceTax
select distinct * into PartPriceTaxUnique from PartPriceTax
select * from PartPriceTaxUnique
3RD NORMAL FORM
3-Transitive Dependency (NO)Don't waste space
Depend ONLY on the primary key
Fix: Check code below to find primary key
Select part column to be primary key
select part,price into PartPrice from PartPriceTaxUniqueselect * from PartPrice


