Article detailing the end of life/support for MD5 Hash and it's replacement option.
Jun 27, 2019•Answer
Answer
Authorize.Net is phasing out the MD5 based hash use for transaction response verification in favor of the SHA-512 based hash utilizing a Signature Key.
The end of life for MD5 Hash will be done in two phases:
Phase 1 - As of February 11, 2019 we have removed ability to configure or update MD5 Hash setting in the Merchant Interface. Merchants who had this setting configured have already been emailed/contacted.
Phase 2 - Stop sending the MD5 Hash data element in the API response. To continue verifying via hash, this will require applications to support the SHA-512 hash via signature key.
Sandbox has been updated as of March 7, 2019 to stop populating the MD5 Hash value, but the field will still be present but empty.
Production has been updated as of June 27, 2019 (10:30am PT) to stop populating the MD5 Hash value, but the field will still be present but empty.
When you receive a transaction response from Authorize.Net, it includes the a SHA2 hash element the name and position depend on the API integration method used. The SHA2 has field contains HMAC-SHA512 hash that Authorize.Net generated for the transaction and can be used to validate the response came from Authorize.Net but is not required to do so.
Note: For CIM createTransaction the SHA2 field and value will not be provided in the response (including Silent Post for this specific call). Note: All Authorize.Net values, including the Signature Key and the transHashSHA2 element, use ISO 8859-1 characters. Using Unicode instead of ISO 8859-1 may cause hash mismatches.
For Advance Integration Method (AIM) the SHA2 element is at the end of the API response. For details please see the Advance Integration Method (AIM) guide page 57-59.
Please note this is a deprecated integration method, please check our Upgrade Guide for API statuses.
For Authorize.Net API and AIM only 3 fields are involved in the SHA2 Hash.
API Login ID
Transaction ID
Amount
For Server Integration Method (SIM) or Direct Post Method (DPM) and utilizing Replay Response the SHA2 element is x_SHA2_Hash. For details please see the Server Integration Method (SIM) guidepages 73-75.
Please note this is a deprecated integration method, please check our Upgrade Guide for API statuses.
Azure App Service provides a highly scalable, self-patching web hosting service. This quickstart shows how to deploy your first ASP.NET Core web app to Azure App Service. When you're finished, you'll have a resource group that consists of an App Service plan and an App Service app with a deployed web application.
If you don't have an Azure subscription, create a free account before you begin.
Prerequisites
To complete this tutorial, install Visual Studio 2017 with the ASP.NET and web development workload.
If you've installed Visual Studio 2017 already:
Install the latest updates in Visual Studio by clicking Help > Check for Updates.
Add the workload by clicking Tools > Get Tools and Features.
Create an ASP.NET Core web app
In Visual Studio, create a project by selecting File > New > Project.
In the New Project dialog, select Visual C# > Web > ASP.NET Core Web Application.
Name the application myFirstAzureWebApp, and then select OK.
You can deploy any type of ASP.NET Core web app to Azure. For this quickstart, select the Web Application template, and make sure authentication is set to No Authentication and no other option is selected.
Select OK.
From the menu, select Debug > Start without Debugging to run the web app locally.
Launch the publish wizard
In the Solution Explorer, right-click the myFirstAzureWebApp project and select Publish.
The publish wizard is automatically launched. Select App Service > Publish to open the Create App Service dialog.
Sign in to Azure
In the Create App Service dialog, click Add an account, and sign in to your Azure subscription. If you're already signed in, select the account you want from the dropdown.
Note
If you're already signed in, don't select Create yet.
Create a resource group
A resource group is a logical container into which Azure resources like web apps, databases, and storage accounts are deployed and managed. For example, you can choose to delete the entire resource group in one simple step later.
Next to Resource Group, select New.
Name the resource group myResourceGroup and select OK.
Create an App Service plan
An App Service plan specifies the location, size, and features of the web server farm that hosts your app. You can save money when hosting multiple apps by configuring the web apps to share a single App Service plan.
App Service plans define:
Region (for example: North Europe, East US, or Southeast Asia)
Instance size (small, medium, or large)
Scale count (1 to 20 instances)
SKU (Free, Shared, Basic, Standard, or Premium)
Next to Hosting Plan, select New.
In the Configure Hosting Plan dialog, use the settings in the table following the screenshot.
In App Name, type a unique app name (valid characters are a-z, 0-9, and -), or accept the automatically generated unique name. The URL of the web app is http://<app_name>.azurewebsites.net, where <app_name> is your app name.
Select Create to start creating the Azure resources.
Once the wizard completes, it publishes the ASP.NET Core web app to Azure, and then launches the app in the default browser.
The app name specified in the create and publish step is used as the URL prefix in the format http://<app_name>.azurewebsites.net.
Congratulations, your ASP.NET Core web app is running live in Azure App Service.
Update the app and redeploy
From the Solution Explorer, open Pages/Index.cshtml.
Replace the two <div> tags with the following code:
HTML
<divclass="jumbotron"><h1>ASP.NET in Azure!</h1><pclass="lead">This is a simple app that we’ve built that demonstrates how to deploy a .NET app to Azure App Service.</p></div>
To redeploy to Azure, right-click the myFirstAzureWebApp project in Solution Explorer and select Publish.
In the publish summary page, select Publish.
When publishing completes, Visual Studio launches a browser to the URL of the web app.
Manage the Azure app
Go to the Azure portal to manage the web app.
From the left menu, select App Services, and then select the name of your Azure app.
You see your web app's Overview page. Here, you can perform basic management tasks like browse, stop, start, restart, and delete.
The left menu provides different pages for configuring your app.
Clean up resources
In the preceding steps, you created Azure resources in a resource group. If you don't expect to need these resources in the future, you can delete them by deleting the resource group.
From the left menu in the Azure portal, select Resource groups and then select myResourceGroup.
On the resource group page, make sure that the listed resources are the ones you want to delete.
Select Delete, type myResourceGroup in the text box, and then select Delete.
Excel for Office 365 for MacWord for Office 365 for MacMore...
You can easily uninstall Office for Mac apps such as Word, Excel, PowerPoint, OneNote, and Outlook using these instructions. You must be signed in as an administrator on the Mac or provide an administrator name and password to complete these steps.
You must be signed in as an administrator on the Mac or provide an administrator name and password to complete these steps.
Remove Office for Mac applications
Open Finder > Applications.
Command +click to select all of the Office for Mac applications.
Ctrl+click an application you selected and click Move to Trash.
Remove files from your user Library folder
In Finder, press +Shift+g.
In the window that opens, enter ~/Library and then click Go.
Open the Containers folder and ctrl+click each of these folders and Move to Trash. Note that some of these folders may not be present.
com.microsoft.errorreporting
com.microsoft.Excel
com.microsoft.netlib.shipassertprocess
com.microsoft.Office365ServiceV2
com.microsoft.Outlook
com.microsoft.Powerpoint
com.microsoft.RMS-XPCService
com.microsoft.Word
com.microsoft.onenote.mac
Warning: Outlook data will be removed when you move the three folders listed in this step to Trash. You should back up these folders before you delete them.
Click the back arrow to go back to the Library folder and open Group Containers. Ctrl+click each of these folders if present, and Move to Trash.
UBF8T346G9.ms
UBF8T346G9.Office
UBF8T346G9.OfficeOsfWebHost
Remove from Dock and restart
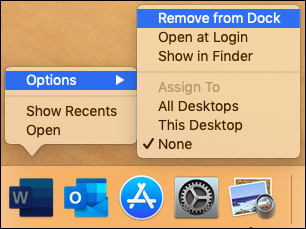
If you put any of the Office applications in your Dock, go to each one and ctrl + click > Options > Remove from Dock.
There are both donated and discounted plans available, depending on your needs. See the Subscription Options tab for prices and subscription information.
What Are the System Requirements for Office 365?
See Microsoft's System requirements for Office page. The requirements are listed under "Office 365 plans for business, education, and government."
Subscription Options
Office 365 Nonprofit Business Essentials
free
Most suitable for small and mid-sized nonprofits with up to 300 users that do not need Office desktop applications
Provides cloud-based access to Office applications, email, instant messaging, HD video conferencing, and 1 TB personal file storage and sharing
Does not include Office desktop applications
Office 365 Nonprofit Business Premium
$3.70/user/month
Most suitable for small and mid-sized nonprofits with up to 300 users that need Office desktop applications
Office desktop applications for PC and Mac included, with apps for tablets and phones
Includes all features of Business Essentials plan plus additional features and services
Office 365 Nonprofit E1
free
Most suitable for small and mid-sized nonprofits with up to 300 users that do not need Office desktop applications
Provides cloud-based access to Office applications, email, instant messaging, HD video conferencing, and 1 TB personal file storage and sharing
Does not include Office desktop applications
Office 365 Nonprofit E3
$5.60/user/month
Most suitable for large nonprofits with more than 300 users that need Office desktop applications
Office desktop applications for PC and Mac included, with apps for tablets and phones
Includes all features of E1 plan plus data protection and other services
Office 365 Nonprofit E5
$18.50/user/month
Most suitable for large nonprofits with more than 300 users that need Office desktop applications
Office desktop applications for PC and Mac included, with apps for tablets and phones
Includes all features of E3 plan plus advanced security and other services


 +click to select all of the Office for Mac applications.