Thursday, March 23, 2017

Managing Office 365 useful information

Managing Office 365 useful information (Office 365 useful links)


HELP AND TRAINING 
Office help and training - This can be shared with your end users to answer any Outlook related questions that they may have. It contains everything from tutorials to video guides. 
Office Quick Starts - Get a quick overview of all Office 365 workloads, standalone apps, downloadable guides and ebooks for Business and Education licenses.
Office Training Center - Learn Office, Word, Excel, Outlook, PowerPoint, OneNote and Access with additional training on past versions and even earn certifications.
Office 365 for IT pros - This is a useful link to train and familiarizes your ITs in Office 365, SharePoint and Exchange. 

CONFIGURATION WIZARDS 
Configure Office ProPlus Apps – Our Office 365 ProPlus deployment advisor will help you get your users up and running on the latest versions of Office. 
Configure OneDrive for Business – Learn how to control and manage OneDrive for Business features in your Office 365 organization. 
Configure SharePoint Online – Choose the SharePoint Online deployment option that works best for your organization and we'll show you the setup steps. 
Configure Skype for Business – Use our deployment advisor to get your Office 365 organization up and running with Skype for Business Online. 
Configure Yammer – Get your organization up and running on Yammer's private social networking service. 
Introduction to Microsoft Teams - Explore Microsoft Teams, the chat-based workspace in Office 365. Learn how Microsoft Teams can help your team to communicate more effectively. 
   
DATA MIGRATION 
Exchange Server Deployment Assistant - The Exchange Server Deployment Assistant is your source for Exchange deployment technical guidance. Tell us what kind of deployment you’re interested in, answer a few questions about your environment, and then view Exchange deployment instructions created just for you.

SECURITY AND COMPLIANCE 
Overview of data loss prevention policies – To comply with business standards and industry regulations, organizations need to protect sensitive information and prevent its inadvertent disclosure. 
Plan for Office 365 security and information protection capabilities – Microsoft Office 365 includes many security and information protection capabilities. Microsoft Enterprise Mobility + Security (EMS) includes additional capabilities for protecting data, identities, and devices with Office 365. EMS includes Microsoft Intune and Azure Active Directory Premium. 
Azure Information Protection – Control and help secure email, documents, and sensitive data that you share outside your company walls. From easy classification to embedded labels and permissions, enhance data protection at all times with Azure Information Protection—no matter where it’s stored or who it’s shared with. 
Requirements for Azure Information Protection – Before you deploy Azure Information Protection for your organization, make sure that you have the following prerequisites. 

EXCHANGE ONLINE PROTECTION 
Best practices for configuring EOP – Follow these best-practice recommendations for Exchange Online Protection (EOP) in order to set yourself up for success and avoid common configuration errors. We recommend using the default configuration settings as a general rule. 
Office 365 email anti-spam protection – In order to help prevent spam in Office 365, you may want to change a protection setting to deal with a specific issue in your organization—say you’re receiving a lot of spam from a particular sender, for example – or to simply fine tune your settings so that they’re tailored to best meet the needs of your organization. 

Protect on-premises mailboxes with Exchange Online Protection – Even if you plan to host some or all of your mailboxes on-premises, you can still protect the mailboxes with Exchange Online Protection (EOP). To configure connectors, your account must be an Office 365 Global Admin, or an Exchange Company Administrator (the Organization Management role group). 


Thanks to the great people from Microsoft


http://incoreporation.com       https://ca.incoreporation.com       http://wwebservices.ca 

Office 365 Deployment Wizard (Deployment Survey)

Office 365 Deployment Wizard

Deployment survey for Office 365 advisor
https://aka.ms/depforoffice365

Thanks to the great people at Microsoft

http://incoreporation.com       https://ca.incoreporation.com       http://wwebservices.ca 


Office 365 Share calendars with external users

Thanks to amazing people from Microsoft, here's great information on how to Share calendars with external users from Office 365

Option 1

According to https://support.office.com/en-us/article/Share-calendars-with-external-users-FB00DD4E-2D5F-4E8D-8FF4-94B2CF002BDD

Share calendars with external users

It’s often necessary to schedule meetings with people outside your organization. To simplify the process of finding mutually agreeable meeting times, Office 365 enables you to make calendars available to “external users,” those who need to see free/busy time but don’t have user accounts for your Office 365 environment.
Calendar sharing is a global setting, meaning that you, the Office 365 admin, can enable it for all users in the tenant. Once sharing is enabled, users can use Outlook Web App to share their calendars with anyone inside or outside the organization. People inside the organization can view the shared calendar side-by-side with their own. People outside the organization will be sent a URL that they can use to view the calendar. Users decide when to share, how much to share, and when to keep their calendars private.
NOTE:  If you want to share calendars with an organization that uses Exchange Server 2013 (an on-premises solution), the Exchange administrator will need to set up an authentication relationship with the cloud. This is known as “federation” and must meet minimum software requirements. See Sharing for more information.

Enable calendar sharing using the Office 365 admin center

  1. Sign in to Office 365 with your work or school account.
  2. Select the app launcher icon App launcher button and choose Admin.
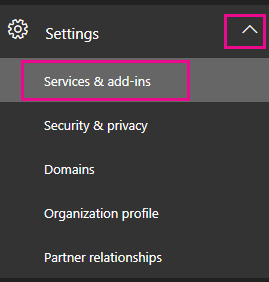
  3. Navigate to Settings > Services & add-ins.
    On the left navigation pane, click Settings, and then click Services & add-ins.
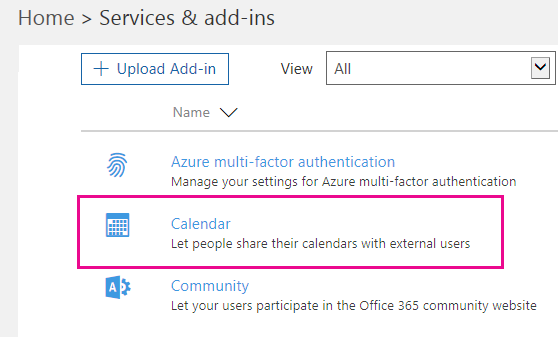
  4. On the Services & add-ins page, click Calendar.
    On the Services & add-ins page, click Calendar.
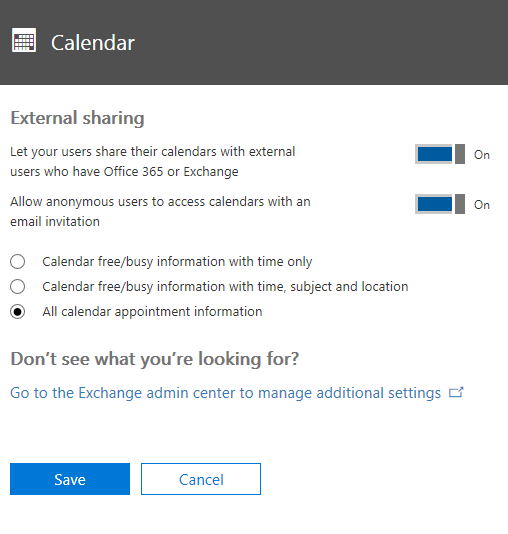
  5. On the Calendar page that opens, do one of the following:
    • For Let your users share their calendars with external users who have Office 365 of Exchange, move the slider to On to enable calendar sharing.
    • For Let your users share their calendars with external users who have Office 365 of Exchange, move the slider to Off to disable calendar sharing.
  6. If you want to allow anonymous users (users without logon credentials) to access calendars via an email invitation, for Allow anonymous users to access calendars with an email invitation, move the slider to Off.
    In the Calendar page, configure the settings as appropriate for your situation.
    When you select the check box to allow anonymous users, you’ll have to decide what type of calendar information to make available to users. You can allow all information, or limit it. These choices specify the amount of information that your users can show on a case-by-case basis. Select one of the following:
    • Calendar free/busy information with time only
    • Calendar free/busy information with time, subject and location
    • All calendar appointment information


Option 2

According to https://support.office.com/en-us/article/Overlay-a-SharePoint-calendar-with-a-calendar-from-Exchange-or-SharePoint-4CAEBE59-3994-4A94-9322-B31ABB8A5E9A

Overlay a SharePoint calendar with a calendar from Exchange or SharePoint

If you use a SharePoint calendar on your site, you can overlay your own Exchange calendar onto it to create a combined calendar view. Alternatively, you can overlay another SharePoint calendar as long as both SharePoint calendars are in the same site collection. In all, you can add up to four Exchange or SharePoint calendars.
This enables you to see combined schedules. For example, when you overlay an Exchange calendar to a SharePoint group calendar, you can see your own schedule and the group schedule at the same time. This can be helpful for choosing a time for a team event, or planning a time to present training.
NOTE:  To change calendar settings, you must have at least design permission level for the site.
To learn more about group calendars in SharePoint, see Use a Group Calendar.

I want to

Overlay an Exchange calendar on a SharePoint calendar

The following procedure describes how to overlay an Exchange calendar onto a SharePoint calendars for a SharePoint calendar. After you overlay the calendar, you can use this calendar to create a special calendar view.
IMPORTANT:  You can only overlay your own Exchange calendar. That is, the Exchange calendar overlay works with the account credentials of the user who is current logged on. SharePoint uses the account information of the current user to retrieve calendar data from the Exchange Web Service.
To overlay an Exchange calendar, follow these steps:
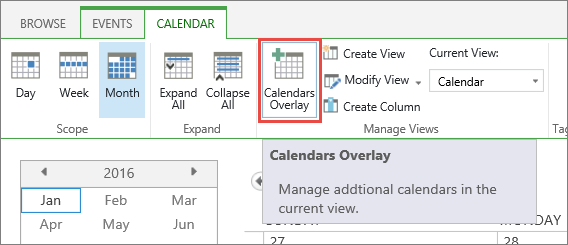
  1. In a SharePoint calendar, in the ribbon, on the Calendar tab, click Calendar Overlays.
    Calendar Overaly button on ribbon
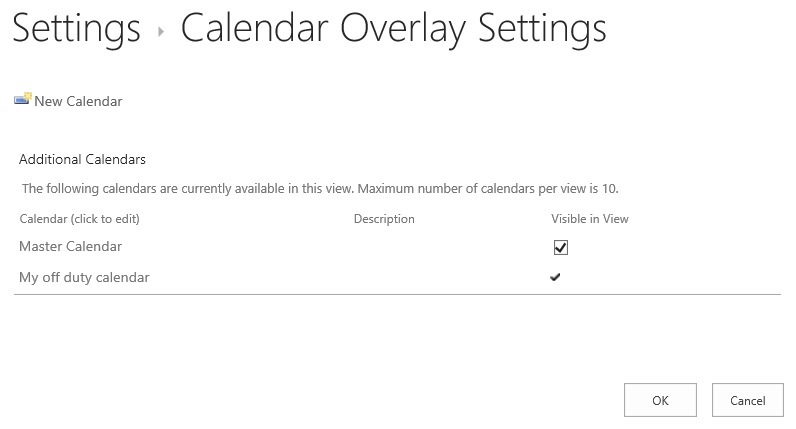
  2. In the Calendar Overlay Settings page, click New Calendar.
    Calendar Overaly button on ribbon
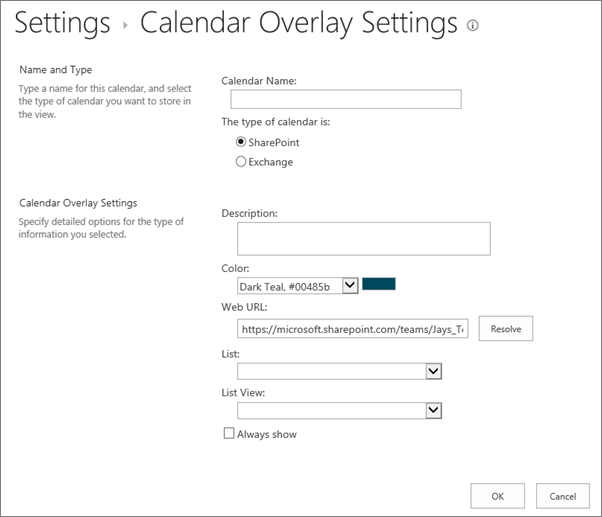
  3. In the Name and Type section, type the Calendar Name and select Exchange.
    Calendar overlay create calendar dialog box.
  4. In the Calendar Overlay Settings section, type a Description for the calendar (optional), and change the default Color theme for the calendar (optional).
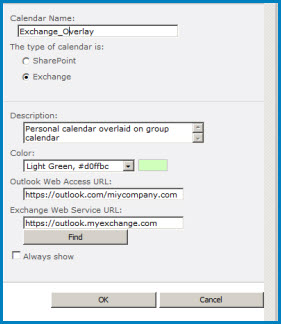
    Screenshot of the Calendar Overlay dialog box in SharePoint. The dialog box shows the Calendar name, calendar type (Exchange), and gives the URLs for Outlook Web Access and Exchange Web Access.
  5. Click Find to automatically fill in web addresses for Outlook Web Access URL and Exchange Web Service URL. If Find does not work in your environment, type the URLs manually.
  6. If you want this Exchange calendar to always appear with the SharePoint group calendar, click Always Show. When Always Show is not checked, you will be able to turn overlays on and off from the page. If it is checked, the overlay calendar will always appear on the page's calendar.
  7. Click OK and then click OK again.

See Also


Featured Posts

Exchange Online Limits - Office 365 Distribution group limits

Exchange Online Limits - Office 365 Distribution group limits What are Exchange Online Limits What are Office 365 Distribution group limi...