Building a local Steam caching server to ease the bandwidth blues
As Reference article :
https://arstechnica.com/gaming/2017/01/building-a-local-steam-caching-server-to-ease-the-bandwidth-blues/
A bit of Linux, a bit of Nginx, and boom—fast and free Steam downloads.

Aurich Lawson
If you play games on PC, where God intended them to be played, chances are you’ve got Steam installed. Since its troubled launch in 2003, Valve’s publishing platform has gone from a thing we had to grudgingly put up with in order to play Half Life 2 to the most popular digital game distribution tool on the planet. Most of us—me included—interact with it pretty much daily.
But as game distribution was shifting from physical to digital, ISPs also began implementing data caps—usually under the guise of “network management” (though anyone who thinks caps aren’t a pure revenue play should send me an e-mail, because I’ve got a bridge to sell you, cheap!). Steam is fast, Steam is easy, and Steam is ubiquitous—but if you’ve just rebuilt a PC or reinstalled an OS and you need to reinstall your games, Steam will obligingly help you put a giant dent in your cap—very quickly.
But there’s an alternative to having to re-download all your Steam games from the Internet: you can set up a local Steam caching server, so that once you download something, you’ve got it on your LAN instead of having to reach for it across the net and incur usage fees.
How this works
The idea is simple: when your computer’s Steam client needs to install or update an application, it contacts one or more of Valve’s SteamPipe content distribution servers. Valve has partnered with ISPs across the world so that most folks have SteamPipe content servers near them (“near” in terms of both physical distance and also network hops). This saves ISPs money on transit and peering.
SteamPipe is used to deliver what the client needs, be it a whole game or just an update, in roughly megabyte-size chunks. (Chunking like this allows developers to publish updates without having to push a whole new game package—they just invalidate old chunks and upload new ones.) As Valve points out on the SteamPipe developer community page, SteamPipe uses plain ol’ HTTP rather than a proprietary protocol. And that gives us the opportunity to stick our fingers into the process and mess with it.
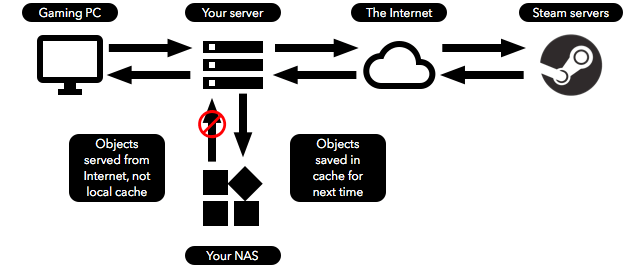
How things will work with our Steam caching server if what we want isn’t in cache.
Recall for a moment how a caching Web server works: a user hits a page, and the server checks its cache to see if the cache has what the user needs in it. If the cache does, the server delivers those objects directly. If not, the caching Web server forwards the request to a backend, retrieves whatever the user needs from that backend, and delivers it. Then the Web server stores the objects in cache for next time so it doesn’t have to bother the backend again.
What if we turn that process sort of inside out? What if we set up a caching Web server like Nginx locally? What if, instead of using the server as a reverse-proxy to cache responses for incoming requests from the Internet for a particular Web site... we use it as forward proxy (or just a regular proxy, I suppose) and cache the responses to our outgoing requests for Steam content?
It sounds like we’re inverting what a reverse-proxying Web server is supposed to be for and using it like a normal Squid-style proxy—but as it turns out, this actually works great.
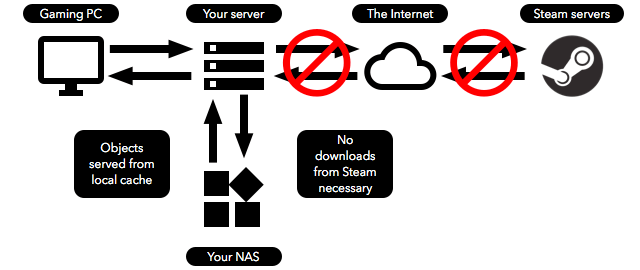
How things will work with our Steam caching server if what we want is in cache.
Did I say “great”? I meant “almost great.” There’s another piece of the puzzle. We need to screw around a bit with DNS for this to actually work. Steam doesn’t have a “check my local server first” option to make this caching thing an automated process, so we’ll need to add DNS entries to fake Steam into thinking that its SteamPipe content server actually is the local cache server we’re going to build.
All roads lead to Rome, but this is our road
Fortunately, none of this is actually as complicated as it sounds—and, as we’ll see, there are pre-built Docker images to do all of this for you, if you don’t want to get your hands dirty.
But before we proceed any farther, we need to go over exactly what you need for your local Steam cache server. As with so many projects, you can take a huge variety of paths to get to the destination; you can do this with nothing more than Windows and your gaming PC, or you can use a Windows or Linux virtual machine, or you can use an actual physical Windows or Linux server. You can keep your Steam cache on local disk or on a network share. You can use whatever application you want, provided it can forward and cache HTTP requests.
For this guide, we’re going to look at two specific configurations: Linux (specifically Ubuntu 16.04 LTS Server) with Docker for the easy way; and Linux (again, Ubuntu 16.04 LTS Server) on bare metal for the DIY way. Both configurations will store the actual cache depot on a network share—I set my depot up using iSCSI for a number of reasons external to this guide, but there’s nothing wrong with NFS (or even Samba, I guess). If you have a few terabytes of disk space, you can also put your depot local on your server. It’s all up to you and what works for you, but this guide will talk about putting your depot on a NAS and accessing it via a mounted NFS share.

Logos, logos everywhere!
The star of our show in both configurations is going to be Nginx, a fast and powerful Web server that runs a significant chunk of the World Wide Web (it’s second in popularity only to Apache, the Microsoft Word of Web servers). Nginx’s ability to maintain its own local content cache from an upstream source is what makes this entire process work. If Nginx sounds familiar to you, it’s because we’ve written about using it at great length with our Web Served series (and, yes, those articles are in dire need of update—that’s on my 2017 to-do list!).
Other tools could be employed here, too—most notably, a standard proxy server like Squid. And, in fact, guides are out there that tell you how to configure Squid for just that. But we’re going with Nginx primarily because of all the documentation out there to do it this way, and also because there are Docker images of working configurations we can pick apart and use.
For the DNS portion, you can fall back on old-fashioned host file editing or more modern (and flexible) actual DNS configuration. If you have a local instance of
dnsmasq or bind running on your LAN—say, on your NAT router or something—that’s where you’ll be working. If this sounds scary or complicated, fear not—the “easy way” method we’re about to describe will take care of everything for you. In the DIY section, we’ll be setting up bind and using that.
JUMP TO ENDPAGE 1 OF 4
A caveat: you can’t preload everything
One final thing we need to make absolutely clear: this caching server as we’re configuring it will not be preemptively downloading every Steam game for you. As near as I can tell from searching around and experimenting with the live configuration and the Steam command line tools, there is no way to get Steam to allow you to download games you haven’t purchased. Therefore, our setup will have the following two important limitations:
- You can only cache games that are already part of your Steam library
- You must download a game with Steam from the Internet at least once with the cache server running in order to cache that game
This means that our Steam cache server won’t necessarily help you right now. However, it can be a tremendous help to Future You, especially if Future You is going to be reinstalling Steam games. Once you download something, your cache server will hang onto it, and the next time you install it, it’ll be there to serve it to you over the LAN.
You also could use SteamCMD (or even the Steam client if you’re feeling masochistic) to warm your cache by downloading and then deleting all the items in your library. But that’s an exercise outside the scope of this guide.
Prerequisites: network shares, virtual machines, or whatever
The whole question of “how the hell do I set this up?” is a complicated one, since so many potential roads will get you there.
If you’re like me, you have a giant NAS in your closet with a few terabytes of available space, and that’s where you want your Steam cache to live. If that’s the case, make sure you create and mount your shares before you get started. I’m using an iSCSI target on my Synology NAS and connecting to it with the OpeniSCSI package from a physical Ubuntu 16.04 LTS server. You can do something similar, or use an NFS mount, or even a Samba share if you hate yourself.
If you’re doing this with a virtual machine, now’s the time to get the VM built and ready to go. You can attach a network share to it the same way as you do to a physical box. Once it's up, the procedures should all work the same.
If you’re going to keep everything installed on your gaming PC, then congrats: you don’t have to worry about network shares. However, you will have a bit more to do, since you’ll need to install Docker for Windows in order to run the Steam cache Docker images we’re going to grab in the next step.
One more major caveat for performance-obsessed folks who also want to do this all on a single computer: keep in mind that you’re going to effectively be running two lightweight virtual Linux machines on your computer, with the two Docker images we’re going to set up. The overall impact to the system won’t be huge, but it also won’t be zero. You will be sacrificing some RAM, some CPU, and some IO subsystem performance to the two Docker images. If this matters to you, then consider setting up a separate physical server for your Steam cache. You can pick up a dirt-cheap Intel Celeron NUC (along with 2-4GB of cheap RAM and a cheap disk) that will be more than adequate for the task.
A strong word of warning
Do not—repeat not—do any of this on a computer with ports 80 or 53 accessible to the Internet. If you’re insane or crazy and you keep your gaming PC set as your router’s DMZ host, for the love of God, don’t run these Docker images on your gaming PC. And also get your gaming PC out of the DMZ and configure port forwarding properly, because the only reason to leave a gaming PC as the DMZ host is laziness—find and fix the underlying issue!
The reasons for making damn sure this setup is properly firewalled and LAN-only are legion. But the short version is that you’re going to be installing services that could be heavily abused by malicious strangers if those services were reachable from the Internet.
This is a LAN-only experiment. Don’t be a bad sysadmin—keep what’s supposed to be on your local network contained on your local network.
Our setup
In order to keep this piece from spiraling into an enormous choose-your-own-adventure monstrosity of overlapping instructions for different configurations, this guide will make the following assumptions:
- Our server is going to be a standalone, physical computer
- Our server will run Ubuntu 16.04 LTS and Nginx mainline
- Our server will keep its cache on a network share, mounted to a directory on the local filesystem
This is the configuration I’m actually using at my house, so it comes with the bonus of knowing it’s functional and having a working config to refer to as I write everything up. Folks who are going to deviate from the baseline config above will have to wing it a bit. Most of the core steps will be applicable no matter where you’re running them, but there will be some particulars you’ll have to figure out on your own.
Create and mount your network share
To get started, we need to get our Steam cache depot location ready. Create the actual NFS share on your NAS or network location in whatever way you usually create NFS shares. (If you’ve got a Synology NAS like me, and you’ve never set up an NFS share before, these instructions should get you there.)
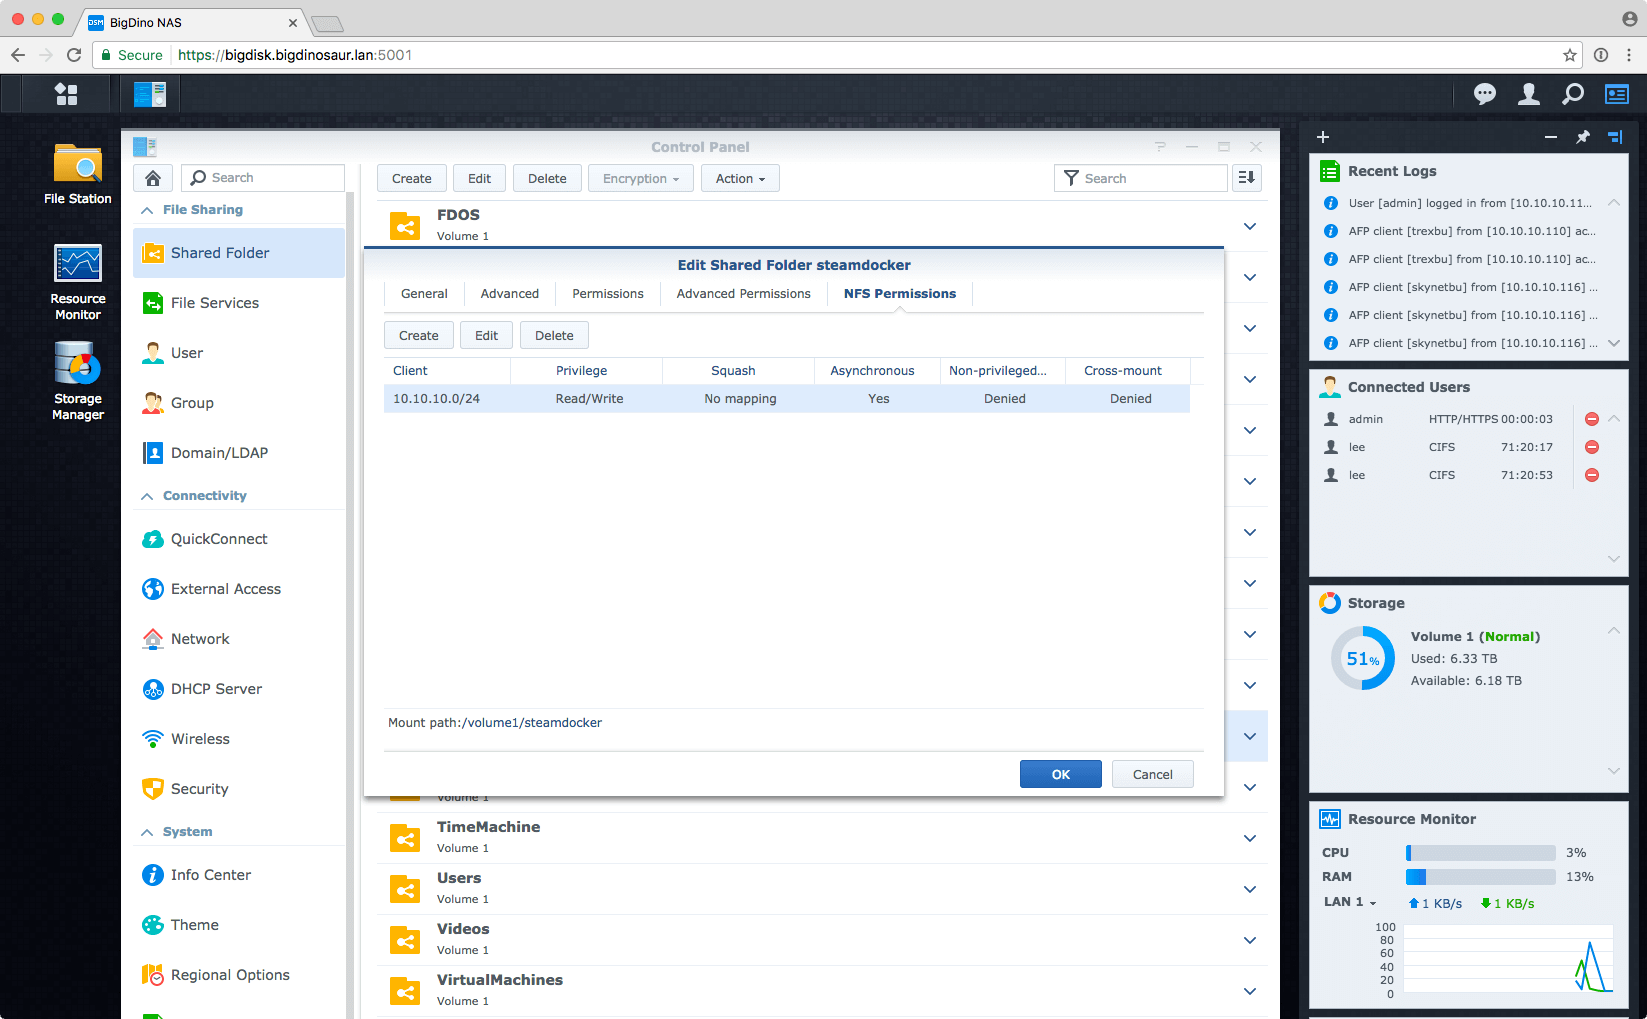
Enlarge / Creating an NFS share on a Synology NAS and modifying its permissions is pretty straightforward.
Then, get your Steam cache server ready to mount the share by installing the
nfs-common package, if you don’t have it installed already:$ sudo apt install nfs-common
Next, create a mount point on the server for the NFS share, and mount the share:
$ sudo mkdir -p /srv/steamcache/depot/
$ sudo mount [NAS IP address]:/nas/share/path /srv/steamcache/data/
If your NAS is at 192.168.1.2 and the NFS share you created on your NAS is
/volume1/steamdocker, you’d do this:$ sudo mount 192.168.1.2:/volume1/steamdocker /srv/steamcache/data
Then run
df |grep -i steam and make sure that the mount shows up in the output. If it does, you’re set.
The penultimate network step is to make the mount permanent, which you can do by editing
/etc/fstab and making the following addition at the bottom:192.168.1.2:/volume1/steamdocker /srv/steamcache/data nfs4 _netdev,auto,noatime 0 0
If you reboot the server, you should see the mount happen automatically after boot.
Lastly, let’s make the share readable and writable by everyone. This server won’t (or shouldn’t, at least) be accessible to anyone not on your LAN, so it’s OK to have the directory permissions wide open. This will also save us some headaches later in trying to properly define a permissions scheme—though if you want, you’re welcome to tighten the directory down once the Steam cache is online. Set the permissions with
chmod:$ sudo chmod -R 777 /srv/steamcache/data
And now we’re ready to split into two groups. If you’re going to stick with Docker, then the next section is for you. If you want to do things the manual (and more interesting!) way, then skip ahead.
The easy way: doing it with Docker
To do things the (mostly) easy way, we need to install Docker. Docker is sort of like VMware, but for applications instead of whole operating systems (that’s a gross oversimplification—if you want to read a bit more about Docker and containerization, you can start here and then get lost in the official docs).
To install Docker on Ubuntu, you should use the official install script by running the following command:
$ sudo curl -sSL https://get.docker.com/ | sh
The script automatically adds Docker’s repo to your sources list, installs Docker’s dependencies (particularly aufs), and then installs the latest version of Docker. You can use the
docker.io package in Canonical’s repo, but you won’t be on the latest version of Docker, and you might experience weirdness.
After Docker is installed, we’re going to pull down and run a pair of Docker images. One will be for the actual caching server (which will include Nginx and its configuration files), while the other deals with the DNS stuff.
The first image is the caching server itself. It comes courtesy of the SteamCache.Net project (you can read more about the image on the project’s Github page). Get it downloaded and running with the following Docker command:
$ sudo docker run --name steamcache --restart=always -d -v /srv/steamcache/data:/data/cache -p 80:80 steamcache/steamcache:latest
This command will pull the right Docker image down from the Internet and build a container for it. It then exposes port 80 on the container as port 80 on the actual server, tells the container to restart itself on system reboot, and then runs the container in the background. The command also attaches our
/srv/steamcache/data/ directory as /data/cache/ inside the running container. Why is that important? Because it’s the location the container’s instance of Nginx is preconfigured to use as its Steam cache depot.
Now that that’s running, we need to pull down the second Docker image to handle DNS. We will once again take advantage of the SteamCache.Net folks’ largess by using another of their Docker images. Run the following command, making sure to substitute in your server’s LAN IP address for the
STEAMCACHE_IP argument:$ sudo docker run --name steamcache-dns --restart=always -d -p 53:53/udp -e STEAMCACHE_IP=192.168.1.3 steamcache/steamcache-dns:latest
The
STEAMCACHE_IP argument sets an environment variable inside the running container that gets used by the DNS server there. That argument also means you can run the Steam cache server’s Docker image on a separate host from the DNS Docker image, if you happen to want to do that. We’re running them on the same host, so we just use the host’s LAN IP address. Again, make sure your server’s LAN IP address is in there, not 192.168.1.3. Unless your server’s LAN IP address is actually 192.168.1.3. In that case, you can leave it alone. Lucky you!
Now would be a good time to bounce the server to make sure everything’s sticking properly. So give it the ol’
sudo reboot and grab a cup of coffee or something, then make sure both images are running after reboot: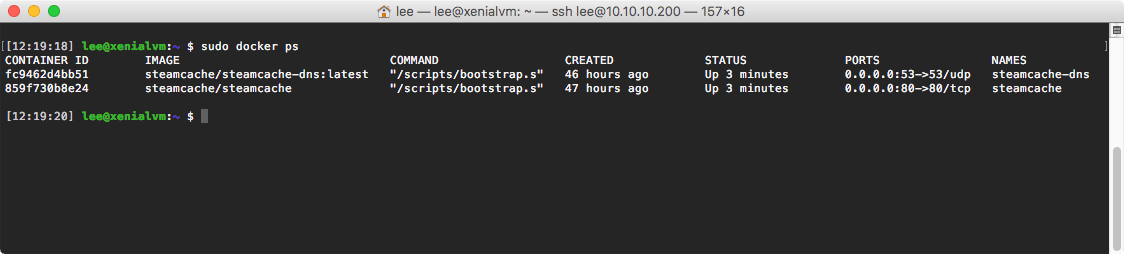
Enlarge / Checking on our running Docker containers after reboot.
Still running? Excellent. Finally, double check that your Steam cache server has the right local directory mounted by running a quick command inside of it and checking the output:
$ sudo docker exec steamcache /bin/sh -c "ls /data/cache"
That command ought to return a directory listing of the contents of
/srv/steamcache/ (you can touch a file in there from your physical machine if you need some kind of marker).
JUMP TO ENDPAGE 2 OF 4
A bit of DNS trickery and a big caveat
That DNS Docker image contains a preconfigured instance of
bind, the Unix DNS daemon that powers huge chunks of the Internet (and huge chunks of lots of private networks, too). The bind daemon listens for DNS queries, and when it gets queries that match a certain subset of Steam and SteamPipe hostnames (you can view the list of domains and servers it’s using by peeking at the Docker image’s bind config files), it will respond with your Steam cache server’s IP address instead of the real Valve IP addresses.
For all other queries, it looks up and returns the correct addresses, just like normal. Because you just installed a recursive DNS server.
Let’s dwell on this for a moment: if you’ve followed this guide, you are now running a fully functional recursive DNS server that will respond to queries from anywhere. This is one of the reasons why you want to ensure that this box is visible only on your LAN.
We’re shortly going to modify your gaming computer’s DNS settings to point at this new DNS server. That introduces several configuration issues you need to be aware of. If you rely upon a third-party DNS service like OpenDNS to filter content, you can’t use the Steam cache DNS server without some modifications (specifically, you’ll need to edit the
/etc/bind/named.conf.options file inside the Docker image and turn on forwarding, so that bind sends on queries to OpenDNS instead of trying to look them up itself). If you use your router’s DNS, then that too will no longer work; you’ll need to figure out another method.
There are ways around every problem, though: you can, for example, skip to the DIY section of the guide and set up your own instance of
bind to do the Steam lookups and forward all other queries to the location of your choice. You can, as noted, edit the /etc/bind/named.conf.options file inside the Docker image to add a forwarding option to the DNS server(s) of your choice. You might even just be able to cut DNS out of the picture entirely and edit your gaming PC’s hosts file to hard-code the Steam cache server’s IP address over the Valve server hostnames. But keep in mind that the lack of wildcard support in the Windows host file means that you’ll be adding a ton of entries; you might need to revise them constantly as Valve adds and removes content hosts.
However you choose to proceed, be aware that this Docker image will run a recursive DNS server on your LAN. If you don’t know or care about DNS, then this isn’t a problem. But if you have specialized needs, you’ll likely need to implement a specialized solution.
DNS check
All right, with those caveats out of the way, let’s verify that our new recursive DNS server instance is operating properly and that we get local lookups for SteamPipe content servers. Pop open a terminal window or a PowerShell window or whatever you’ve got on your operating system of choice. Fire a DNS query at your new server, substituting your server’s IP address:
$ dig @192.168.1.3 +short steamcache.cs.steampowered.com
Or, if you have a gaming PC running Windows 10, try it this way with PowerShell:
PS> Resolve-DnsName steamcache.cs.steampowered.com -server 192.168.1.3
However you do the lookup, you should see it return the address of your Steam cache box. If it does, then congrats—you’re almost done.
The final step is to point your gaming computer at your new DNS server. One way to do this is to modify your router’s settings and change the DNS address it hands out with DHCP. If you don’t know how or don’t want to do that, then you can override your gaming computer’s DNS settings directly.
To do that on Windows 10, pop into your Control Panel and type “Network connections” in the search bar at upper-right. Select “View network connections” from the search result before right-clicking on your Ethernet adapter and choosing “Properties” from the context menu. In the Properties box, click “Internet Protocol Version 4 (TCP/IPv4)” in the list of items, and then click the “Properties” button. In the second Properties box that appears, change the bottom radio button selection from “Obtain DNS server address automatically” to “Use the following DNS server addresses.” Add your Steam server’s LAN IP address in the “Preferred DNS server” box. Then hit OK to close the TCP/IP properties box, and OK again to close the Ethernet adapter property box.
That’s it. Skip down to the section titled “Watching it work” to see everything in action, or read on for the DIY way of setting up everything manually.
The harder but more interesting way: DIY
Hello, future-starter! I can see by that gleam in your eye that you’re not a do-it-the-easy-way kind of person, are you? That’s why you clicked on an article about proxying and caching Steam! That’s why you’re an Ars Technica reader! It’s always good to learn the manual way of doing things—no telling what the hell these computers might do if left to their own devices.
Honestly, the DIY setup isn’t all that complex: we’re going to take our little server, install and configure Nginx, and install and configure
bind. It’ll work every bit as well as doing things with Docker—better, even, because bare metal is always easier to deal with than whatever insane Docker bugs might crop up with your exact kernel version and device list (sorry, Docker devs—much love to you, but I’d never felt true despair until I was faced with trying to figure out a Docker networking bug).Get Nginx running on port 80
First, we’ll pull down and configure Nginx, our Web server and the application that handles the actual caching. To get Nginx installed, we want to add the recommended Nginx repo to our list of sources so that we’re working with something a little more current than the default version. Run the following commands to get set up:
$ sudo add-apt-repository ppa:nginx/development
$ sudo apt update
$ sudo apt install nginx
Don’t be scared off by the “development” branch up there. Per the Nginx FAQ, the “development” branch is actually Nginx’s “mainline” branch, which receives updates and features more quickly than the stable branch. There aren’t any downsides to using mainline instead of stable in a LAN-only setup like this.
We’re making the assumption here that the Steam cache is the only thing Nginx is going to be doing. Because of this, we can crib directly from the same Nginx config files used by the Steam cache Docker image. This saves us time and allows us to once again take advantage of the configuration work already done by the maintainers of that image.
So, with Nginx installed, let’s edit the main Nginx configuration file at
/etc/nginx/nginx.conf. Delete whatever’s in there and replace it with this:user www-data;
worker_processes auto;
pid /run/nginx.pid;
events {
worker_connections 4096;
multi_accept on;
use epoll;
}
http {
sendfile on;
tcp_nopush on;
tcp_nodelay on;
keepalive_timeout 65;
types_hash_max_size 2048;
include /etc/nginx/mime.types;
default_type application/octet-stream;
access_log /var/log/nginx/access.log;
error_log /var/log/nginx/error.log;
gzip on;
# Steam cache log format changes
log_format steamcache-default '$remote_addr - $remote_user [$time_local] "$request" $status $body_bytes_sent "$http_referer" "$http_user_agent" DEFAULT';
log_format steamcache-other '$remote_addr - $remote_user [$time_local] "$request" $status $body_bytes_sent "$http_referer" "$http_user_agent" OTHER';
log_format steamcache-local '$remote_addr - $remote_user [$time_local] "$request" $status $body_bytes_sent "$http_referer" "$http_user_agent" LOCAL';
log_format steamcache-remote '$remote_addr - $remote_user [$time_local] "$request" $status $body_bytes_sent "$http_referer" "$http_user_agent" REMOTE';
include /etc/nginx/sites-enabled/*;
}
If you want to tune the performance a bit, you can replace the
auto after worker_processes with your CPU’s physical core count.
Next, we need to edit the default site definition file and wipe out all the default stuff and replace it with the config options that enable Nginx to do its caching thing. Open up
/etc/nginx/sites-available/default/ for editing, and make its contents look like this:server {
listen *:80 default;
location / {
root /var/www/;
add_header Host $host;
}
}
Then, create a new site definition file in
/etc/nginx/sites-available named steamcache and populate it with these lines:server {
listen 80;
server_name *.cs.steampowered.com content1.steampowered.com content2.steampowered.com content3.steampowered.com content4.steampowered.com content5.steampowered.com content6.steampowered.com content7.steampowered.com content8.steampowered.com *.steamcontent.com *.steampipe.steamcontent.com;
root /srv/steamcache/data;
index index.html index.htm;
access_log /srv/steamcache/logs/access.log steamcache-default;
error_log /srv/steamcache/logs/error.log;
proxy_temp_path /tmp/nginx/ 1 2;
resolver 8.8.8.8;
location /depot/ {
try_files $uri @mirror;
access_log /srv/steamcache/logs/access.log steamcache-local;
}
location / {
proxy_next_upstream error timeout http_404;
proxy_pass http://$host$request_uri;
proxy_redirect off;
proxy_set_header Host $host;
proxy_set_header X-Real-IP $remote_addr;
proxy_set_header X-Forwarded-For $proxy_add_x_forwarded_for;
add_header X-Mirror-Upstream-Status $upstream_status;
add_header X-Mirror-Upstream-Response-Time $upstream_response_time;
add_header X-Mirror-Status $upstream_cache_status;
add_header Host $host;
access_log /srv/steamcache/logs/access.log steamcache-other;
}
location @mirror {
proxy_store on;
proxy_store_access user:rw group:rw all:r;
proxy_next_upstream error timeout http_404;
proxy_pass http://$host$request_uri;
proxy_redirect off;
proxy_set_header Host $host;
proxy_set_header X-Real-IP $remote_addr;
proxy_set_header X-Forwarded-For proxy_add_x_forwarded_for;
add_header X-Mirror-Upstream-Status $upstream_status;
add_header X-Mirror-Upstream-Response-Time $upstream_response_time;
add_header X-Mirror-Status $upstream_cache_status;
access_log /srv/steamcache/logs/access.log steamcache-remote;
}
}
Then, we need to create a symbolic link in the
sites-enabled directory to the new site definition file, so Nginx knows to enable it, and then we need to reload Nginx so the new configuration is active. While we’re at it, we’ll create the directories we’re going to use for logging and Steam package ID storage, and ensure permissions on all the Steam cache directories are set:$ sudo ln -s /etc/nginx/sites-available/steamcache /etc/nginx/sites-enabled/steamcache $ sudo mkdir /srv/steamcache/logs /srv/steamcache/info $ sudo chmod -R 777 /srv/steamcache/ $ sudo chown -R www-data:www-data /srv/steamcache $ sudo systemctl reload nginx
Quickly explaining the Nginx options
Briefly and without digging into every single line in the Nginx configuration, what we’ve done above is to tell Nginx to listen on TCP port 80 for incoming HTTP traffic where the hostname headers match the list on the
server_name line in the steamcache file (we’ve kept the default site definition as a catchall safety—anything Nginx receives that doesn’t match the steamcache list will get matched by the default site definition and effectively ignored).
We’ve then set up three “locations,” which in Nginx-speak are strings to match against the request URI. The most interesting is the
depot location, which is what a Steam client requesting SteamPipe chunk files will hit (that is, Steam attempts to access the /depot path on one of the SteamPipe content servers, and Nginx knows to proxy that request because of this location directive). When Nginx gets a request for http://one.of.our.steam.server.names/depot, it then uses a special command called try_files to first look in its local cache (which it knows about because of the root declaration a bit further up in the server block) for the thing being requested, and if it doesn’t find it, to send the request to the @mirror location (here’s the Nginx command reference for try_files—neat!).
The
@mirror location doesn’t match anything in the URI—instead, it’s a virtual location, allowing us to pin behavior or actions on something other than a URI match. This location directive activates Nginx’s proxy storage function and sets some options around it, and then does something sneaky:proxy_pass http://$host$request_uri;
It passes the request (after setting some HTTP headers) straight on to the original Steam server URL, and delivers whatever the Steam servers return straight to your Steam client—and also to your Steam cache.
But wait—aren’t we going to be using our own modified DNS settings so that we specifically can’t talk to Steam’s servers directly? How does Nginx know how to find and contact SteamPipe when we’re screwing around with DNS to keep that from happening?
The answer is in the config. There’s one line that exempts Nginx from our DNS shenanigans:
resolver 8.8.8.8;
We’ve told Nginx to use Google’s DNS servers and not our LAN’s DNS servers. This is the secret sauce that enables Nginx to reach out and grab what we need from Steam.
The remaining location (with just the slash) is the default location, since it matches everything that the other two don’t (Nginx evaluates location matching in order). It also uses the
proxy_pass function to relay whatever requests it gets up to Steam, but without caching the response. We only care about caching /depot requests.Bind your DNS well
The last major step is to set up local DNS so that we get our Steamcache server when we look up SteamPipe hostnames. To do that, we’re going to install and configure
bind.
Grab
bind from Canonical’s repositories, and then stop the newly-installed service from running so we can do some surgery on it.$ sudo apt install bind9 $ sudo systemctl stop bind9
To get
bind working like we want, we’ll once again crib from our Steamcache Docker packages—this time from the DNS image. Briefly, we’re going to build a minimal bind configuration, and then we’re going to create DNS zone files for all of the SteamPipe servers we want to redirect. The zone files will happily respond to SteamPipe DNS requests with our Steamcache server.
The main
bind config files live in /etc/bind/, so we’ll start there. First, edit the named.conf file so that it looks like this:include "/etc/bind/named.conf.options"; include "/etc/bind/named.conf.local"; include "/etc/bind/named.conf.default-zones"; include "/etc/bind/steamcache.conf";
This tells our DNS server to also parse an extra config file named
steamcache.conf when it starts up. We’ll get to that file in a moment.
Then, edit the
named.conf.options file so that it looks like this:options {
directory "/var/cache/bind";
dnssec-validation auto;
auth-nxdomain no;
allow-recursion {
192.168.1.0/24;
};
allow-query {
192.168.1.0/24;
};
allow-query-cache {
192.168.1.0/24;
};
forwarders {
8.8.8.8;
8.8.4.4;
};
};
This is essentially the same config as the Docker image uses, but with the options tightened down a bit to only allow servers on your LAN to make queries—you’ll want to replace
192.168.1.0/24 with whatever CIDR netblock you’re using for your LAN.
We’re also using the
forwarders block to allow you to use whatever DNS you were using before this all started—if that’s desirous. If you aren’t using services provided by third-party DNS, then you can leave the forwarders section out. If you don’t know or care about the specifics of a forwarding DNS server versus a caching recursive DNS server, leave it like it is above (pointing at Google’s DNS servers).
Next, we need to create a new file called
steamcache.conf, and populate it with these lines:zone "cs.steampowered.com" in { type master; file "/var/lib/bind/db.cs.steampowered.com"; };
zone "content1.steampowered.com" in { type master; file "/var/lib/bind/db.content_.steampowered.com"; };
zone "content2.steampowered.com" in { type master; file "/var/lib/bind/db.content_.steampowered.com"; };
zone "content3.steampowered.com" in { type master; file "/var/lib/bind/db.content_.steampowered.com"; };
zone "content4.steampowered.com" in { type master; file "/var/lib/bind/db.content_.steampowered.com"; };
zone "content5.steampowered.com" in { type master; file "/var/lib/bind/db.content_.steampowered.com"; };
zone "content6.steampowered.com" in { type master; file "/var/lib/bind/db.content_.steampowered.com"; };
zone "content7.steampowered.com" in { type master; file "/var/lib/bind/db.content_.steampowered.com"; };
zone "content8.steampowered.com" in { type master; file "/var/lib/bind/db.content_.steampowered.com"; };
zone "steamcontent.com" in { type master; file "/var/lib/bind/db.steamcontent.com"; };
This file defines the zones to which we’ll be responding directly with our Steam cache server’s address (in DNS-speak, these are the zones over which our DNS server will have authoritative control).
Speaking of zone files—now it’s time to create ‘em. Fortunately, we only need to carve out three, since all of the
content*.steampowered.com servers reference the same zone file.
Head on over to
/var/lib/bind/ and we’ll get those files written. First, create a file named db.cs.steampowered.com and populate it thusly:$ORIGIN cs.steampowered.com.
$TTL 600
@ IN SOA ns1 dns.steamcache.net. (
2015040800
604800
600
600
600 )
@ IN NS ns1
ns1 IN A 192.168.1.3
steamcache IN A 192.168.1.3
* IN CNAME steamcache.cs.steampowered.com.
Briefly (there’s that word again!), this sets up the
cs.steampowered.com zone, defines the nameserver for that zone, and then sets up some A-records and a CNAME so that the DNS server knows what addresses to serve up in response to queries. Substitute in your Steam cache server’s LAN IP address for 192.168.1.3.
Next, let’s create and populate
db.content_.steampowered.com:$TTL 600
@ IN SOA ns1 dns.steamcache.net. (
2015040800
604800
600
600
600 )
@ IN NS ns1
ns1 IN A 192.168.1.3
@ IN A 192.168.1.3
Same deal as above—substitute in your Steamcache server’s LAN IP address for 192.168.1.3.
Finally, let’s do
db.steamcontent.com:$ORIGIN steamcontent.com.
$TTL 600
@ IN SOA ns1 dns.steamcache.net. (
2016060800
604800
600
600
600 )
@ IN NS ns1
ns1 IN A 192.168.1.3
steamcache IN A 192.168.1.3
* IN CNAME steamcache.steamcontent.com.
*.steampipe IN CNAME steamcache.steamcontent.com.
And once again, make sure to put in the right IP address.
Our DNS server should now be properly configured—now we just have to start it up:
$ sudo systemctl start bind9
The last DNS operation you need to do is to point your gaming PC at this new DNS server. The steps to do that are the exact same as they were a few sections up—get into your network card properties, go to the TCP/IP properties there, and override the DHCP DNS settings manually with your Steam cache server’s IP address. Refer back to the “DNS check” section of this article for details.
JUMP TO ENDPAGE 3 OF 4
And a script to watch over all
We’re almost completely done with this whole adventure—the only thing left is to put together a quick script that will let us watch over our Steam cache box and see if it’s actually proxying and caching stuff.
Credit once again goes to the Steamcache.net folks, as we’ll be reusing and adapting the log-watcher script from their Docker container. Create a new file in your home directory called
watchlog.sh and make it look like this:#!/bin/sh
############################
#
# This script will show the log from the Steam Cache in colours
# (Red: Remote, Green: Local, Orange: other).
# Where it can, it will try and find the name of the depot being
# downloaded and show that as part of the output.
#
############################
STEAMCACHE_LOGS=/srv/steamcache/logs
STEAMCACHE_DEPOTINFO=/srv/steamcache/info
echo "Watching logs..."
getGameName() {
if ! [ -s ${STEAMCACHE_DEPOTINFO}/${1} ]; then
wget -O ${STEAMCACHE_DEPOTINFO}/$1 https://steamdb.info/depot/$1/ >/dev/null 2>&1
fi
#Allows for when something goes wrong with the name.
G=`cat ${STEAMCACHE_DEPOTINFO}/${1} | grep "\<h1>" | sed 's/.*header-title\">//;s/<\/h1.*//'`
echo $G
}
mkdir -p ${STEAMCACHE_DEPOTINFO}
tail -F ${STEAMCACHE_LOGS}/access.log | while read LINE; do
GAMEID=`echo ${LINE} | grep "\/depot" | sed 's/.*\/depot\/\([0-9]*\)\/.*/\1/'`
if ! [ "x${GAMEID}" = "x" ]; then
GAMENAME=`getGameName ${GAMEID}`
else
GAMENAME="none"
fi
echo "(${GAMENAME}) ${LINE}" | awk '
/LOCAL/ {print "\033[32m" $0 "\033[39m"}
/REMOTE/ {print "\033[31m" $0 "\033[39m"}
/OTHER/ {print "\033[33m" $0 "\033[39m"}
'
done
Make sure to mark the script as executable:
$ chmod +x watchlog.sh
Watching it work
If you’re a Docker user who’s just skipped over the DIY section and are now rejoining us, welcome back! At this point everything should be operational and we’re ready to run our
watchlog script.
I ran into some trouble getting the script to work if the two Nginx log files don’t already exist—trying to pre-create them via
touch didn’t seem to work correctly. So, at this point, first try to download something in Steam—anything at all, though preferably something tiny. That will create the log files, and then we’ll be good to go.
For the Docker folks, you’ll need to run the following command to execute the script, which is already built and ready to go inside the container:
$ sudo docker exec steamcache /scripts/watchlog.sh
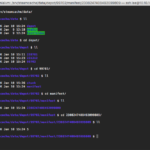
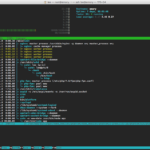
For the DIY folks, you can just run the script directly, without any Docker business. However you execute it, you should see a blank window to start with, because nothing’s being proxied.
The script might also start off displaying a few lines from your previous test download—that’s okay, too. They will probably be red, because with this script, red is used to show chunks that had to be retrieved from Steam rather than from cache.
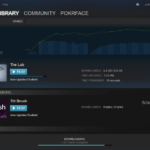
Leave the script running, and pop back to your Steam client and uninstall the thing you just downloaded—and then install it again. The log window should fill up with green text—every green line is a chunk that was served out of cache rather than from the Internet.

Enlarge / Go, little cache server, go!
Depending on your Internet connection speed, you may also notice a significant bump in download throughput (you folks on Google Fiber can start gloating now). I’ve set this cache system up several different ways in preparing and writing this article, and when running the caching server in a cut-down virtual machine with a single CPU core on the same physical server as Steam, I don’t get that much of a boost. But when running it on a separate physical box, I see speeds of about 500Mbps from the caching server.
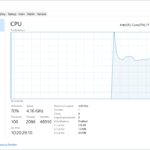
Based on the observed loads in Windows, the bottleneck appears to be my gaming PC—when pulling Steam data at that rate, decoding the chunks into files, and writing the files out to disk, Windows reports that my i7-6700K CPU is tasked pretty heavily—between 60-70%. By contrast, Nginx is barely ticking over, showing 1-2% CPU usage on the caching server. (Nginx is very, very good at quickly and efficiently serving up static objects—that’s what it was built to do, after all!)

As for the depot itself, you can certainly poke around if you wish, but there’s not much to see. Everything is identified by Valve’s catalog numbers, so the entire depot is essentially a big hierarchy inscrutably named directories and files.
Congrats! But do you want to go farther?
You now have a fully operational local Steam caching server. Hooray! Go on a download tear, cache up everything you need to download, and never worry about your data cap again. Well, except for the next couple of months, where you might blow your cap out of the water warming up the cache.

Enlarge / Writing this piece was a lot easier thanks to VMware and snapshots—I could go back and forth through the various stages as I needed to triple-check myself.
But you’ve done all this work, and it only helps you with Steam. There are other game services out there. What about Origin? What about Battle.Net?
Ah, those wily Steamcache.Net folks—it turns out they have an answer for everything. If you want to expand your caching server to other services, grab their generic caching Docker image and dig in. The configuration there can be adapted to work with Riot Games, Frontier, Battle.Net, Uplay—and even Windows Update. Origin, though, presents a special challenge—for one, the service has switched to using HTTPS, making caching more complicated. For another, Origin downloads are extents—that is, they are a specified range of large multi-gigabyte files rather than individual files themselves. This also complicates Origin caching. Per this reddit thread, caching Origin data requires you to either locally NAT your server's port 443 to Origin, or install an SNI proxy and use it to forward the Origin client's TLS requests to Origin while still enabling you to cache the returned data. As of this writing, I haven't put in the work necessary to test out Origin caching, but I would very much like to get it working.
One final option for making your LAN gaming cache more complete: you could abandon what we've done so far and instead use this completely different Nginx-based configuration. It doesn't include DNS, so you'll still need to handle that part, but it appears based on the documentation that it will automatically handle all the major gaming services (including Origin).
And that, dear reader, is finally it. As we close and the lights dim and you ride off into the sunset with your new games and your new server, I’d like to point out that we made it through an entire 7,000-word article about caching and I didn’t make a GIMME THE CACHE joke even once. Do you know how difficult that was? You’ll have to forgive me if I can’t quite wrap this piece up without linking to the clip. It is a very nice hat, after all.
TelcomCanada.com
www.incoreporation.com


No comments:
Post a Comment