What happens when a domain gets deleted after it expired?
Please note that you get 36 days to renew the domain after which the domain enters the "Queued For Deletion" phase which lasts for 6 days where you will neither be able to renew the domain nor restore it.
After this phase, the domain enters the restoration phase which lasts for 30 days where you will be able to restore the domain but at a higher cost.
Please note that once the domain passes the restoration phase the domain is held by the registry for 4 to 6 days and will be made available for fresh registration on first come first serve basis.
Please note that we cannot give you an exact time frame when the domain will be made available for fresh registration.
You will have to keep a track of the domain in order to register it on first come first serve basis.
Kindly note that we cannot control the back ordering process as it is handled by third-party organizations.
This article helps IT administrators simplify Windows enrollment for their users. Once you've set up Intune, users enroll Windows devices by signing in with their work or school account.
As an Intune admin, you can simplify enrollment in the following ways:
Two factors determine how you can simplify Windows device enrollment:
Do you use Azure Active Directory Premium? Azure AD Premium is included with Enterprise Mobility + Security and other licensing plans.
What versions of Windows clients will users enroll? Windows 10 devices can automatically enroll by adding a work or school account. Earlier versions must enroll using the Company Portal app.
Intune supports multiple users on devices that both:
run the Windows 10 Creator's update
are Azure Active Directory domain-joined.
When standard users sign in with their Azure AD credentials, they receive apps and policies assigned to their user name. Only the device's Primary user can use the Company Portal for self-service scenarios like installing apps and performing device actions (Remove, Reset). For shared Windows 10 devices that do not have a primary user assigned, the Company Portal can still be used to install Available apps.
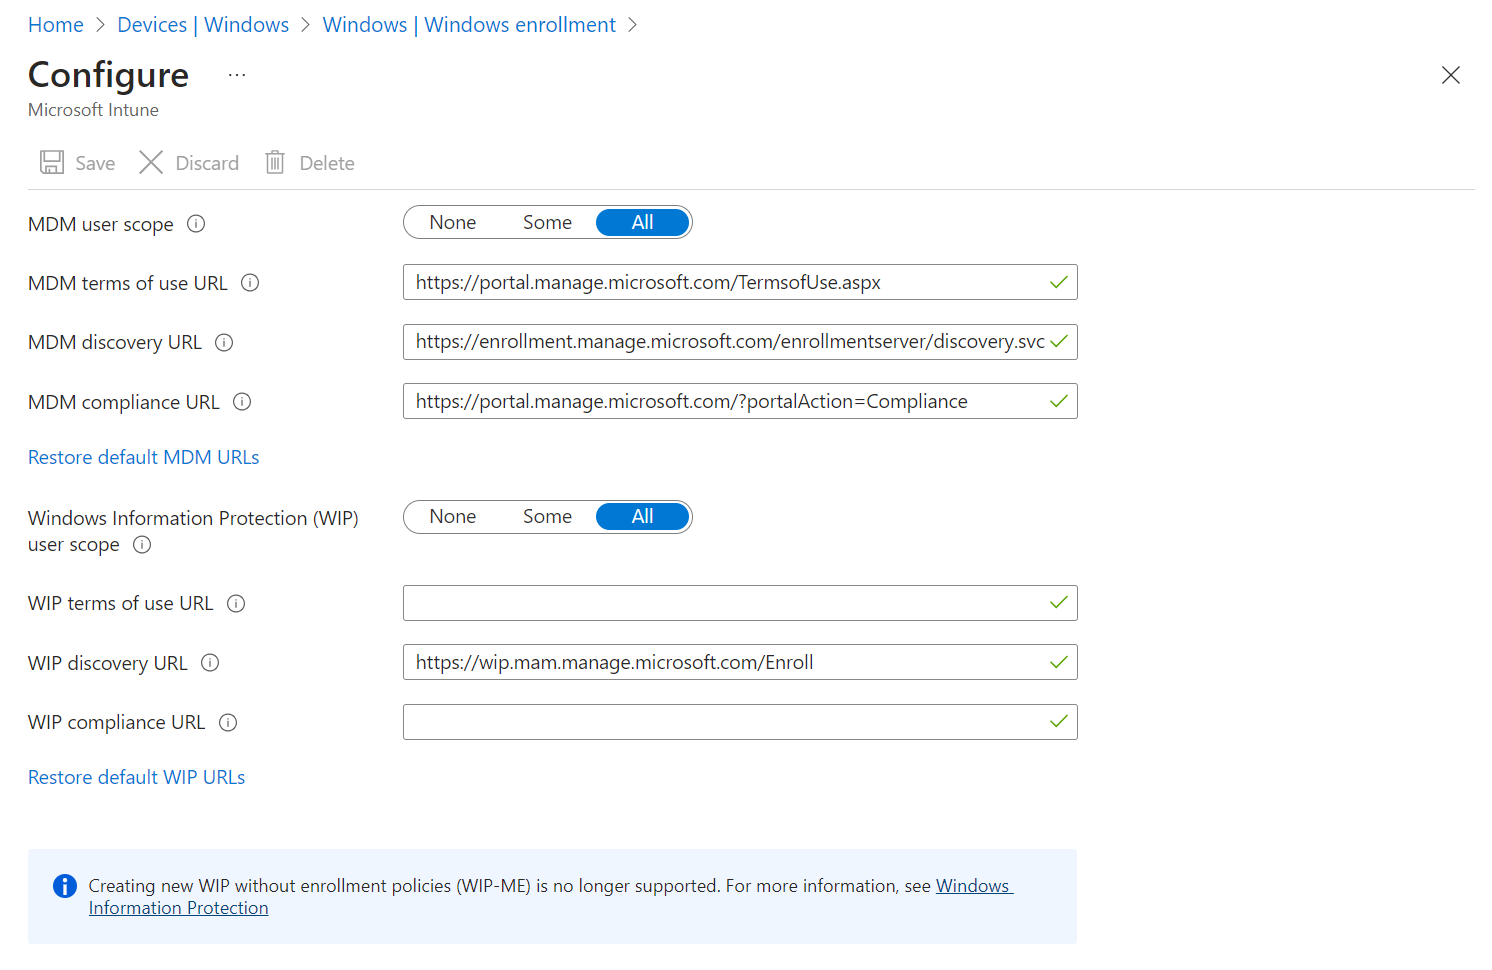
Enable Windows 10 automatic enrollment
Automatic enrollment lets users enroll their Windows 10 devices in Intune. To enroll, users add their work account to their personally owned devices or join corporate-owned devices to Azure Active Directory. In the background, the device registers and joins Azure Active Directory. Once registered, the device is managed with Intune.
Sign in to the Azure portal, and select Azure Active Directory.
Select Mobility (MDM and MAM).
Select Microsoft Intune.
Configure MDM User scope. Specify which users' devices should be managed by Microsoft Intune. These Windows 10 devices can automatically enroll for management with Microsoft Intune.
None - MDM automatic enrollment disabled
Some - Select the Groups that can automatically enroll their Windows 10 devices
All - All users can automatically enroll their Windows 10 devices
Important
For Windows BYOD devices, the MAM user scope takes precedence if both the MAM user scope and the MDM user scope (automatic MDM enrollment) are enabled for all users (or the same groups of users). The device will not be MDM enrolled, and Windows Information Protection (WIP) Policies will be applied if you have configured them.
If your intent is to enable automatic enrollment for Windows BYOD devices to an MDM: configure the MDM user scope to All (or Some, and specify a group) and configure the MAM user scope to None (or Some, and specify a group – ensuring that users are not members of a group targeted by both MDM and MAM user scopes).
For corporate devices, the MDM user scope takes precedence if both MDM and MAM user scopes are enabled. The device will get automatically enrolled in the configured MDM.
Note
MDM user scope must be set to an Azure AD group that contains user objects.
Use the default values for the following URLs:
MDM Terms of use URL
MDM Discovery URL
MDM Compliance URL
Select Save.
By default, two-factor authentication is not enabled for the service. However, two-factor authentication is recommended when registering a device. To enable two-factor authentication, configure a two-factor authentication provider in Azure AD and configure your user accounts for multi-factor authentication. See Getting started with the Azure Multi-Factor Authentication Server.
Simplify Windows enrollment without Azure AD Premium
To simplify enrollment, create a domain name server (DNS) alias (CNAME record type) that redirects enrollment requests to Intune servers. Otherwise, users trying to connect to Intune must enter the Intune server name during enrollment.
Step 1: Create CNAME (optional) Create CNAME DNS resource records for your company's domain. For example, if your company's website is contoso.com, you would create a CNAME in DNS that redirects EnterpriseEnrollment.contoso.com to enterpriseenrollment-s.manage.microsoft.com.
Although creating CNAME DNS entries is optional, CNAME records make enrollment easier for users. If no enrollment CNAME record is found, users are prompted to manually enter the MDM server name, enrollment.manage.microsoft.com.
SIMPLIFY WINDOWS ENROLLMENT WITHOUT AZURE AD PREMIUM
Type
Host name
Points to
TTL
CNAME
EnterpriseEnrollment.company_domain.com
EnterpriseEnrollment-s.manage.microsoft.com
1 hour
CNAME
EnterpriseRegistration.company_domain.com
EnterpriseRegistration.windows.net
1 hour
If the company uses more than one UPN suffix, you need to create one CNAME for each domain name and point each one to EnterpriseEnrollment-s.manage.microsoft.com. For example, users at Contoso use the following formats as their email/UPN:
name@contoso.com
name@us.contoso.com
name@eu.contoso.com
The Contoso DNS admin should create the following CNAMEs:
TABLE 3
Type
Host name
Points to
TTL
CNAME
EnterpriseEnrollment.contoso.com
EnterpriseEnrollment-s.manage.microsoft.com
1 hour
CNAME
EnterpriseEnrollment.us.contoso.com
EnterpriseEnrollment-s.manage.microsoft.com
1 hour
CNAME
EnterpriseEnrollment.eu.contoso.com
EnterpriseEnrollment-s.manage.microsoft.com
1 hour
EnterpriseEnrollment-s.manage.microsoft.com – Supports a redirect to the Intune service with domain recognition from the email's domain name
Changes to DNS records might take up to 72 hours to propagate. You can't verify the DNS change in Intune until the DNS record propagates.
Additional endpoints are used but no longer supported
EnterpriseEnrollment-s.manage.microsoft.com is the preferred FQDN for enrollment. There are two other endpoints that have been used by customers in the past and still work, but they are no longer supported. EnterpriseEnrollment.manage.microsoft.com (without the -s) and manage.microsoft.com both work as the target for the auto-discovery server, but the user will have to touch OK on a confirmation message. If you point to EnterpriseEnrollment-s.manage.microsoft.com, the user won't have to do the additional confirmation step, so this is the recommended configuration
Alternate Methods of Redirection Are Not Supported
Using a method other than the CNAME configuration is not supported. For example, using a proxy server to redirect enterpriseenrollment.contoso.com/EnrollmentServer/Discovery.svc to either enterpriseenrollment-s.manage.microsoft.com/EnrollmentServer/Discovery.svc or manage.microsoft.com/EnrollmentServer/Discovery.svc is not supported.
In the Domain box, enter the company website and then choose Test.
Tell users how to enroll Windows devices
Tell your users how to enroll their Windows devices and what to expect after they're brought into management.
Note
End users must access the Company Portal website through Microsoft Edge to view Windows apps that you've assigned for specific versions of Windows. Other browsers, including Google Chrome, Mozilla Firefox, and Internet Explorer do not support this type of filtering.
If you do not have Auto-MDM enrollment enabled, but you have Windows 10 devices that have been joined to Azure AD, two records will be visible in the Intune console after enrollment. You can stop this by making sure that users with Azure AD joined devices go to Accounts > Access work or school and Connect using the same account.
Azure Active Directory has a different CNAME that it uses for device registration for iOS/iPadOS, Android, and Windows devices. Intune conditional access requires devices to be registered, also called "workplace joined". If you plan to use conditional access, you should also configure the EnterpriseRegistration CNAME for each company name you have.
Windows 10 auto enrollment and device registration
This section applies to US government cloud customers.
Although creating CNAME DNS entries is optional, CNAME records make enrollment easier for users. If no enrollment CNAME record is found, users are prompted to manually enter the MDM server name, enrollment.manage.microsoft.us.
WINDOWS 10 AUTO ENROLLMENT AND DEVICE REGISTRATION
Tutorial: Use Autopilot to enroll Windows devices in Intune
3 minutes to read
Windows Autopilotsimplifies enrolling devices. With Microsoft Intune and Autopilot, you can give new devices to your end users without the need to build, maintain, and apply custom operating system images.
In this tutorial, you'll learn how to:
Add devices to Intune
Create an Autopilot device group
Create an Autopilot deployment profile
Assign the Autopilot deployment profile to the device group
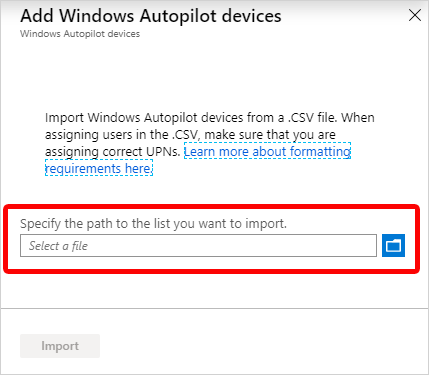
The first step in setting up Windows Autopilot is to add the Windows devices to Intune. All you have to do is create a CSV file and import it into Intune.
In any text editor, create a list of comma-separated values (CSV) that identify the Windows devices. Use the following format:
UnderAdd Windows Autopilot devices, browse to the CSV file you saved.
ChooseImportto start importing the device information. Importing can take several minutes.
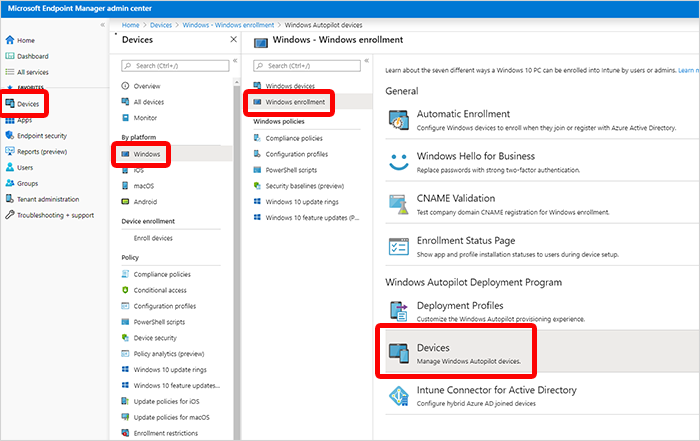
After import is complete, chooseDevices>Windows>Windows enrollment>Devices(underWindows Autopilot Deployment Program>Sync. A message displays that the synchronization is in progress. The process might take a few minutes to complete, depending on how many devices you're synchronizing.
Refresh the view to see the new devices.
Create an Autopilot device group
Next, you'll create a device group and put the Autopilot devices you just loaded into it.
ForGroup name, enterAutopilot Group. ForGroup description, enterTest group for Autopilot devices.
ForMembership type, choose eitherAssigned.
In theGroupblade, chooseMembersand add the Autopilot devices to the group. Autopilot devices that aren't yet enrolled are devices where the name equals the serial number of the device.
ChooseCreate.
Create an Autopilot deployment profile
After creating a device group, you must create a deployment profile so that you can configure the Autopilot devices.
On theBasicspage, forName, enterAutopilot Profile. ForDescription, enterTest profile for Autopilot devices.
SetConvert all targeted devices to AutopilottoYes. This setting makes sure that all devices in the list get registered with the Autopilot deployment service. Allow 48 hours for the registration to be processed.
SelectNext.
On theOut-of-box experience (OOBE)page, forDeployment mode, chooseUser-driven. Devices with this profile are associated with the user enrolling the device. User credentials are required to enroll the device.
In theJoin to Azure AD asbox, chooseAzure AD joined.
Configure the following options and leave others set to the default:
End-user license agreement (EULA):Hide
Privacy settings:Show
User account type:Standard
SelectNext.
On theAssignmentspage, chooseSelected groupsforAssign to.
ChooseSelect groups to include, chooseAutopilot Group.
SelectNext.
On theReview + Createpage, chooseCreateto create the profile.
Distribute devices to users
You can now distribute the Windows devices to your users. When they sign in for the first time, the Autopilot system will automatically enroll and configure the devices.
Clean up resources
If you don't want to use Autopilot devices anymore, you can delete them.
As an Intune administrator, you can enroll Android devices in the following ways:
Android Enterprise (offering a set of enrollment options that provide users with the most up-to-date and secure features):
Android Enterprise personally-owned with a work profile: For personal devices granted permission to access corporate data. Admins can manage work accounts, apps, and data. Personal data on the device is kept separate from work data and admins don't control personal settings or data.
Android Enterprise dedicated: For corporate-owned, single use devices, such as digital signage, ticket printing, or inventory management. Admins lock down the usage of a device for a limited set of apps and web links. It also prevents users from adding other apps or taking other actions on the device.
Android Enterprise fully managed: For corporate-owned, single user devices used exclusively for work and not personal use. Admins can manage the entire device and enforce policy controls unavailable to personally-owned/corporate-owned work profiles.
Android device administrator, including Samsung Knox Standard devices and Zebra devices. In areas where Android Enterprise is available, Google is encouraging movement off device administrator (DA) management by decreasing its management support in new Android releases. However, where Android Enterprise or Google Mobile Services (GMS) are unavailable, you'll want to use device administrator and familiarize yourself with these changes. For more information, see Is Android Enterprise available in my country?
Prerequisites
To prepare to manage mobile devices, you must set the mobile device management (MDM) authority to Microsoft Intune. See Set the MDM authority for instructions. You set this item only once, when you are first setting up Intune for mobile device management.
For devices manufactured by Zebra Technologies, you may need to grant the Company Portal additional permissions depending on the capabilities of the specific device. Mobility Extensions on Zebra devices has more details.
Enroll your personal or corporate-owned Android device to get secure access to company email, apps, and data. Company Portal supports Android devices, including Samsung Knox, running Android 4.4 and later.
Note
Samsung Knox is a type of security that certain Samsung devices use for additional protection outside of what native Android provides. To check if you have a Samsung Knox device,> go to Settings > About device. If you don't see Knox version listed there, you have a native Android device.
During enrollment, you might be asked to choose a category that best describes how you use your device. Your company support uses your answer to check the apps that you have access to.
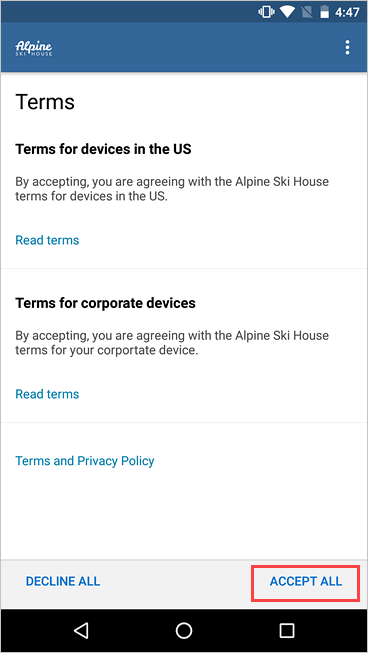
Open the Company Portal app and sign in with your work or school account.
If you're prompted to accept your organization's terms and conditions, tap ACCEPT ALL.
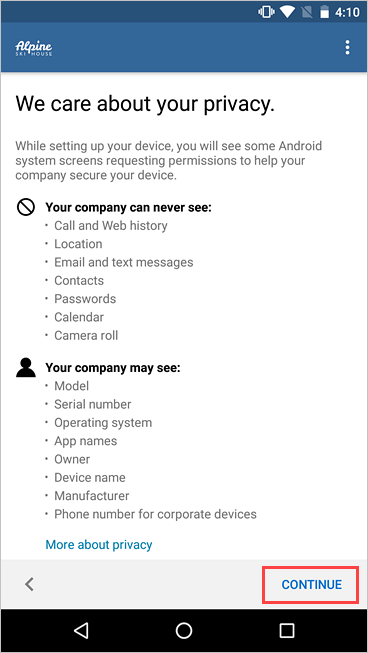
Review what your organization can and can't see. Then tap CONTINUE.
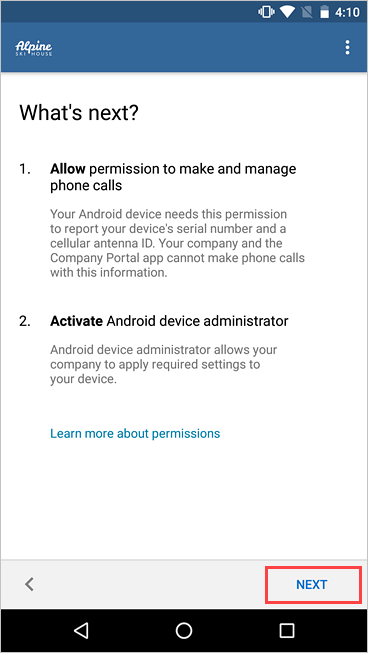
Review what to expect in the upcoming steps. Then tap NEXT.
Depending on your version of Android, you might be prompted to allow access to certain parts of your device. These prompts are required by Google and not controlled by Microsoft.
Tap Allow for the following permissions:
Allow Company Portal to make and manage phone calls: This permission enables your device to share its international mobile station equipment identity (IMEI) number with Intune, your organization's device management provider. It's safe to allow this permission. Microsoft will never make or manage phone calls.
Allow Company Portal to access your contacts: This permission lets the Company Portal app create, use, and manage your work account. It's safe to allow this permission. Microsoft will never access your contacts.
If you deny permission, you'll be prompted again the next time you sign in to Company Portal. To turn off these messages, select Never ask again. To manage app permissions, go to the Settings app > Apps > Company Portal > Permissions > Phone.
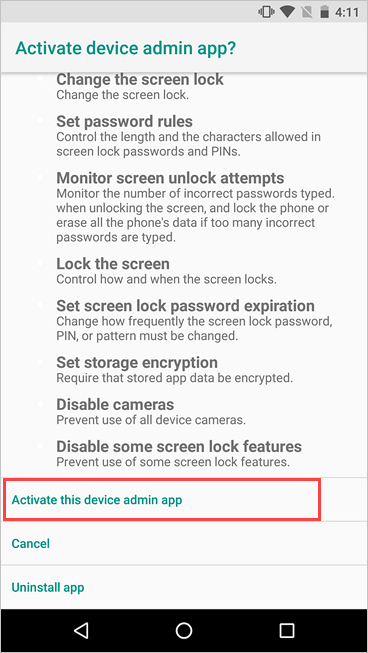
Activate the device admin app.
Company Portal needs device administrator permissions to securely manage your device. Activating the app lets your organization identify possible security issues, such as repeated failed attempts to unlock your device, and respond appropriately.
Note
Microsoft does not control the messaging on this screen. We understand that its phrasing can seem somewhat drastic. Company Portal can't specify which restrictions and access are relevant to your organization. If you have questions about how your organization uses the app, contact your IT support person. Go to the Company Portal website to find your organization's contact information.
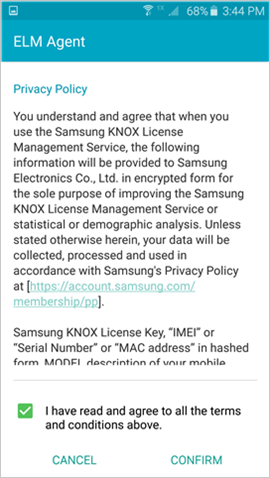
Your device begins enrolling. If you're using a Samsung Knox device, you'll be prompted to review and acknowledge the ELM Agent privacy policy first.
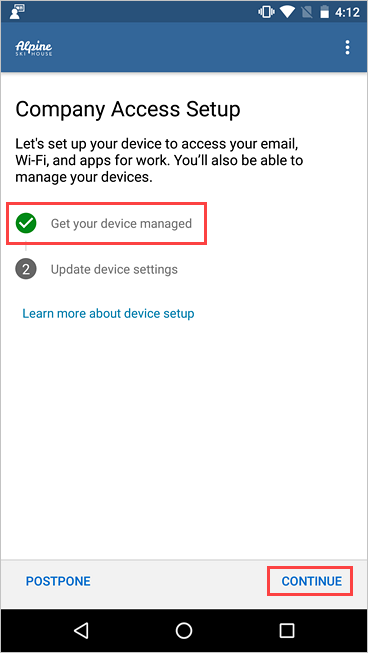
On the Company Access Setup screen, check that your device is enrolled. Then tap CONTINUE.
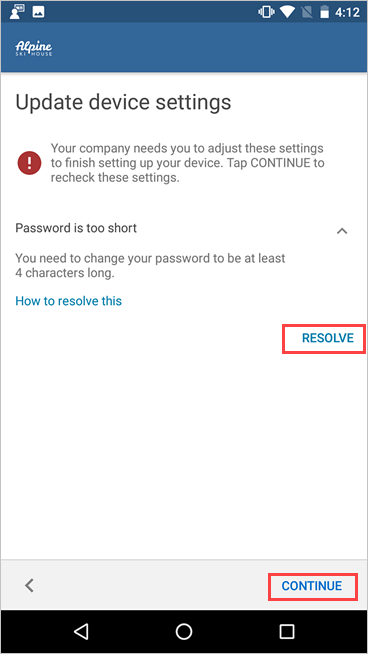
Your organization might require you to update your device settings. Tap RESOLVE to adjust a setting. When you're done updating settings, tap CONTINUE.
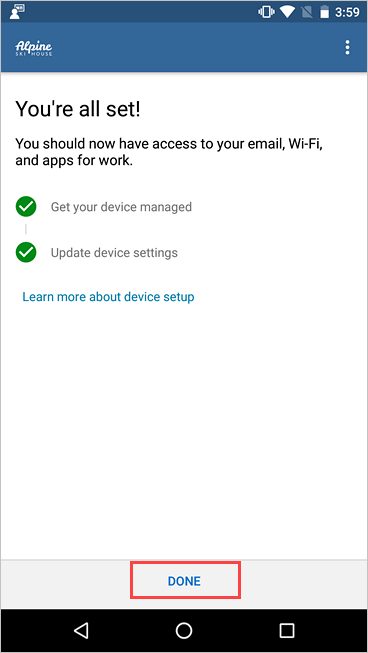
When setup is complete, tap DONE.
Next steps
Before you try to install a school or work app, go to Settings > Security, and turn on Unknown sources. If you don't turn on this option, you'll see the following message when you try to install an app: "Install blocked. For security reasons, your device is set to block installations of apps obtained from unknown sources." You can tap Settings on the message to go directly to Unknown sources.
Note
If your organization is using telecom expense management software, you will have an additional few steps to complete before your device is fully enrolled. Find out more here.
Automatically enroll iOS/iPadOS devices by using Apple's Automated Device Enrollment
24 minutes to read
Important
Apple recently changed from using the Apple Device Enrollment Program (DEP) to using Apple Automated Device Enrollment (ADE). The Microsoft Intune user interface doesn't currently reflect that change. Currently, you'll still see Device Enrollment Program in the Intune portal. Wherever you see references to DEP, Intune now uses Automated Device Enrollment.
You can set up Intune to enroll iOS/iPadOS devices purchased through Apple's Automated Device Enrollment (ADE). Automated Device Enrollment lets you enroll large numbers of devices without ever touching them. Devices like iPhones, iPads, and MacBooks can be shipped directly to users. When a user turns on the device, Setup Assistant, which includes the typical out-of-box-experience for Apple products, runs with preconfigured settings and the device enrolls into management.
To enable ADE, you use the Intune portal and either the Apple Business Manager (ABM) portal or the Apple School Manager (ASM) portal. In either Apple portal, you need a list of serial numbers or a purchase order so you can assign devices to Intune for management. You create ADE enrollment profiles in Intune. These profiles contain settings that are applied to devices during enrollment. ADE can't be used with a Device Enrollment Manager account.
Note
ADE sets device configurations that can't necessarily be removed by end users. Therefore, before ADE is used, the device must be wiped to return it to an out-of-box (new) state. For more information, see Deployment guide: Enroll iOS and iPadOS devices.
ADE enrollments aren't compatible with the App Store version of the Company Portal app. You can give users access to the Company Portal app on an ADE device. You might want to provide this access for one of the following reasons:
To let users choose which corporate apps they want to use on their devices
To use modern authentication to complete the enrollment process
To provide a staged enrollment in which the device is enrolled and receives device policies before users authenticate in Company Portal
To enable modern authentication during enrollment, push the app to the device by using Install Company Portal with VPP (Volume Purchase Program) in the ADE profile. For more information, see Automatically enroll iOS/iPadOS devices with Apple's ADE.
To enable Company Portal to update automatically and provide the Company Portal app on devices already enrolled with ADE, deploy the Company Portal app through Intune as a required VPP app with an application configuration policy applied. Deploy the Company Portal app in this way to enable Device Staging. With Device Staging, a device is fully enrolled and receives device policies before the addition of a user affinity.
What is supervised mode?
Apple introduced supervised mode in iOS/iPadOS 5. An iOS/iPadOS device in supervised mode provides more management control, like blocking of screen captures and blocking of the installation of apps from App Store. So it's especially useful for corporate-owned devices. Intune supports configuring devices for supervised mode as part of ADE.
Support for unsupervised ADE devices was deprecated in iOS/iPadOS 11. In iOS/iPadOS 11 and later, ADE-configured devices should always be supervised. The ADE is_supervised flag will be ignored in iOS/iPadOS 13.0 and later. All iOS/iPadOS devices with version 13.0 and later are automatically supervised when enrolled with Automated Device Enrollment.
Maximum Automated Device Enrollment devices per profile: Same as the maximum number of devices per token.
Maximum Automated Device Enrollment tokens per Intune account: 2,000.
Maximum Automated Device Enrollment devices per token: We recommend that you don't exceed 60,000 devices per token. Otherwise you might have sync problems. If you have more than 60,000 devices, split the devices into multiple ADE tokens.
Get an Apple Automated Device Enrollment token
Before you can enroll iOS/iPadOS devices with ADE, you need an ADE token (.p7m) file from Apple. This token lets Intune sync information about ADE devices that your corporation owns. It also allows Intune to upload enrollment profiles to Apple and to assign devices to those profiles.
You can use either the ABM portal or the ASM portal to enable ADE. The rest of this article refers to the ABM portal, but the steps are the same for both portals.
Note
If you delete the token from the Intune classic portal before you migrate to Azure, Intune might restore a deleted Apple ADE token. You can delete the ADE token again from the Azure portal.
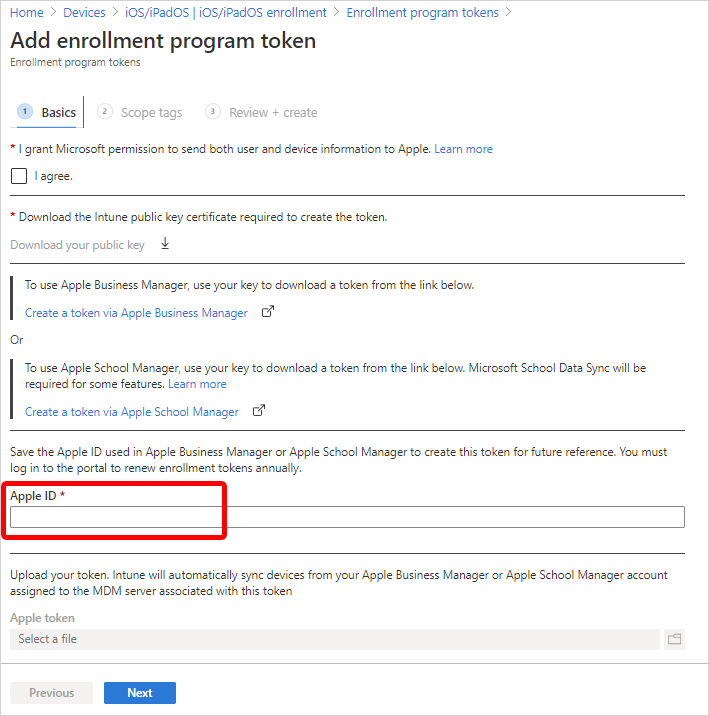
Step 1: Download the Intune public key certificate
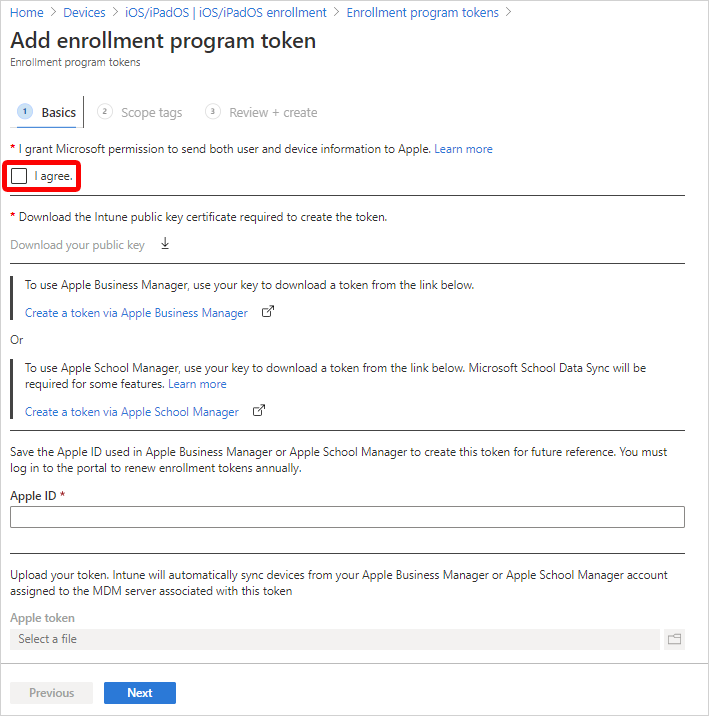
Select I agree to give permission to Microsoft to send user and device information to Apple:
Select Download the Intune public key certificate required to create the token. This step downloads and saves the encryption key (.pem) file locally. The .pem file is used to request a trust-relationship certificate from the Apple Business Manager portal.
Keep this web browser tab and page open. If you close the tab:
The certificate you downloaded is invalidated.
You have to repeat steps.
On the Review + create tab, the Create button isn't available, and you can't complete this procedure.
Step 2: Go to the Apple Business Manager portal
Use the Apple Business Manager portal to create and renew your ADE token (MDM server). This token is added to Intune and communicates between Intune and Apple.
Note
The following steps describe what you need to do in Apple Business Manager. For the specific steps, refer to Apple's documentation. Apple Business Manager User Guide (on Apple's website) might be helpful.
In settings, all tokens are shown. Add an MDM server, and upload the public key certificate (.pem file) that you downloaded from Intune in Step 1: Download the Intune public key certificate (in this article).
Use the server name to identify the mobile device management (MDM) server. It isn't the name or URL of the Microsoft Intune service.
After you save the MDM server, select it, and then download the token (.p7m file). You'll upload this .p7m token in Intune in Step 4: Upload your token and finish (in this article).
Assign devices to the Apple token (MDM server)
In Apple Business Manager > Devices, select the devices you want to assign to this token. You can sort by various device properties, like serial number. You can also select multiple devices simultaneously.
Edit device management, and select the MDM server you just added. This step assigns devices to the token.
(Optional.) If you want to apply scope tags to this ADE token, click Select scope tags, and then select existing scope tags. Scope tags applied to a token are inherited by profiles and devices added to the token.
With the push certificate, Intune can enroll and manage iOS/iPadOS devices by pushing policies to enrolled mobile devices. Intune automatically synchronizes with Apple to access your enrollment program account.
Create an Apple enrollment profile
Now that you've installed your token, you can create an enrollment profile for ADE devices. A device enrollment profile defines the settings applied to a group of devices during enrollment. There's a limit of 1,000 enrollment profiles per ADE token.
Note
Devices will be blocked if there aren't enough Company Portal licenses for a VPP token or if the token is expired. Intune will display an alert when a token is about to expire or licenses are running low.
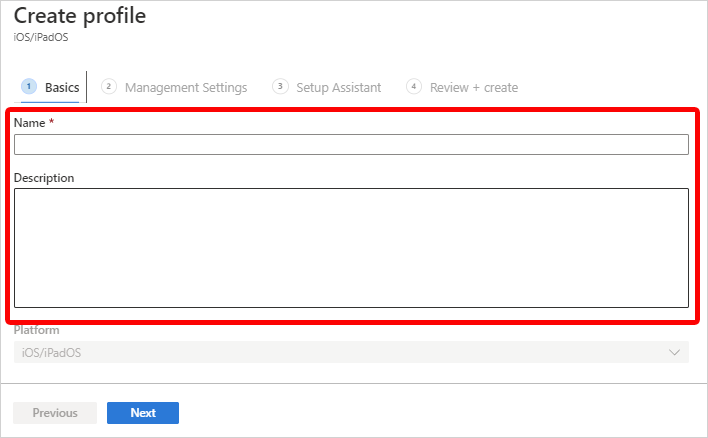
Select a token, and then select Profiles > Create profile > iOS/iPadOS:
On the Basics tab, enter a Name and Description for the profile for administrative purposes. Users don't see these details.
Select Next.
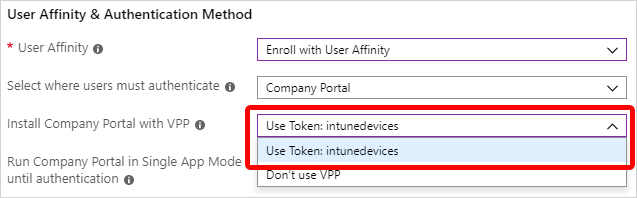
In the User Affinity list, select an option that determines whether devices with this profile must enroll with or without an assigned user.
Enroll with User Affinity. Select this option for devices that belong to users who want to use Company Portal for services like installing apps. If you're using Active Directory Federation Services and you're using Setup Assistant to authenticate, a WS-Trust 1.3 Username/Mixed endpoint is required. Learn more.
Enroll without User Affinity. Select this option for devices that aren't affiliated with a single user. Use this option for devices that don't access local user data. This option is typically used for kiosk, point of sale (POS), or shared-utility devices.
In some situations, you might want to associate a primary user on devices enrolled without user affinity. To do this task, you can send the IntuneUDAUserlessDevice key to the Company Portal app in an app configuration policy for managed devices. The first user that signs in to the Company Portal app is established as the primary user. If the first user signs out and a second user signs in, the first user remains the primary user of the device. For more information, see Configure the Company Portal app to support iOS and iPadOS ADE devices.
If you chose Enroll with User Affinity, you can let users authenticate with Company Portal instead of the Apple Setup Assistant:
Note
Authenticate with the Company Portal app if you want to:
Use multifactor authentication.
Prompt users to change their passwords when they first sign in.
Prompt users to reset their expired passwords during enrollment.
These features aren't supported when you authenticate by using Apple Setup Assistant.
If you selected Company Portal for your authentication method, you can use a VPP token to automatically install Company Portal on the device. In this case, the user doesn't have to provide an Apple ID. To install Company Portal by using a VPP token, select a token in Install Company Portal with VPP. You need to have already added Company Portal to the VPP token. To ensure that Company Portal continues to be updated after enrollment, make sure that you've configured an app deployment in Intune (Intune > Client Apps).
To ensure that user interaction isn't required, you'll probably want to make Company Portal an iOS/iPadOS VPP app, make it a required app, and use device licensing for the assignment. Make sure that the token doesn't expire and that you have enough device licenses for Company Portal. If the token expires or runs out of licenses, Intune installs the App Store Company Portal instead and prompts for an Apple ID.
Note
If you set the authentication method to Company Portal, make sure that the device enrollment process is completed within the first 24 hours of the Company Portal download to the ADE device. Otherwise enrollment might fail, and a factory reset will be needed to enroll the device.
If you selected Setup Assistant for the authentication method but you also want to use Conditional Access or deploy company apps on the devices, you need to install Company Portal on the devices and sign in to complete the Azure AD registration. To do so, select Yes for Install Company Portal. If you want users to receive Company Portal without having to authenticate in to the App Store, in Install Company Portal with VPP, select a VPP token. Make sure the token doesn't expire and that you have enough device licenses for the Company Portal app to deploy correctly.
If you select a token for Install Company Portal with VPP, you can lock the device in Single App Mode (specifically, the Company Portal app) right after the Setup Assistant completes. Select Yes for Run Company Portal in Single App Mode until authentication to set this option. To use the device, the user must first authenticate by signing in with Company Portal.
Multifactor authentication isn't supported on a single device locked in Single App Mode. This limitation exists because the device can't switch to a different app to complete the second factor of authentication. If you want multifactor authentication on a Single App Mode device, the second factor must be on a different device.
This feature is supported only for iOS/iPadOS 11.3.1 and later.
If you want devices using this profile to be supervised, select Yes in the Supervised list:
Supervised devices give you more management options and disabled Activation Lock by default. Microsoft recommends that you use ADE as the mechanism for enabling supervised mode, especially if you're deploying large numbers of iOS/iPadOS devices. Apple Shared iPad for Business devices must be supervised.
Users are notified that their devices are supervised in two ways:
The lock screen says: This iPhone is managed by company name.
The Settings > General > About screen says: This iPhone is supervised. Company name can monitor your Internet traffic and locate this device.
Note
If a device is enrolled without supervision, you need to use Apple Configurator if you want to set it to supervised. To reset the device in this way, you need to connect it to a Mac with a USB cable. For more information, see Apple Configurator Help.
In the Locked enrollment list, select Yes or No. Locked enrollment disables iOS/iPadOS settings that allow the management profile to be removed from the Settings menu. After device enrollment, you can't change this setting without wiping the device. To use this option, the device must have the Supervised management option set to Yes.
Note
If a device is enrolled with locked enrollment, the user won't be able to use Remove Device or Factory Reset in the Company Portal app. The options will be unavailable to the user. Also, the user won't be able to remove the device on the Company Portal website.
If a BYOD device is converted to an Apple ADE device and enrolled with a profile that has locked enrollment enabled, the user will be allowed to use Remove Device and Factory Reset for 30 days. After 30 days, the options will be disabled or unavailable. For more information, see Prepare devices manually.
If you selected Enroll without User Affinity and Supervised in the previous steps, you need to decide whether to configure the devices to be Apple Shared iPad for Business devices. If you select Yes for Shared iPad, multiple users will be able to sign in to a single device. Users will authenticate by using their Managed Apple IDs and federated authentication accounts or by using a temporary session (like the Guest account). This option requires iOS/iPadOS 13.4 or later.
If you configured your devices as Apple Shared iPad for Business devices, you need to set Maximum cached users. Set this value to the number of users that you expect to use the shared iPad. You can cache up to 24 users on a 32-GB or 64-GB device. If you choose a low number, it might take a while for your users' data to appear on their devices after they sign in. If you choose a high number, your users might not have enough disk space.
Note
If you want to set up Apple Shared iPad for Business, configure these settings:
In the User Affinity list, select Enroll without User Affinity.
In the Supervised list, select Yes.
In the Shared iPad list, select Yes.
Temporary sessions are enabled by default and allow your users to sign in to a shared iPad without a Managed Apple ID account. You can disable temporary sessions on shared iPads by configuring iOS/iPadOS Shared iPad device restriction settings.
In the Sync with computers list, select an option for the devices that use this profile. If you select Allow Apple Configurator by certificate, you need to choose a certificate under Apple Configurator Certificates. For iOS/iPadOS 13.0 and later, Apple deprecated this setting.
Note
If you set Sync with computers to Deny all, the port will be limited on iOS and iPadOS devices. The port will be limited to only charging. It will be blocked from using iTunes or Apple Configurator 2.
If you set Sync with computers to Allow Apple Configurator by certificate, make sure you have a local copy of the certificate that you can use later. You won't be able to make changes to the uploaded copy, and it's important to retain an copy of this certificate. If you want to connect to the iOS/iPadOS device from a macOS device or PC, the same certificate must be installed on the device making the connection to the iOS/iPadOS device.
If you selected Allow Apple Configurator by certificate in the previous step, choose an Apple Configurator certificate to import.
You can specify a naming format for devices that's automatically applied when they're enrolled and upon each successive check-in. To create a naming template, select Yes under Apply device name template. Then, in the Device Name Template box, enter the template to use for the names that use this profile. You can specify a template format that includes the device type and serial number. This feature supports iPhone, iPad, and iPod Touch.
Select Next: Setup Assistant Customization.
On the Setup Assistant Customization tab, configure the following profile settings:
TABLE 1
Department setting
Description
Department
Appears when users tap About Configuration during activation.
Department Phone
Appears when users tap the Need Help button during activation.
You can choose to hide Setup Assistant screens on the device during user setup.
If you select Hide, the screen won't be displayed during setup. After setting up the device, the user can still go to the Settings menu to set up the feature.
If you select Show, the screen will be displayed during setup. Users can sometimes skip the screen without taking action. They can then later go to the device's Settings menu to set up the feature.
TABLE 2
Setup Assistant Screens setting
If you select Show, during setup the device will...
Passcode
Prompt the user for a passcode. Always require a passcode for unsecured devices unless access is controlled in some other way. (For example, a kiosk mode configuration that restricts the device to one app.) For iOS/iPadOS 7.0 and later.
Location Services
Prompt the user for their location. For macOS 10.11 and later, and iOS/iPadOS 7.0 and later.
Restore
Display the Apps & Data screen. This screen gives users the option to restore or transfer data from iCloud Backup when they set up the device. For macOS 10.9 and later, and iOS/iPadOS 7.0 and later.
iCloud and Apple ID
Give the user the options to sign in with their Apple ID and use iCloud. For macOS 10.9 and later, and iOS/iPadOS 7.0 and later.
Terms and conditions
Require the user to accept Apple's terms and conditions. For macOS 10.9 and later, and iOS/iPadOS 7.0 and later.
Touch ID
Give the user the option to set up fingerprint identification for the device. For macOS 10.12.4 and later, and iOS/iPadOS 8.1 and later.
Apple Pay
Give the user the option to set up Apple Pay on the device. For macOS 10.12.4 and later, and iOS/iPadOS 7.0 and later.
Zoom
Give the user to the option to zoom the display when they set up the device. For iOS/iPadOS 8.3 and later.
Siri
Give the user the option to set up Siri. For macOS 10.12 and later, and iOS/iPadOS 7.0 and later.
Diagnostics Data
Display the Diagnostics screen. This screen gives the user the option to send diagnostic data to Apple. For macOS 10.9 and later, and iOS/iPadOS 7.0 and later.
Display Tone
Give the user the option to turn on Display Tone. For macOS 10.13.6 and later, and iOS/iPadOS 9.3.2 and later.
Privacy
Display the Privacy screen. For macOS 10.13.4 and later, and iOS/iPadOS 11.3 and later.
Android Migration
Give the user the option to migrate data from an Android device. For iOS/iPadOS 9.0 and later.
iMessage & FaceTime
Give the user the option to set up iMessage and FaceTime. For iOS/iPadOS 9.0 and later.
Onboarding
Display onboarding informational screens for user education, like Cover Sheet and Multitasking and Control Center. For iOS/iPadOS 11.0 and later.
Watch Migration
Give the user the option to migrate data from a watch device. For iOS/iPadOS 11.0 and later.
Screen Time
Display the Screen Time screen. For macOS 10.15 and later, and iOS/iPadOS 12.0 and later.
Software Update
Display the mandatory software update screen. For iOS/iPadOS 12.0 and later.
SIM Setup
Give the user the option to add a cellular plan. For iOS/iPadOS 12.0 and later.
Appearance
Display the Appearance screen. For macOS 10.14 and later, and iOS/iPadOS 13.0 and later.
Device to Device Migration
Give the user the option to migrate data from an old device to this device. For iOS/iPadOS 13.0 and later.
Registration
Display the registration screen. For macOS 10.9 and later.
FileVault
Display the FileVault 2 encryption screen. For macOS 10.10 and later.
iCloud diagnostics
Display the iCloud Analytics screen. For macOS 10.12.4 and later.
iCloud Storage
Display the iCloud Documents and Desktop screen. For macOS 10.13.4 and later.
Select Next to go to the Review + create tab.
To save the profile, select Create.
Note
If you need to re-enroll your Automated Device Enrollment device, you need to first add the serial number of the device as a corporate identifier. You might need to re-enroll your ADE device if you're troubleshooting a problem, like if the device isn't receiving policy. To re-enroll:
Re-enroll the device by downloading Company Portal and completing device enrollment.
Dynamic groups in Azure Active Directory
You can use the enrollment Name field to create a dynamic group in Azure Active Directory (Azure AD). For more information, see Azure Active Directory dynamic groups.
For the fastest policy delivery on ADE devices that have user affinity, make sure the enrolling user is a member, before device setup, of an Azure AD user group.
If you assign dynamic groups to enrollment profiles, there might be a delay in delivering applications and policies to devices after the enrollment.
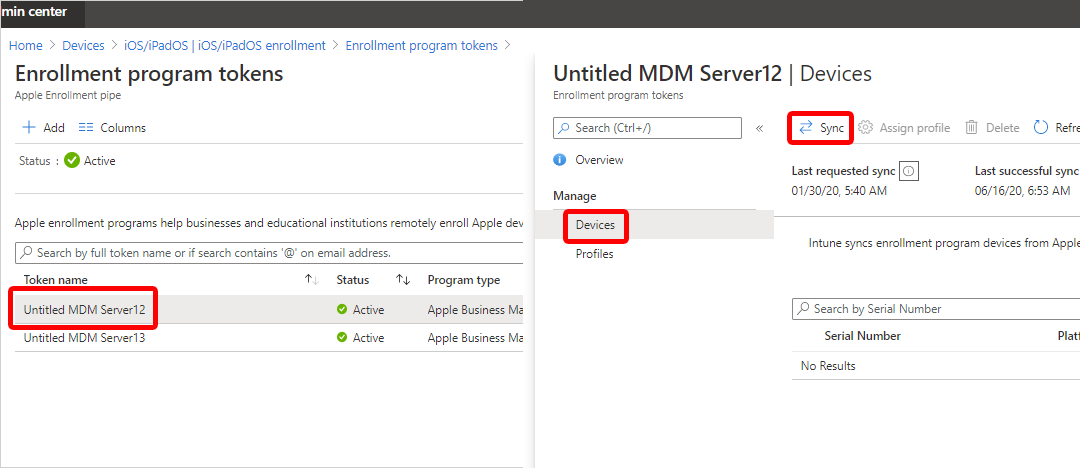
Sync managed devices
Now that Intune has permission to manage your devices, you can synchronize Intune with Apple to see your managed devices in Intune in the Azure portal.
Select a token in the list, and then select Devices > Sync:
To follow Apple's terms for acceptable enrollment program traffic, Intune imposes the following restrictions:
A full sync can run no more than once every seven days. During a full sync, Intune fetches the complete updated list of serial numbers assigned to the Apple MDM server connected to Intune. If an ADE device is deleted from the Intune portal, it should be unassigned from the Apple MDM server in the ADE portal. If it's not unassigned, it won't be reimported to Intune until the full sync is run.
A sync is run automatically every 12 hours. You can also sync by selecting the Sync button (no more than once every 15 minutes). All sync requests are given 15 minutes to finish. The Sync button is disabled until a sync is completed. This sync will refresh existing device status and import new devices assigned to the Apple MDM server.
Assign an enrollment profile to devices
Before devices can be enrolled, you need to assign an enrollment program profile to them.
Note
You can also assign serial numbers to profiles in the Apple Serial Numbers pane.
Select Set Default Profile, select a profile in the list, and then select Save. The profile will be applied to all devices that enroll with the token.
Distribute devices
You enabled management and syncing between Apple and Intune and assigned a profile so your ADE devices can be enrolled. You're now ready to distribute devices to users. Some things to know:
Devices enrolled with user affinity require that each user be assigned an Intune license.
Devices enrolled without user affinity typically don't have any associated users. These devices need to have an Intune device license. If devices enrolled without user affinity will be used by an Intune-licensed user, a device license isn't needed.
To summarize, if a device has a user, the user needs to have an assigned Intune license. If the device doesn't have an Intune-licensed user, the device needs to have an Intune device license.
A device that's been activated needs to be wiped before it can enroll in Intune. After it's been wiped, you can apply the enrollment profile.
If you're enrolling with ADE and user affinity, the following error can happen during setup:
The SCEP server returned an invalid response.
To resolve this error, you need to factory reset the device. This error occurs because of a 15-minute time limit on SCEP certificates, which is enforced for security.
Renew your ADE token yearly. The Endpoint Manager admin center shows the expiration date.
If the Apple ID password changes for the user who set up the token in Apple Business Manager, renew your enrollment program token in Intune and Apple Business Manager.
If the user who set up the token in Apple Business Manager leaves the organization, renew your enrollment program token in Intune and Apple Business Manager.
Renew your tokens
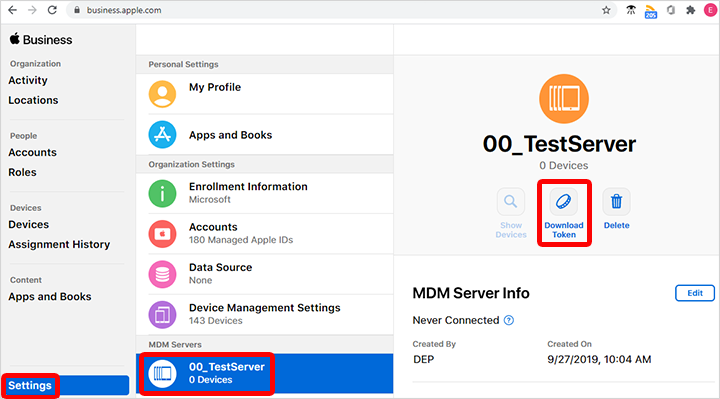
Go to business.apple.com and sign in with an account that has an Administrator or Device Enrollment Manager role.
Select Settings. Under MDM Servers, select the MDM server associated with the token file that you want to renew. Select Download Token:
Select Download Server Token.
Note
As it says in the prompt, don't select Download Server Token if you don't intend to renew the token. Doing so will invalidate the token being used by Intune (or any other MDM solution). If you already downloaded the token, be sure to continue with the next steps until the token is renewed.
After you download the token, go to Microsoft Endpoint Manager admin center. Select Devices > iOS/iPadOS > iOS/iPadOS enrollment > Enrollment program tokens. Select the token.
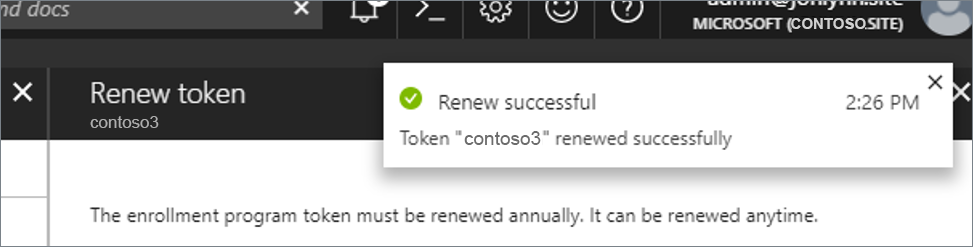
Select Renew token. Enter the Apple ID used to create the original token (if it's not automatically populated):
Upload the newly downloaded token.
Select Next to go to the Scope tags page. Assign scope tags if you want to.
Select Renew token. You'll see a confirmation that the token is renewed:
Delete an Automated Device Enrollment token from Intune
You can delete an enrollment profile token from Intune as long as:
No devices are assigned to the token.
No devices are assigned to the default profile.
To delete an enrollment profile token:
In Microsoft Endpoint Manager admin center, select Devices > iOS/macOS > iOS/macOS enrollment > Enrollment Program Tokens. Select the token, and then select Devices.
Delete all the devices assigned to the token.
Go to Devices > iOS/macOS > iOS/macOS enrollment > Enrollment Program Tokens. Select the token, and then select Profiles.
If there's a default profile, delete it.
Go to Devices > iOS/macOS > iOS/macOS enrollment > Enrollment Program Tokens. Select the token, and then select Delete.
Enroll your macOS device using the Company Portal app
4 minutes to read
Enroll your macOS device with the Intune Company Portal app to gain secure access to your work or school email, files, and apps.
Organizations typically require you to enroll your device before you can access proprietary data. After your device is enrolled, it becomes managed. Your organization can assign policies and apps to the device through a mobile device management (MDM) provider, such as Intune. To get continuous access to work or school information on your device, you must set up your device to match your organization's policy settings.
This article describes how to use the Company Portal app for macOS to set up and maintain your device so that you meet your organization's requirements.
What to expect from the Company Portal app
During initial setup, the Company Portal app requires you to sign in and authenticate yourself with your organization. Company Portal then informs you of any device settings you need to configure to meet your organization's requirements. For example, organizations often set minimum or maximum character password requirements that you'll be required to meet.
After you enroll your device, Company Portal will always make sure that your device is protected according to your organization's requirements. For example, if you install an app from a source that's not trusted, Company Portal will alert you and might restrict access to your organization's resources. App protection policies like this one are common. To regain access, you'll likely need to uninstall the app.
If after enrollment your organization enforces a new security requirement, such as multi-factor authentication, Company Portal will notify you. You'll have the chance to adjust your settings so that you can continue to work from your device.
Use the following steps to enroll your macOS device with your organization. Your device must be running macOS 10.12 or later.
Note
Throughout this process, you might be prompted to allow Company Portal to use confidential information that's stored in your keychain. These prompts are part of Apple security. When you get the prompt, type in your login keychain password and select Always Allow. If you press Enter or Return on your keyboard, the prompt will instead select Allow, which may result in additional prompts.
The Company Portal installer .pkg file will download. Open the installer and continue through the steps.
Agree to the software license agreement.
Enter your device password or registered fingerprint to install the software.
Open Company Portal.
Important
Microsoft AutoUpdate might open to update your Microsoft software. After all updates are installed, open the Company Portal app. For the best setup experience, install the latest versions of Microsoft AutoUpdate and Company Portal.
Enroll your Mac
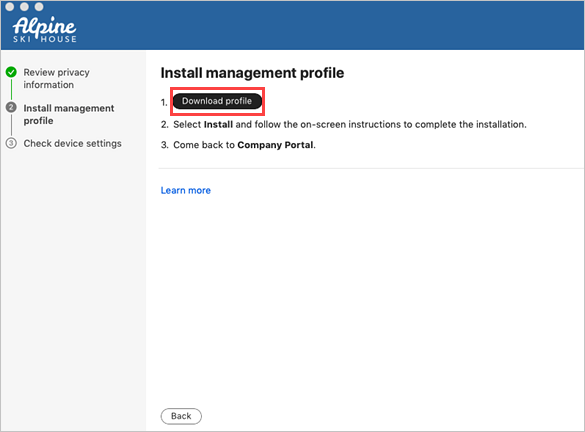
Sign in to Company Portal with your work or school account.
On the Install management profile screen, select Download profile.
Your device's system preferences will open. a. Select Install and then select Install again. b. If you’re prompted to, enter your device password.
Once the profile is installed, it will appear in the profiles list under Management Profile.
Return to Company Portal.
Your organization might require you to update your device settings. When you're done updating settings, select Retry.
When setup is complete, select Done.
Troubleshooting and feedback
If you run into issues during enrollment, go to Help > Send Diagnostic Report to report the issue to Microsoft app developers. This information is used to help improve the app. They'll also use this information to help resolve the problem if your IT support person reaches out to them for help.
After you report the problem to Microsoft, you can send the details of your experience to your IT support person. Select Email Details. Type in what you experienced in the body of the email. To find your support person's email address, go to the Company Portal app > Contact. Or check the Company Portal website.
Additionally, the Microsoft Intune Company Portal team would love to hear your feedback. Go to Help > Send Feedback to share your thoughts and ideas.
Unverified profiles
When you view the installed mobile device management (MDM) profiles in System Preferences > Profiles, some profiles might show an unverified status. As long as the management profile shows a verified status, you don't need to be concerned.
The management profile is what defines the MDM channel connection. As long as the management profile is verified, any other profiles delivered to the machine via that channel inherit the security traits of the management profile.
Updating the Company Portal app
Updating the Company Portal app is done the same way as any other Office app, through Microsoft AutoUpdate for macOS. Find out more about updating Microsoft apps for macOS.
Next Steps
Still need help? Contact your company support. For contact information, check the Company Portal website.
Before you can configure, assign, protect, or monitor apps, you must add them to Microsoft Intune.
The users of apps and devices at your company (your company's workforce) might have several app requirements. Before adding apps to Intune and making them available to your workforce, you may find it helpful to assess and understand a few app fundamentals. There are various types of apps that are available for Intune. You must determine app requirements that are needed by the users at your company, such as the platforms and capabilities that your workforce needs. You must determine whether to use Intune to manage the devices (including apps) or have Intune manage the apps without managing the devices. Also, you must determine the apps and capabilities that your workforce needs, and who needs them. The information in this article helps you get started.
App types in Microsoft Intune
Intune supports a wide range of app types. The available options differ for each app type. Intune lets you add and assign the following app types:
APP TYPES IN MICROSOFT INTUNE
App types
Installation
Updates
Apps from the store (store apps)
Intune installs the app on the device.
App updates are automatic.
Apps written in-house (line-of-business)
Intune installs the app on the device (you supply the installation file).
You must update the app.
Apps that are built-in (built-in apps)
Intune installs the app on the device.
App updates are automatic.
Apps on the web (web link)
Intune creates a shortcut to the web app on the device home screen.
App updates are automatic.
Apps from other Microsoft services
Intune creates a shortcut to the app in the Company Portal. For more information, see App source setting options.
App updates are automatic.
Specific app type details
The following table lists the specific app types and how you can add them in the Intune Add app pane:
SPECIFIC APP TYPE DETAILS
App-specific type
General type
App-specific procedures
Android store apps
Store app
Select Android as the app type, and enter the Google Play store URL for the app.
Android Enterprise apps
Store app
Select Android as the app type, and enter the Managed Google Play store URL for the app. 1
iOS/iPadOS store apps
Store app
Select iOS as the app type, search for the app, and select the app in Intune.
Microsoft store apps
Store app
Select Windows as the app type, and enter the Microsoft store URL for the app.
Managed Google Play apps
Store app
Select Managed Google Play as the app type, search for the app, and select the app in Intune.
Microsoft 365 apps for Windows 10
Store app (Microsoft 365)
Select Windows 10 under Microsoft 365 Apps as the app type, and then select the Microsoft 365 app that you want to install.
Microsoft 365 apps for macOS
Store app (Microsoft 365)
Select macOS under Microsoft 365 Apps as the app type, and then select the Microsoft 365 app suite.
Microsoft Edge, version 77 and later for Windows 10
Store app
Select Windows 10 under Microsoft Edge, version 77 and later as the app type.
Microsoft Edge, version 77 and later for macOS
Store app
Select macOS under Microsoft Edge, version 77 and later as the app type.
Android line-of-business (LOB) apps
LOB app
Select Line-of-business app as the app type, select the App package file, and then enter an Android installation file with the extension .apk.
iOS/iPadOS LOB apps
LOB app
Select Line-of-business app as the app type, select the App package file, and then enter an iOS/iPadOS installation file with the extension .ipa.
Windows LOB apps
LOB app
Select Line-of-business app as the app type, select the App package file, and then enter a Windows installation file with the extension .msi, .appx, .appxbundle, .msix, and .msixbundle.
Built-in iOS/iPadOS app
Built-in app
Select Built-In app as the app type, and then select the built-in app in the list of provided apps.
Built-in Android app
Built-in app
Select Built-In app as the app type, and then select the built-in app in the list of provided apps.
Web apps
Web app
Select Web link as the app type, and then enter a valid URL pointing to the web app.
Android Enterprise system apps
Store app
Select Android Enterprise system app as the app type, and then enter the app name, publisher, and package file.
Windows app (Win32)
LOB app
Select Windows app (Win32) as the app type, select the App package file, and then select an installation file with the extension .intunewin.
macOS LOB apps
LOB app
Select Line-of-business as the app type, select the App package file, and then select an installation file with the extension .intunemac.
1 For more information about Android Enterprise and Android work profiles, see Understanding licensed apps below.
You can add an app in Microsoft Intune by selecting Apps > All apps > Add. The Select app type pane is displayed and allows you to select the App type.
Tip
An LOB app is one that you add from an app installation file. For example, to install an iOS/iPadOS LOB app, you add the application by selecting Line-of-business app as the App type in the Select app type pane. You then select the app package file (extension .ipa). These types of apps are typically written in-house.
Assess app requirements
As an IT Admin, you determine not only which apps your group must use, but you also determine the capabilities needed for each group and subgroup. For each app, you determine the platforms needed, the groups of users that need the app, the configuration policies to apply for those groups, and the protection policies to apply.
Additionally, you must determine whether to focus on Mobile Device Management (MDM) or only on Mobile Application Management (MAM).
Using Intune to manage the device with MDM is useful when:
Users need a Wi-Fi or a VPN corporate connectivity profile to be productive.
Users need a set of apps to be pushed to their device.
Your organization needs to comply with regulatory or other policies that call out specific MDM controls, such as security or encryption.
Using Intune to manage apps with MAM without managing the device is useful when:
You want to allow users to use their own device (BYOD).
You want to provide a one-time pop-up message to let users know that MAM protections are in place, rather than continual device-level notification.
You want to comply with policies that require less management capability on personal devices. For instance, you want to manage the corporate data for the apps, rather than manage the corporate data for the entire device.
As you're determining which apps your workforce needs, consider the various groups of users and the various apps they use. Knowing these groups is also helpful after you've added an app. After you add an app, you assign a group of users that can use the app.
First, you must determine which group should have access to the app, based on the sensitivity of the data the app contains. You might need to include or exclude certain types of roles within your organization. For example, only certain LOB apps might be required for your sales group, whereas people focused on engineering, finance, HR, or legal might not need to use the LOB apps. In addition, your sales group might need additional data protection and access to internal corporate services on their mobile devices. You must determine how this group will connect to resources using the app. Will the data that the app accesses live in the cloud or on-premises? Also, how will the users connect to resources by using the app?
Intune also supports enabling access to client apps that require secure access to on-premises data, such as line-of-business app servers. You ordinarily provide this type of access by using Intune-managed certificates for access control, combined with a standard VPN gateway or proxy in the perimeter, such as Azure Active Directory Application Proxy. The Intune App Wrapping Tool and App SDK can help contain the accessed data within your line-of-business app, so that it can't pass corporate data to consumer apps or services.
Apps from the store: Apps that have been uploaded to either the Microsoft store, the iOS/iPadOS store, or the Android store are store apps. The provider of a store app maintains and provides updates to the app. You select the app in the store list and add it by using Intune as an available app for your users.
Apps written in-house (line-of-business): Apps that are created in-house are line-of-business (LOB) apps. The functionality of this type of app has been created for one of the Intune supported platforms, such as Windows, iOS/iPadOS, macOS, or Android. Your organization creates and provides you with updates as a separate file. You provide updates of the app to users by adding and deploying the updates using Intune.
Apps on the web: Web apps are client-server applications. The server provides the web app, which includes the UI, content, and functionality. Additionally, modern web hosting platforms commonly offer security, load balancing, and other benefits. This type of app is separately maintained on the web. You use Intune to point to this app type. You also assign which groups of users can access the app. Note that Android does not support web apps.
Apps from other Microsoft services: Apps that have been sourced from either Azure AD or Office Online. Azure AD Enterprise applications are registered and assigned via the Microsoft Endpoint Manager admin center. Office Online applications are assigned using the licensing controls available in the M365 Admin Center. You can hide or show Azure AD Enterprise and Office Online applications to end-users in the Company Portal. From the Microsoft Endpoint Manager admin center, select Tenant administration > Customization to find this configuration setting. Select to Hide or Show either Azure AD Enterprise applications or Office Online applications in the Company Portal for each end-user. Each end-user will see their entire application catalog from the chosen Microsoft service. By default, each additional app source will be set to Hide. For more information, see App source setting options.
As you're determining which apps your organization needs, consider how the apps integrate with cloud services, what data the apps access, whether the apps are available to BYOD users, and whether the apps require internet access.
For more information about the types of apps that your organization needs, Create a design.
Understanding app management and protection policies
Intune lets you modify the functionality of apps that you deploy to help align them with your company's compliance and security policies. This control allows you to determine how your company data is protected. Intune-managed apps are enabled with a rich set of mobile application protection policies, such as:
Restricting copy-and-paste and save-as functions.
Configuring web links to open inside the Microsoft Edge app.
Enabling multi-identity use and app-level Conditional Access.
Intune-managed apps can also enable app protection without requiring enrollment, which gives you the choice of applying data loss-prevention policies without managing the user's device. Additionally, you can incorporate mobile-app management in your mobile and line-of-business apps by using the Intune App SDK and App Wrapping Tool. For more information about these tools, see Intune App SDK overview.
Understanding licensed apps
In addition to understanding web apps, store apps, and LOB apps, you should also be aware of the destination of volume-purchase-program apps and licensed apps, such as:
Apple Volume Purchasing Program for Business (iOS): The iOS/iPadOS App Store lets you purchase multiple licenses for an app that you want to run in your company. Purchasing multiple copies helps you to efficiently manage apps in your company. For more information, see Manage iOiOS/iPadOSS volume-purchased apps.
Android Enterprise fully managed work profile: How you assign apps to Android Enterprise fully managed work profile devices differs from how you assign them to standard Android devices. All apps you install for Android Enterprise fully managed work profiles come from the Managed Google Play store. You use Intune to browse for the apps you want and approve them. The app then appears in the Licensed apps node of the Azure portal, and you can manage assignment of the app as you would any other app.
Microsoft Store for Business (Windows 10): Microsoft Store for Business gives you a place to find and purchase apps for your organization, individually or in volume. By connecting the store to Microsoft Intune, you can manage volume-purchased apps in the Azure portal. For more information, see Manage apps from Microsoft Store for Business.
Note
The file extensions for Windows apps include .msi, .appx, .appxbundle, .msix and .msixbundle.
Before you add apps
Before you begin to add and assign apps, consider the following points:
When you add and assign an app from a store, your users must have an account with that store to be able to install the app.
Some apps or items that you assign might depend on built-in iOS/iPadOS apps. For example, if you assign a book in the iOS/iPadOS store, the iBooks app must be present on the device. If you have removed the iBooks built-in app, you cannot use Intune to reinstate it.
Important
If you change the name of the app through the Intune azure portal after you have deployed and installed the app, the app will no longer be able to be targeted using commands.
Cloud storage space
All apps that you create by using the software installer installation type (for example, a line-of-business app) are packaged and uploaded to Intune cloud storage. A trial subscription of Intune includes 2 gigabytes (GB) of cloud-based storage that is used to store managed apps and updates. A full subscription does not limit the total amount of storage space.
Requirements for cloud storage space are as follows:
All app installation files must be in the same folder.
The maximum file size for any file that you upload is 8 GB.
Note
Windows Line-of-business (LOB) apps, including Win32, Windows Universal AppX, Windows Universal AppX bundle, Windows Universal MSI X, and Windows Universal MSI X bundle, have a maximum size limit of 8 GB per app. All other LOB apps, including iOS/iPadOS LOB apps, have a maximum size limit of 2 GB per app.
Create and edit categories for apps
App categories can be used to help you sort apps to make them easier for users to find in the company portal. You can assign one or more categories to an app, for example, Developer apps or Communication apps.
When you add an app to Intune, you are given the option to select the category you want. Use the platform-specific topics to add an app and assign categories. To create and edit your own categories, use the following procedure:
Select Apps > App categories. The App categories pane displays a list of current categories.
Do either of the following:
To add a category, in the Create category pane, select Add, and then enter a name for the category. Names can be entered in one language only, and they are not translated by Intune.
To edit a category, select the ellipsis (...) next to the category, and then select Pin to dashboard or Delete.
Select Create.
Apps that are added automatically by Intune
Previously, Intune contained a number of built-in apps that you could quickly assign. Based on Intune customer feedback, we removed this list, and the built-in apps are no longer displayed. However, if you have already assigned any built-in apps, the apps remain visible in the list of apps. You can continue to assign the apps as required.
Note
For the installation of a required non-Line-of-Business app, Intune will attempt to install the app by sending an install command whenever the device checks-in, given that the app is not detected and the app's install state is not Install Pending.
Installing, updating, or removing required apps
Intune will automatically reinstall, update, or remove a required app within 24 hours, rather than waiting for the 7 day re-evaluation cycle.
Intune will automatically reinstall, update, or remove a required app based on the following conditions:
If an end user uninstalls an app that you have required to be installed on the end user's device, Intune will automatically reinstall the app when this schedule elapses.
If a required app install fails or somehow the app is not present on the device, Intune evaluates compliance and reinstalls the app when this schedule elapses.
An admin targets an app as available to a user group and an end user installs the app from the company portal on the device. Later, the admin updates the app from v1 to v2. Intune will update the app when this schedule elapses, provided that any previous version of the app is still present on the device.
If the admin deploys uninstall intent and the app is present on the device and failed to uninstall, Intune evaluates compliance and uninstalls the app when this schedule elapses.
Uninstall an app
When you need to uninstall an app from user's devices, use the following steps.
Select Apps > All apps > the app > Assignments > Add group.
In the Add group pane, select Uninstall.
Select Included Groups to select the groups of users that are affected by this app assignment.
Select the groups that you want to apply the uninstall assignment.
Click Select on the Select groups pane.
Click OK on the Assign pane to set the assignment.
If you want to exclude any groups of users from being affected by this app assignment, select Exclude Groups.
If you have chosen to exclude any groups, in Select groups, select Select.
Select OK in the Add group pane.
Select Save in the app Assignments pane.
Important
To uninstall the app successfully, make sure to remove the members or group assignment for install before assigning them to be uninstalled. If a group is assigned to both install an app and uninstall an app, the app will remain and not be removed.