Thursday, March 23, 2017

Office 365 Share calendars with external users

Thanks to amazing people from Microsoft, here's great information on how to Share calendars with external users from Office 365

Option 1

According to https://support.office.com/en-us/article/Share-calendars-with-external-users-FB00DD4E-2D5F-4E8D-8FF4-94B2CF002BDD

Share calendars with external users

It’s often necessary to schedule meetings with people outside your organization. To simplify the process of finding mutually agreeable meeting times, Office 365 enables you to make calendars available to “external users,” those who need to see free/busy time but don’t have user accounts for your Office 365 environment.
Calendar sharing is a global setting, meaning that you, the Office 365 admin, can enable it for all users in the tenant. Once sharing is enabled, users can use Outlook Web App to share their calendars with anyone inside or outside the organization. People inside the organization can view the shared calendar side-by-side with their own. People outside the organization will be sent a URL that they can use to view the calendar. Users decide when to share, how much to share, and when to keep their calendars private.
NOTE:  If you want to share calendars with an organization that uses Exchange Server 2013 (an on-premises solution), the Exchange administrator will need to set up an authentication relationship with the cloud. This is known as “federation” and must meet minimum software requirements. See Sharing for more information.

Enable calendar sharing using the Office 365 admin center

  1. Sign in to Office 365 with your work or school account.
  2. Select the app launcher icon App launcher button and choose Admin.
  3. Navigate to Settings > Services & add-ins.
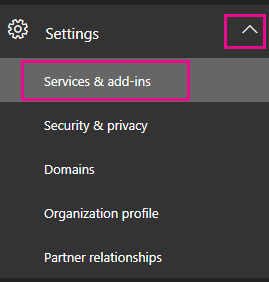
    On the left navigation pane, click Settings, and then click Services & add-ins.
  4. On the Services & add-ins page, click Calendar.
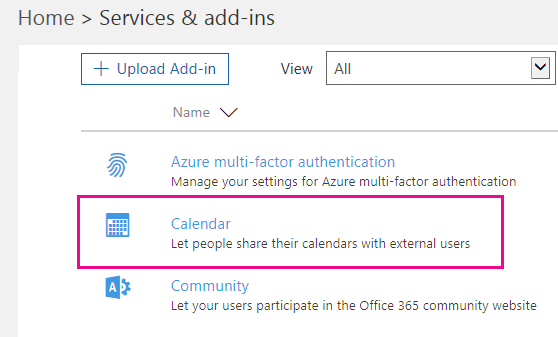
    On the Services & add-ins page, click Calendar.
  5. On the Calendar page that opens, do one of the following:
    • For Let your users share their calendars with external users who have Office 365 of Exchange, move the slider to On to enable calendar sharing.
    • For Let your users share their calendars with external users who have Office 365 of Exchange, move the slider to Off to disable calendar sharing.
  6. If you want to allow anonymous users (users without logon credentials) to access calendars via an email invitation, for Allow anonymous users to access calendars with an email invitation, move the slider to Off.
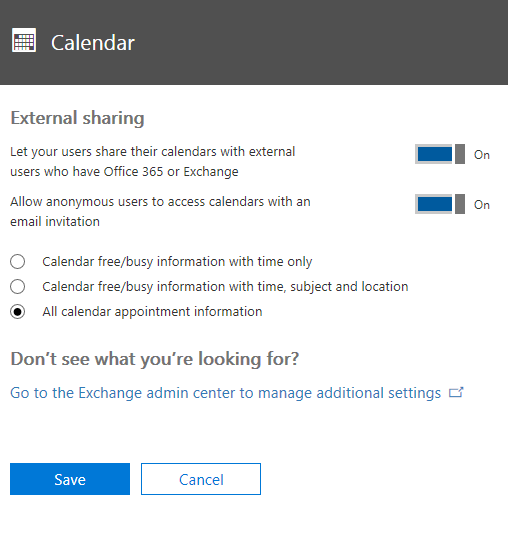
    In the Calendar page, configure the settings as appropriate for your situation.
    When you select the check box to allow anonymous users, you’ll have to decide what type of calendar information to make available to users. You can allow all information, or limit it. These choices specify the amount of information that your users can show on a case-by-case basis. Select one of the following:
    • Calendar free/busy information with time only
    • Calendar free/busy information with time, subject and location
    • All calendar appointment information


Option 2

According to https://support.office.com/en-us/article/Overlay-a-SharePoint-calendar-with-a-calendar-from-Exchange-or-SharePoint-4CAEBE59-3994-4A94-9322-B31ABB8A5E9A

Overlay a SharePoint calendar with a calendar from Exchange or SharePoint

If you use a SharePoint calendar on your site, you can overlay your own Exchange calendar onto it to create a combined calendar view. Alternatively, you can overlay another SharePoint calendar as long as both SharePoint calendars are in the same site collection. In all, you can add up to four Exchange or SharePoint calendars.
This enables you to see combined schedules. For example, when you overlay an Exchange calendar to a SharePoint group calendar, you can see your own schedule and the group schedule at the same time. This can be helpful for choosing a time for a team event, or planning a time to present training.
NOTE:  To change calendar settings, you must have at least design permission level for the site.
To learn more about group calendars in SharePoint, see Use a Group Calendar.

I want to

Overlay an Exchange calendar on a SharePoint calendar

The following procedure describes how to overlay an Exchange calendar onto a SharePoint calendars for a SharePoint calendar. After you overlay the calendar, you can use this calendar to create a special calendar view.
IMPORTANT:  You can only overlay your own Exchange calendar. That is, the Exchange calendar overlay works with the account credentials of the user who is current logged on. SharePoint uses the account information of the current user to retrieve calendar data from the Exchange Web Service.
To overlay an Exchange calendar, follow these steps:
  1. In a SharePoint calendar, in the ribbon, on the Calendar tab, click Calendar Overlays.
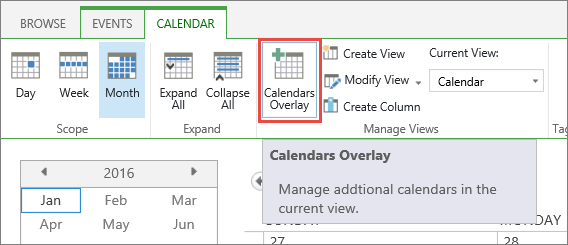
    Calendar Overaly button on ribbon
  2. In the Calendar Overlay Settings page, click New Calendar.
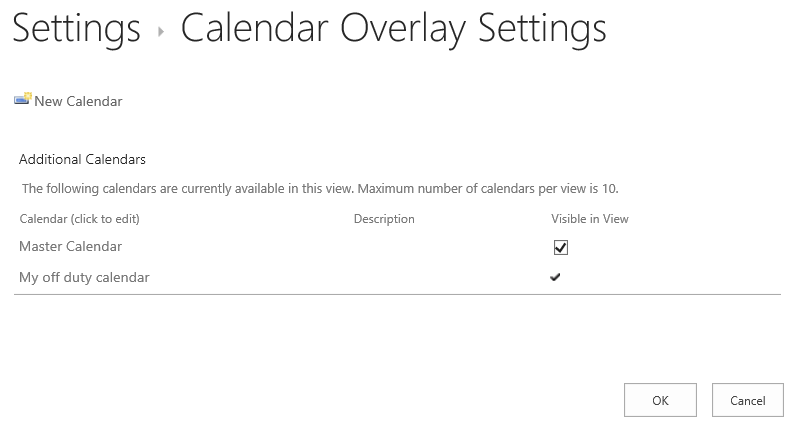
    Calendar Overaly button on ribbon
  3. In the Name and Type section, type the Calendar Name and select Exchange.
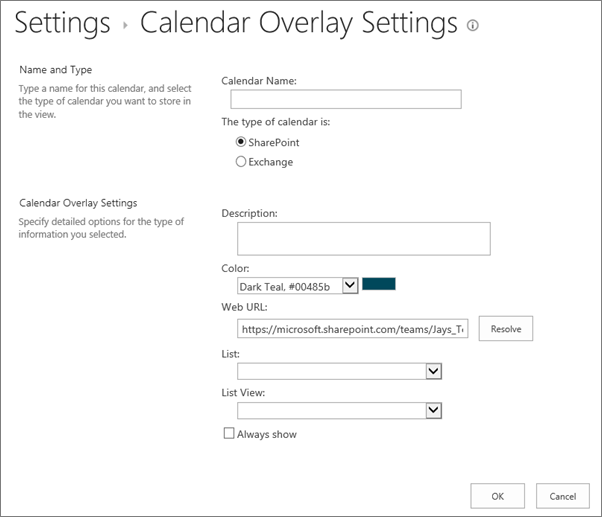
    Calendar overlay create calendar dialog box.
  4. In the Calendar Overlay Settings section, type a Description for the calendar (optional), and change the default Color theme for the calendar (optional).
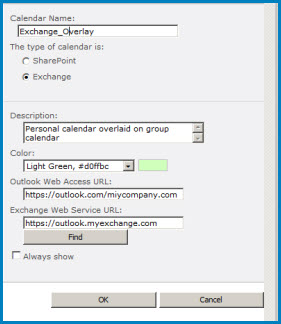
    Screenshot of the Calendar Overlay dialog box in SharePoint. The dialog box shows the Calendar name, calendar type (Exchange), and gives the URLs for Outlook Web Access and Exchange Web Access.
  5. Click Find to automatically fill in web addresses for Outlook Web Access URL and Exchange Web Service URL. If Find does not work in your environment, type the URLs manually.
  6. If you want this Exchange calendar to always appear with the SharePoint group calendar, click Always Show. When Always Show is not checked, you will be able to turn overlays on and off from the page. If it is checked, the overlay calendar will always appear on the page's calendar.
  7. Click OK and then click OK again.

See Also


Thursday, November 10, 2016

Linux Commands: How to view partition sizes

Linux Commands: How to view partition sizes

sudo lsblk -o NAME,FSTYPE,SIZE,MOUNTPOINT,LABEL
or
lsblk -f


sudo lsblk -o NAME,FSTYPE,SIZE,MOUNTPOINT,LABEL
NAME    FSTYPE              SIZE MOUNTPOINT LABEL
sda                       447.1G            
├─sda1  linux_raid_member  19.5G            
│ └─md1 ext4               19.5G /          /
├─sda2  linux_raid_member 427.1G            
│ └─md2 ext4              427.1G /home      /home
└─sda3  swap                511M [SWAP]     swap-sda3
sdb                       447.1G            
├─sdb1  linux_raid_member  19.5G            
│ └─md1 ext4               19.5G /          /
├─sdb2  linux_raid_member 427.1G            
│ └─md2 ext4              427.1G /home      /home

└─sdb3  swap                511M [SWAP]     swap-sdb3


and 


List drives system can see


fdisk -l

Disk /dev/sda: 480.1 GB, 480103981056 bytes
255 heads, 63 sectors/track, 58369 cylinders, total 937703088 sectors
Units = sectors of 1 * 512 = 512 bytes
Sector size (logical/physical): 512 bytes / 4096 bytes
I/O size (minimum/optimal): 4096 bytes / 4096 bytes
Disk identifier: 0xc73d95be

   Device Boot      Start         End      Blocks   Id  System
/dev/sda1   *        4096    40962047    20478976   fd  Linux RAID autodetect
/dev/sda2        40962048   936648703   447843328   fd  Linux RAID autodetect
/dev/sda3       936648704   937695231      523264   82  Linux swap / Solaris

Disk /dev/sdb: 480.1 GB, 480103981056 bytes
255 heads, 63 sectors/track, 58369 cylinders, total 937703088 sectors
Units = sectors of 1 * 512 = 512 bytes
Sector size (logical/physical): 512 bytes / 4096 bytes
I/O size (minimum/optimal): 4096 bytes / 4096 bytes
Disk identifier: 0xce6e28eb

   Device Boot      Start         End      Blocks   Id  System
/dev/sdb1   *        4096    40962047    20478976   fd  Linux RAID autodetect
/dev/sdb2        40962048   936648703   447843328   fd  Linux RAID autodetect
/dev/sdb3       936648704   937695231      523264   82  Linux swap / Solaris

Disk /dev/md2: 458.6 GB, 458591502336 bytes
2 heads, 4 sectors/track, 111960816 cylinders, total 895686528 sectors
Units = sectors of 1 * 512 = 512 bytes
Sector size (logical/physical): 512 bytes / 4096 bytes
I/O size (minimum/optimal): 4096 bytes / 4096 bytes
Disk identifier: 0x00000000

Disk /dev/md2 doesn't contain a valid partition table

Disk /dev/md1: 21.0 GB, 20970405888 bytes
2 heads, 4 sectors/track, 5119728 cylinders, total 40957824 sectors
Units = sectors of 1 * 512 = 512 bytes
Sector size (logical/physical): 512 bytes / 4096 bytes
I/O size (minimum/optimal): 4096 bytes / 4096 bytes

Disk identifier: 0x00000000


Linux command to view Disk Usage
use  du (disk usage) or df (disk free) 
enter specific folder
-h display humain readable format
-a display disk usage size of all all files and folders
-c display total size at the bottom of the list
-time to display modification date


http://incoreporation.com       https://ca.incoreporation.com       http://wwebservices.ca 

Tuesday, November 1, 2016

Microsoft Outlook AutoComplete list NK2

Microsoft Outlook AutoComplete list NK2

According to Microsoft here
https://support.microsoft.com/en-ca/kb/2199226

How to enable the AutoComplete feature

This section details how to enable or disable the AutoComplete feature.
Outlook 2010, Outlook 2013, and Outlook 2016
To access the AutoComplete setting, follow these steps: 
  1. On the File menu, click Options.
  2. Select the Mail tab.
  3. Scroll approximately halfway down until you see Send messages. Make sure that the Use Auto-Complete List to suggest names when typing in the To, Cc, and Bcc lines box is checked.

Outlook 2003 and Outlook 2007
To access the AutoComplete settings, follow the steps:
  1. Click Tools, and then click Options.
  2. Click the E-mail options button.
  3. Click the Advanced E-mail Options button.
  4. Make sure that the Suggest names while completing To, Cc, and Bcc fields box is checked. (The screen shot for this step follows.)The screen shot for this step.

How to import .nk2 files into Outlook 2010, Outlook 2013, and Outlook 2016

Microsoft Office Outlook 2007 and earlier versions store the AutoComplete list in an nickname (.nk2) file on the disk. Outlook 2010, Outlook 2013, and Outlook 2016 store the AutoComplete list as a hidden message in your primary message store. Outlook 2010, Outlook 2013, and Outlook 2016 let you import the older .nk2 files.

For more information about how to import .nk2 files in Outlook 2010, go to the following Microsoft website:
For more information about how to import .nk2 files in Outlook 2013 and Outlook 2016, click the following article number to view the article in the Microsoft Knowledge Base:  
2806550 How to import .nk2 files into Outlook 2013 or Outlook 2016

How to copy the AutoComplete list

The steps to export and import the AutoComplete list are different, depending on the version of Outlook that you are using.
Outlook 2010, Outlook 2013, and Outlook 2016
To copy the AutoComplete list in Outlook 2010, Outlook 2013, and Outlook 2016, follow these steps:

Step 1

To export the AutoComplete mailbox message, follow these steps:
  1. Exit Outlook, and then close Outlook Web Access or Outlook Web App (OWA) on all workstations that are connected to your mailbox.
  2. Download and install MFCMAPI from http://mfcmapi.codeplex.com.
  3. Run mfcmapi.exe.
  4. On the Session menu, click Logon.
  5. If you are prompted for a profile, select the desired profile name, and then click OK.
  6. In the top pane, locate the line that corresponds to your mailbox, and then double-click it.
  7. In the left-side navigation pane, expand Root Container, and then expand Top of Information Store or IPM_SUBTREE.
  8. Right-click the Inbox folder, and then click Open Associated Content Table. This action opens a new MFCMAPI window that contains various properties.
  9. Under the Subject column, right-click the item that has the subject IPM.Configuration.Autocomplete, and then click Export Message. This action opens the Save Message To File window.
  10. In the drop-down list, select MSG file (UNICODE), and then click OK.
  11. Select a folder location to which you want to save the message, and then click Save. Note this location.
Step 2

To import the AutoComplete mailbox message, follow these steps.
  1. Exit Outlook, and then close Outlook Web Access or Outlook Web App (OWA) on all workstations that are connected to your mailbox.
  2. Download and install MFCMAPI from http://mfcmapi.codeplex.com
  3. Run mfcmapi.exe.
  4. On the Session menu, click Logon.
  5. If you are prompted for a profile, select the desired profile name, and then click OK.
  6. In the top pane, locate the line that corresponds to your mailbox, and then double-click it.
  7. In the left-side navigation pane, expand Root - Mailbox, and then expand Top of Information Store or IPM_SUBTREE.
  8. Right-click the Inbox folder, and then click Open Associated Content Table. This action opens a new MFCMAPI window that contains various properties.
  9. To avoid duplicate entries, you must delete the existing AutoComplete message.

    Note Before you delete the IPM.Configuration.Autocomplete message, you must export the message by using the steps in the "How to export the Auto-Complete cache" section.

    To delete the existing AutoComplete message, follow these steps:

    1. In the Subject column, locate the item that has the subject IPM.Configuration.Autocomplete.
    2. Right-click the item, and then click Delete message. This opens the Delete Item window.
    3. In the drop-down list, select Permanent deletion (deletes to deleted item retention if supported), and then click OK.
  10. On the Folder menu, click Import, and then click From MSG.
  11. Locate the .msg file that you created in step 11 of the "How to Export the Auto-Complete List" section, and then click OK.
  12. In the Load MSG window that appears, select Load message into current folder in the Load style list, and then click OK.
The AutoComplete information is imported from the IPM.Configuration.Autocomplete_<hexadecimal code>.msg, where the placeholder<hexadecimal code> represents a long string of numbers and letters.
Outlook 2003 and Outlook 2007
The steps to copy the AutoComplete list in Outlook 2003 and Outlook 2007 are different. This is because Outlook 2003 and Outlook 2007 store the AutoComplete list in the .nk2 file.

To copy the AutoComplete list in Outlook 2003, go to the following Microsoft website:
To copy the AutoComplete list in Outlook 2007, go to the following Microsoft website:

How to remove AutoComplete list entries one at a time

To remove entries from the AutoComplete cache one entry at a time, follow these steps:
  1. Open a new email message.
  2. Type the first few characters of the AutoComplete entry that you want to remove.
  3. When the entry appears in the list of suggested names, move your mouse pointer over the name until it becomes highlighted, but do not click the name.
  4. When the "X" icon appears next to the highlighted name, click X to remove the name from the list, or press the Delete key on the keyboard.

How to clear the whole AutoComplete list

This section explains how to delete the AutoComplete list.
Outlook 2010, Outlook 2013, and Outlook 2016
Use one of the following two methods to delete the AutoComplete list in Outlook 2010, Outlook 2013, and Outlook 2016.

Method 1
  1. Open Outlook.
  2. On the File tab, click Options.
  3. Click the Mail tab.
  4. Under Send Messages, click Empty Auto-Complete List.

  5. Click Yes.

Method 2

Start Outlook by using the /CleanAutoCompleteCache switch. To do this, follow these steps:
  1. Click Start, and then click Run.
  2. Type Outlook.exe /CleanAutoCompleteCache.

    Note If Outlook is not installed in the default location, you must point to the path of Outlook.exe.
Outlook 2003 and Outlook 2007
To delete the AutoComplete list in Outlook 2003 and Outlook 2007, you must manually delete the .nk2 file. To delete the .nk2 file, follow these steps:
  1. Exit Outlook.
  2. Click Start, and then click Computer.
  3. Click Organize, and then click Folder and search options.
  4. On the View tab, click Show hidden files, folders, and drives.
  5. Click OK.
  6. Click Start, click All Programs, click Accessories, and then click Run.
  7. In the Run dialog box, type the following command (including the quotation marks), and then click OK:

    “C:\ Users\UserName\AppData\Roaming\Microsoft\Outlook”


    NoteUsername in this path is the name of the currently logged on Windows user.
  8. Right-click the .NK2 file that has name of the profile that you want to reset, and then click Rename. 
  9. Rename the file as profilename.bak, and then press Enter.
  10. tart Outlook.

Issues with the AutoComplete cache

This section describes known issues that can occur with the AutoComplete cache. The AutoComplete cache can become corrupted over time and may not save new entries. If this happens, you can try to remove individual entries from the list. To do this, see the section titled "How to remove AutoComplete list entries one at a time." If that does not resolve the issue, the whole AutoComplete list can be reset. To do this, see the section titled "How to clear the whole AutoComplete list."

How to change the limit for the AutoComplete list

Because this configuration is untested, we do not recommend it. If you have a larger AutoComplete list, you could also lose a larger number of cached entries if your AutoComplete cache becomes unusable because of corruption. Given this disclaimer, you can use the following registry data to increase the AutoComplete list limit in Outlook.

Important This section, method, or task contains steps that tell you how to modify the registry. However, serious problems might occur if you modify the registry incorrectly. Therefore, make sure that you follow these steps carefully. For added protection, back up the registry before you modify it. Then, you can restore the registry if a problem occurs. For more information about how to back up and restore the registry, click the following article number to view the article in the Microsoft Knowledge Base:

322756 How to back up and restore the registry in Windows
  1. Exit Outlook.
  2. Start Registry Editor.
    • In Windows 8.x, press the Windows key, type regedit and then press Enter.
    • In Windows 7 and Windows Vista, click Start, type regedit in the Start Search box, and then press Enter.
  3. Locate and then select the following registry subkey:

    HKEY_CURRENT_USER\Software\Microsoft\Office\x.0\Outlook\AutoNameCheck

    Note The placeholder x.0 in this registry subkey represents your version of Microsoft Office. Use the appropriate value from the following list.

    Outlook 2016 = 16.0
    Outlook 2013 = 15.0
    Outlook 2010 = 14.0
    Outlook 2007 = 12.0
    Outlook 2003 = 11.0
  4. On the Edit menu, point to New, and then click DWORD value.
  5. Type MaxNickNames, and then press Enter.
  6. On the Edit menu, click Modify.
  7. Type the new value for the limit, and then click OK.

    Notes
    • Make sure that you type the number in decimal form. That is the correct form in which to type the number.
    • Try increasing the limit by only a marginal amount to test the new limit. For example, to create a 20 percent increase in the limit in Outlook 2013, you would specify 1200 for the MaxNickNames value.
  8. Exit Registry Editor.
  9. Start Outlook.
Note The MaxNickNames registry value merely specifies the nondefault limit. Therefore, you can also use this value to lower the limit of the nickname cache.

http://incoreporation.com       https://ca.incoreporation.com       http://wwebservices.ca 

Featured Posts

Exchange Online Limits - Office 365 Distribution group limits

Exchange Online Limits - Office 365 Distribution group limits What are Exchange Online Limits What are Office 365 Distribution group limi...