How to prepare a non-routable domain (such as .local domain) for directory synchronization
Applies To: Office 365 Admin Microsoft 365 Business
When you synchronize your on-premises directory with Office 365 you have to have a verified domain in Azure Active Directory. Only the User Principal Names (UPN) that are associated with the on-premises domain are synchronized. However, any UPN that contains an non-routable domain, for example .local (like billa@contoso.local), will be synchronized to an .onmicrosoft.com domain (like billa@contoso.onmicrosoft.com). If you currently use a .local domain for your user accounts in Active Directory it's recommended that you change them to use a verified domain (like billa@contoso.com) in order to properly sync with your Office 365 domain.
What if I only have a .local on-premises domain?
The most recent tool you can use for synchronizing your Active Directory to Azure Active Directory is named Azure AD Connect. For more information, see Integrating your on-premises identities with Azure Active Directory.
Azure AD Connect synchronizes your users' UPN and password so that users can sign in with the same credentials they use on-premises. However, Azure AD Connect only synchronizes users to domains that are verified by Office 365. This means that the domain also is verified by Azure Active Directory because Office 365 identities are managed by Azure Active Directory. In other words, the domain has to be a valid Internet domain (for example, .com, .org, .net, .us, etc.). If your internal Active Directory only uses a non-routable domain (for example, .local), this can't possibly match the verified domain you have on Office 365. You can fix this issue by either changing your primary domain in your on premises Active Directory, or by adding one or more UPN suffixes.
Change your primary domain
Change your primary domain to a domain you have verified in Office 365, for example, contoso.com. Every user that has the domain contoso.local is then updated to contoso.com. For instructions, see How Domain Rename Works. This is a very involved process, however, and an easier solution is to add UPN suffixes, as shown in the following section.
Add UPN suffixes and update your users to them
You can solve the .local problem by registering new UPN suffix or suffixes in Active Directory to match the domain (or domains) you verified in Office 365. After you register the new suffix, you update the user UPNs to replace the .local with the new domain name for example so that a user account looks like billa@contoso.com.
After you have updated the UPNs to use the verified domain,you are ready to synchronize your on-premises Active Directory with Office 365.
Step 1: Add the new UPN suffix
- On the server that Active Directory Domain Services (AD DS) runs on, in the Server Manager choose Tools > Active Directory Domains and Trusts.Or, if you don't have Windows Server 2012Press Windows key + R to open the Run dialog, and then type in Domain.msc, and then choose OK.

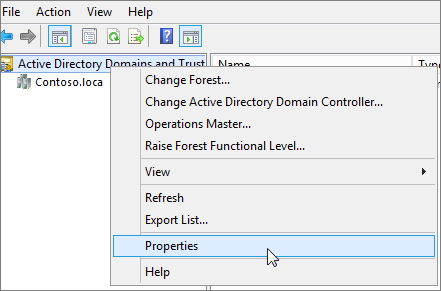
- On the Active Directory Domains and Trusts window, right-click Active Directory Domains and Trusts, and then choose Properties.

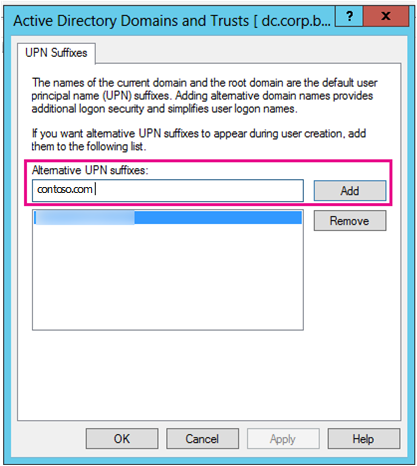
- On the UPN Suffixes tab, in the Alternative UPN Suffixes box, type your new UPN suffix or suffixes, and then choose Add > Apply.
 Choose OK when you're done adding suffixes.
Step 2: Change the UPN suffix for existing users
- On the server that Active Directory Domain Services (AD DS) runs on, in the Server Manager choose Tools > Active Directory Active Directory Users and Computers.Or, if you don't have Windows Server 2012Press Windows key + R to open the Run dialog, and then type in Dsa.msc, and then click OK
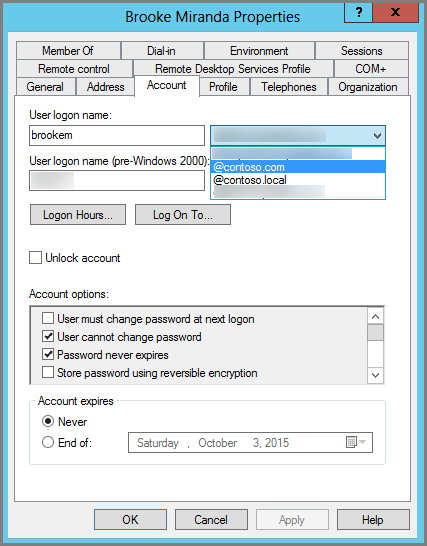
- Select a user, right-click, and then choose Properties.
- On the Account tab, in the UPN suffix drop-down list, choose the new UPN suffix, and then choose OK.

- Complete these steps for every user.Alternately you can bulk update the UPN suffixes by using PowerShell.
You can also use Windows PowerShell to change the UPN suffix for all users
If you have a lot of users to update, it is easier to use Windows PowerShell. The following example uses the cmdlets Get-ADUser and Set-ADUser to change all contoso.local suffixes to contoso.com.
See Active Directory Windows PowerShell module to learn more about using Windows PowerShell in Active Directory.
- Run the following Windows PowerShell commands to update all contoso.local suffixes to contoso.com:
$LocalUsers = Get-ADUser -Filter {UserPrincipalName -like '*contoso.local'} -Properties userPrincipalName -ResultSetSize $null$LocalUsers | foreach {$newUpn = $_.UserPrincipalName.Replace("contoso.local","contoso.com"); $_ | Set-ADUser -UserPrincipalName $newUpn}
No comments:
Post a Comment