Migrate Active Directory Domain Controller from server 2008 R2 to server 2016
https://www.youtube.com/watch?v=ueX31msugCA
Active Directory Migration From Windows Server 2008 R2 to Windows Server 2016
https://youtu.be/RCX_1A_-UZUreplication windows server doesn't exist anymore how to delete
How to remove an non-existent domain controller 
Clean Up Server Metadata
Applies To: Windows Server 2008, Windows Server 2008 R2, Windows Server 2012
Metadata cleanup is a required procedure after a forced removal of Active Directory Domain Services (AD DS). You perform metadata cleanup on a domain controller in the domain of the domain controller that you forcibly removed. Metadata cleanup removes data from AD DS that identifies a domain controller to the replication system. Metadata cleanup also removes File Replication Service (FRS) and Distributed File System (DFS) Replication connections and attempts to transfer or seize any operations master (also known as flexible single master operations or FSMO) roles that the retired domain controller holds.
You can clean up server metadata by using the following:
- Clean up server metadata by using GUI tools
- Clean up server metadata using the command line
- Clean up server metadata by using a script
Note
If you receive an “Access is denied” error when you use any of these methods to perform metadata cleanup, make sure that the computer object and the NTDS Settings object for the domain controller are not protected against accidental deletion. To verify this right-click the computer object or the NTDS Settings object, click Properties, click Object, and clear the Protect object from accidental deletion check box. In Active Directory Users and Computers, the Objecttab of an object appears if you click View and then click Advanced Features.
Clean up server metadata by using GUI tools
When you use Remote Server Administration Tools (RSAT) or the Active Directory Users and Computers console (Dsa.msc) that is included with Windows Server 2008 or Windows Server 2008 R2 to delete a domain controller computer account from the Domain Controllers organizational unit (OU), the cleanup of server metadata is performed automatically. Previously, you had to perform a separate metadata cleanup procedure.
You can also use the Active Directory Sites and Services console (Dssite.msc) to delete a domain controller’s computer account, which also completes metadata cleanup automatically. However, Active Directory Sites and Services removes the metadata automatically only when you first delete the NTDS Settings object below the computer account in Dssite.msc.
As long as you are using the Windows Server 2008, Windows Server 2008 R2, or RSAT versions of Dsa.msc or Dssite.msc, you can clean up metadata automatically for domain controllers running earlier versions of Windows operating systems.
Membership in Domain Admins, or equivalent, is the minimum required to complete these procedures. Review details about using the appropriate accounts and group memberships at Local and Domain Default Groups (http://go.microsoft.com/fwlink/?LinkId=83477).
To clean up server metadata by using Active Directory Users and Computers
- Open Active Directory Users and Computers: On the Start menu, point to Administrative Tools, and then click Active Directory Users and Computers.
- If you have identified replication partners in preparation for this procedure and if you are not connected to a replication partner of the removed domain controller whose metadata you are cleaning up, right-click Active Directory Users and Computers <DomainControllerName>, and then click Change Domain Controller. Click the name of the domain controller from which you want to remove the metadata, and then click OK.
- Expand the domain of the domain controller that was forcibly removed, and then click Domain Controllers.
- In the details pane, right-click the computer object of the domain controller whose metadata you want to clean up, and then click Delete.
- In the Active Directory Domain Services dialog box, click Yes to confirm the computer object deletion.
- In the Deleting Domain Controller dialog box, select This Domain Controller is permanently offline and can no longer be demoted using the Active Directory Domain Services Installation Wizard (DCPROMO), and then click Delete.

- If the domain controller is a global catalog server, in the Delete Domain Controller dialog box, click Yes to continue with the deletion.
- If the domain controller currently holds one or more operations master roles, click OK to move the role or roles to the domain controller that is shown.You cannot change this domain controller. If you want to move the role to a different domain controller, you must move the role after you complete the server metadata cleanup procedure.
To clean up server metadata by using Active Directory Sites and Services
- Open Active Directory Sites and Services: On the Start menu, point to Administrative Tools, and then click Active Directory Sites and Services.
- If you have identified replication partners in preparation for this procedure and if you are not connected to a replication partner of the removed domain controller whose metadata you are cleaning up, right-click Active Directory Users and Computers <DomainControllerName>, and then click Change Domain Controller. Click the name of the domain controller from which you want to remove the metadata, and then click OK.
- Expand the site of the domain controller that was forcibly removed, expand Servers, expand the name of the domain controller, right-click the NTDS Settings object, and then click Delete.

- In the Active Directory Domain Services dialog box, click Yes to confirm the NTDS Settings deletion.
- In the Deleting Domain Controller dialog box, select This Domain Controller is permanently offline and can no longer be demoted using the Active Directory Domain Services Installation Wizard (DCPROMO), and then click Delete.
- If the domain controller is a global catalog server, in the Delete Domain Controller dialog box, click Yes to continue with the deletion.
- If the domain controller currently holds one or more operations master roles, click OK to move the role or roles to the domain controller that is shown.
- Right-click the domain controller that was forcibly removed, and then click Delete.

- In the Active Directory Domain Services dialog box, click Yes to confirm the domain controller deletion.
Clean up server metadata using the command line
As an alternative, you can clean up metadata by using Ntdsutil.exe, a command-line tool that is installed automatically on all domain controllers and servers that have Active Directory Lightweight Directory Services (AD LDS) installed. Ntdsutil.exe is also available on computers that have RSAT installed.
To clean up server metadata by using Ntdsutil
- Open a command prompt as an administrator: On the Start menu, right-click Command Prompt, and then click Run as administrator. If the User Account Control dialog box appears, provide Enterprise Admins credentials, if required, and then click Continue.
- At the command prompt, type the following command, and then press ENTER:
ntdsutil - At the
ntdsutil:prompt, type the following command, and then press ENTER:metadata cleanup - At the
metadata cleanup:prompt, type the following command, and then press ENTER:remove selected server <ServerName>Orremove selected server <ServerName1> on <ServerName2>Value Description ntdsutil: metadata cleanupInitiates removal of objects that refer to a decommissioned domain controller.remove selected serverRemoves objects for a specified, decommissioned domain controller from a specified server.<ServerName> or <ServerName1>The distinguished name of the domain controller whose metadata you want to remove, in the form cn=ServerName,cn=Servers,cn=SiteName, cn=Sites,cn=Configuration,dc=ForestRootDomain. If you specify only one server name, the objects are removed from the current domain controller.on <ServerName2>Specifies removing server metadata on <ServerName2>, the Domain Name System (DNS) name of the domain controller to which you want to connect. If you have identified replication partners in preparation for this procedure, specify a domain controller that is a replication partner of the removed domain controller. - In Server Remove Configuration Dialog, review the information and warning, and then click Yesto remove the server object and metadata.At this point, Ntdsutil confirms that the domain controller was removed successfully. If you receive an error message that indicates that the object cannot be found, the domain controller might have been removed earlier.
- At the
metadata cleanup:andntdsutil:prompts, typequit, and then press ENTER. - To confirm removal of the domain controller:Open Active Directory Users and Computers. In the domain of the removed domain controller, click Domain Controllers. In the details pane, an object for the domain controller that you removed should not appear.Open Active Directory Sites and Services. Navigate to the Servers container and confirm that the server object for the domain controller that you removed does not contain an NTDS Settings object. If no child objects appear below the server object, you can delete the server object. If a child object appears, do not delete the server object because another application is using the object.
Clean up server metadata by using a script
Another option for cleaning up server metadata is to use a script. For information about using a script to clean up metadata, see Remove Active Directory Domain Controller Metadata (http://go.microsoft.com/fwlink/?LinkID=123599).
See Also
Concepts
Other Resources
How to remove data in Active Directory after an unsuccessful domain controller demotion
Summary
This article describes how to remove data in Active Directory after an unsuccessful domain controller demotion.
Warning If you use the ADSI Edit snap-in, the LDP utility, or any other LDAP version 3 client, and you incorrectly modify the attributes of Active Directory objects, you can cause serious problems. These problems may require you to reinstall Microsoft Windows 2000 Server, Microsoft Windows Server 2003, Microsoft Exchange 2000 Server, Microsoft Exchange Server 2003, or both Windows and Exchange. Microsoft cannot guarantee that problems that occur if you incorrectly modify Active Directory object attributes can be solved. Modify these attributes at your own risk.
The Active Directory Installation Wizard (Dcpromo.exe) is used for promoting a server to a domain controller and for demoting a domain controller to a member server (or to a stand-alone server in a workgroup if the domain controller is the last in the domain). As part of the demotion process, the wizard removes the configuration data for the domain controller from Active Directory. This data takes the form of an NTDS Settings object that exists as a child of the server object in Active Directory Sites and Services.
The information is in the following location in Active Directory:
If the NTDS Settings object is removed incorrectly (for example, if the NTDS Settings object is removed incorrectly from a demotion attempt), the administrator can manually remove the metadata for a server object. In Windows Server 2008, and Windows Server 2008 R2, the administrator can remove the metadata for a server object by removing the server object in the Active Directory Users and Computers snap-in.
In Windows Server 2003 and Windows 2000 Server, the administrator can use the Ntdsutil.exe utility to manually remove the NTDS Settings object. The following steps list the procedure for removing the NTDS Settings object in Active Directory for a particular domain controller. At each Ntdsutil menu, the administrator can type help for more information about the available options.
Note You do not need to manually remove the FRS member object in Windows Server 2003 RTM because the Ntdsutil.exe utility has already removed the FRS member object when you run the utility. Additionaly, the metadata of the computer account cannot be removed if the computer account of the DC contains another leaf object. For example, Remote Installation Services (RIS) might be installed on the DC.
The Adsiedit utility is included with the Windows Support Tools feature in both Windows 2000 Server and Windows Server 2003. To install the Windows Support Tools, following these steps:
Warning If you use the ADSI Edit snap-in, the LDP utility, or any other LDAP version 3 client, and you incorrectly modify the attributes of Active Directory objects, you can cause serious problems. These problems may require you to reinstall Microsoft Windows 2000 Server, Microsoft Windows Server 2003, Microsoft Exchange 2000 Server, Microsoft Exchange Server 2003, or both Windows and Exchange. Microsoft cannot guarantee that problems that occur if you incorrectly modify Active Directory object attributes can be solved. Modify these attributes at your own risk.
The Active Directory Installation Wizard (Dcpromo.exe) is used for promoting a server to a domain controller and for demoting a domain controller to a member server (or to a stand-alone server in a workgroup if the domain controller is the last in the domain). As part of the demotion process, the wizard removes the configuration data for the domain controller from Active Directory. This data takes the form of an NTDS Settings object that exists as a child of the server object in Active Directory Sites and Services.
The information is in the following location in Active Directory:
CN=NTDS Settings,CN=<servername>,CN=Servers,CN=<sitename>,CN=Sites,CN=Configuration,DC=<domain>...
The attributes of the NTDS Settings object include data representing how the domain controller is identified in respect to its replication partners, the naming contexts that are maintained on the machine, whether the domain controller is a global catalog server, and the default query policy. The NTDS Settings object is also a container that may have child objects that represent the domain controller's direct replication partners. This data is required for the domain controller to operate in the environment, but is retired upon demotion.If the NTDS Settings object is removed incorrectly (for example, if the NTDS Settings object is removed incorrectly from a demotion attempt), the administrator can manually remove the metadata for a server object. In Windows Server 2008, and Windows Server 2008 R2, the administrator can remove the metadata for a server object by removing the server object in the Active Directory Users and Computers snap-in.
In Windows Server 2003 and Windows 2000 Server, the administrator can use the Ntdsutil.exe utility to manually remove the NTDS Settings object. The following steps list the procedure for removing the NTDS Settings object in Active Directory for a particular domain controller. At each Ntdsutil menu, the administrator can type help for more information about the available options.
Windows Server 2003 Service Pack 1 (SP1) or later service packs – Enhanced version of Ntdsutil.exe
The version of Ntdsutil.exe that is included with Service Pack 1 or later service packs for Windows Server 2003 has been enhanced to make the metadata cleanup process complete. The Ntdsutil.exe version that is included with SP1 or later service packs does the following when metadata cleanup is run:- Removes the NTDSA or NTDS Setting subject.
- Removes inbound AD connection objects that existing destination DCs use to replicate from the source DC being deleted .
- Removes the computer account .
- Removes FRS member object.
- Removes FRS subscriber objects.
- Tries to seize flexible single operations master roles (also known as flexible single master operations or FSMO) held by the DC that are being removed .
Procedure 1: Windows Server 2003 SP1 or later service packs only
- Click Start, point to
Programs, point to Accessories, and then click Command Prompt. - At the command prompt, type
ntdsutil, and then press ENTER. - Type metadata cleanup, and then press ENTER. Based on the options given, the administrator can perform the removal, but additional configuration parameters must be specified before the removal can occur.
- Type connections and press ENTER. This menu is used to connect to the specific server where the changes occur. If the currently logged on user does not have administrative permissions, different credentials can be supplied by specifying the credentials to use before making the connection. To do this, type set creds
DomainNameUserNamePassword, and then press ENTER. For a null password, type null for the password parameter. - Type connect to server
servername, and then press ENTER. You should receive confirmation that the connection is successfully established. If an error occurs, verify that the domain controller being used in the connection is available and the credentials you supplied have administrative permissions on the server.
Note If you try to connect to the same server that you want to delete, when you try to delete the server that step 15 refers to, you may receive the following error message:Error 2094. The DSA Object cannot be deleted0x2094 - Type quit, and then press ENTER. The
Metadata Cleanup menu appears. - Type select operation target and press ENTER.
- Type list domains and press ENTER. A list of domains in the forest is displayed, each with an associated number.
- Type select domain
number and press ENTER, where
number is the number associated with the domain the server you are removing is a member of. The domain you select is used to determine whether the server being removed is the last domain controller of that domain. - Type list sites and press ENTER. A list of sites, each with an associated number, appears.
- Type select site
number and press ENTER, where
number is the number associated with the site the server you are removing is a member of. You should receive a confirmation listing the site and domain you chose. - Type list servers in site and press ENTER. A list of servers in the site, each with an associated number, is displayed.
- Type select server
number, where
number is the number associated with the server you want to remove. You receive a confirmation listing the selected server, its Domain Name System (DNS) host name, and the location of the server's computer account you want to remove. - Type quit and press ENTER. The Metadata Cleanup menu appears.
- Type remove selected server and press ENTER. You should receive confirmation that the removal completed successfully. If you receive the following error message, the NTDS Settings object may already be removed from Active Directory as the result of another administrator removing the NTDS Settings object or replication of the successful removal of the object after running the DCPROMO utility.Error 8419 (0x20E3)
The DSA object could not be found
Note You may also see this error when you try to bind to the domain controller that will be removed. Ntdsutil has to bind to a domain controller other than the one that will be removed with metadata cleanup. - Type quit, and then press ENTER at each menu quit the Ntdsutil utility. You should receive confirmation that the connection disconnected successfully.
- Remove the cname record in the _msdcs.root domain of forest zone in DNS. Assuming that DC will be reinstalled and re-promoted, a new NTDS Settings object is created with a new GUID and a matching cname record in DNS. You do not want the DCs that exist to use the old cname record.
As best practice, you should delete the host name and other DNS records. If the lease time that remains on Dynamic Host Configuration Protocol (DHCP) address assigned to offline server is exceeded then another client can obtain the IP address of the problem DC. - In the DNS console, use the DNS MMC to delete the A record in DNS. The A record is also known as the Host record. To delete the A record, right-click the A record, and then click Delete. Also, delete the cname record in the _msdcs container. To do this, expand the
_msdcs container, right-click cname, and then click Delete.
Important If this is a DNS server, remove the reference to this DC under the
Name Servers tab. To do this, in the DNS console, click the domain name under
Forward Lookup Zones, and then remove this server from the
Name Servers tab.
Note If you have reverse lookup zones, also remove the server from these zones. - If the deleted computer is the last domain controller in a child domain, and the child domain was also deleted, use ADSIEdit to delete the trustDomain object for the child. To do this, follow these steps:
- Click Start, click
Run, type adsiedit.msc, and then click OK - Expand the Domain NC container.
- Expand DC=Your Domain, DC=COM, PRI, LOCAL, NET.
- Expand CN=System.
- Right-click the Trust Domain object, and then click Delete.
- Click Start, click
- Use Active Directory Sites and Services to remove the domain controller. To do this, follow these steps:
- Start Active Directory Sites and Services.
- Expand Sites.
- Expand the server's site. The default site is Default-First-Site-Name.
- Expand Server.
- Right-click the domain controller, and then click
Delete.
- When you use DFS Replication in Windows Server 2008 and in later versions, the current version of Ntdsutil.exe does not clean up the DFS Replication object. In this case, you can use Adsiedit.msc to correct the DFS Replication objects for Active Directory Domain Services (AD DS) manually. To do this, follow these steps:
- Logon a domain controller as a domain administrator in the affected domain.
Start Adsiedit.msc.
Connect to the default naming context.- Locate the following DFS Replication topology container:CN=Topology,CN=Domain System Volume,CN=DFSR-Globalsettings,CN=System,DC=Your Domain,DC=Domain Suffix
- Delete the msDFSR-Member CN object that has the old computer name.
Procedure 2: Windows 2000 (All versions) Windows Server 2003 RTM
- Click Start, point to
Programs, point to Accessories, and then click Command Prompt. - At the command prompt, type
ntdsutil, and then press ENTER. - Type metadata cleanup, and then press ENTER. Based on the options given, the administrator can perform the removal, but additional configuration parameters must be specified before the removal can occur.
- Type connections and press ENTER. This menu is used to connect to the specific server where the changes occur. If the currently logged on user does not have administrative permissions, different credentials can be supplied by specifying the credentials to use before you make the connection. To do this, type set creds
DomainNameUserNamePassword, and then press ENTER. For a null password, type null for the password parameter. - Type connect to server
servername, and then press ENTER. You should receive confirmation that the connection is successfully established. If an error occurs, verify that the domain controller being used in the connection is available and the credentials you supplied have administrative permissions on the server.
Note If you try to connect to the same server that you want to delete, when you try to delete the server that step 15 refers to, you may receive the following error message:Error 2094. The DSA Object cannot be deleted0x2094 - Type quit, and then press ENTER. The
Metadata Cleanup menu appears. - Type select operation target and press ENTER.
- Type list domains and press ENTER. A list of domains in the forest is displayed, each with an associated number.
- Type select domain
number and press ENTER, where
number is the number associated with the domain the server you are removing is a member of. The domain you select is used to determine whether the server being removed is the last domain controller of that domain. - Type list sites and press ENTER. A list of sites, each with an associated number, is displayed.
- Type select site
number and press ENTER, where
number is the number associated with the site the server you are removing is a member of. You should receive a confirmation listing the site and domain you chose. - Type list servers in site and press ENTER. A list of servers in the site, each with an associated number, is displayed.
- Type select server
number, where
number is the number associated with the server you want to remove. You receive a confirmation listing the selected server, its Domain Name System (DNS) host name, and the location of the server's computer account you want to remove. - Type quit and press ENTER. The Metadata Cleanup menu appears.
- Type remove selected server and press ENTER. You should receive confirmation that the removal completed successfully. If you receive the following error message:Error 8419 (0x20E3)the NTDS Settings object may already be removed from Active Directory as the result of another administrator removing the NTDS Settings object, or replication of the successful removal of the object after you run the Dcpromo utility.
The DSA object could not be found
Note You may also see this error when you try to bind to the domain controller that will be removed. Ntdsutil has to bind to a domain controller other than the one that will be removed with metadata cleanup. - Type quit at each menu to quit the Ntdsutil utility. You should receive confirmation that the connection disconnected successfully.
- Remove the cname record in the _msdcs.root domain of forest zone in DNS. Assuming that DC will be reinstalled and re-promoted, a new NTDS Settings object is created by using a new GUID and a matching cname record in DNS. You do not want the DC's that exist to use the old cname record.
As best practice you should delete the hostname and other DNS records. If the lease time that remains on Dynamic Host Configuration Protocol (DHCP) address assigned to offline server is exceeded then another client can obtain the IP address of the problem DC.
Note You do not need to manually remove the FRS member object in Windows Server 2003 RTM because the Ntdsutil.exe utility has already removed the FRS member object when you run the utility. Additionaly, the metadata of the computer account cannot be removed if the computer account of the DC contains another leaf object. For example, Remote Installation Services (RIS) might be installed on the DC.
The Adsiedit utility is included with the Windows Support Tools feature in both Windows 2000 Server and Windows Server 2003. To install the Windows Support Tools, following these steps:
- Windows 2000 Server: On the Windows 2000 Server CD, open the Support\Tools folder, double-click Setup.exe, and then follow the instructions that appear on the screen.
- Windows Server 2003: On the Windows Server 2003 CD, open the Support\Tools folder, double-click Suptools.msi, click
Install, and then follow the steps in the Windows Support Tools Setup Wizard to complete the installation.
- Use ADSIEdit to delete the computer account. To do this, follow these steps:
- Click Start, click
Run, type adsiedit.msc in the
Open box, and then click OK. - Expand the Domain NC container.
- Expand DC=Your Domain Name, DC=COM, PRI, LOCAL, NET.
- Expand OU=Domain Controllers.
- Right-click CN=domain controller name, and then click Delete.
Clear, change the value to 4096, and then click
Set. You can now delete the object.
Note The FRS subscriber object is deleted when the computer object is deleted because it is a child of the computer account. - Click Start, click
- Use ADSIEdit to delete the FRS member object. To do this, follow these steps:
- Click Start, click
Run, type adsiedit.msc in the
Open box, and then click OK - Expand the Domain NC container.
- Expand DC=Your Domain, DC=COM, PRI, LOCAL, NET.
- Expand CN=System.
- Expand CN=File Replication Service.
- Expand CN=Domain System Volume (SYSVOL share).
- Right-click the domain controller you are removing, and then click Delete.
- Click Start, click
- In the DNS console, use the DNS MMC to delete the A record in DNS. The A record is also known as the Host record. To delete the A record, right-click the A record, and then click Delete. Also delete the cname (also known as the Alias) record in the _msdcscontainer. To do so, expand the _msdcs container, right-click the cname, and then click Delete.
Important If this was a DNS server, remove the reference to this DC under the Name Servers tab. To do this, in the DNS console, right-click the domain name under Forward Lookup Zones, click Properties, and then remove this server from the Name Serverstab.
Note If you have reverse lookup zones, also remove the server from these zones. - If the deleted computer was the last domain controller in a child domain and the child domain was also deleted, use ADSIEdit to delete the trustDomain object for the child. To do this, follow these steps:
- Click Start, click
Run, type adsiedit.msc in the
Open box, and then click OK - Expand the Domain NC container.
- Expand DC=Your Domain, DC=COM, PRI, LOCAL, NET.
- Expand CN=System.
- Right-click the Trust Domain object, and then click Delete.
- Click Start, click
- Use Active Directory Sites and Services to remove the domain controller. To do this, follow these steps:
- Start Active Directory Sites and Services.
- Expand Sites.
- Expand the server's site. The default site is
Default-First-Site-Name. - Expand Server.
- Right-click the domain controller, and then click
Delete.
Advanced optional syntax with the SP1 or later versions of Ntdsutil.exe
Windows Server 2003 SP1 introduced a new syntax that can be used. By using the new syntax, it is no longer required to bind to the DS and select your operation target. To use the new syntax, you must know or obtain the DN of the NTDS settings object of the server that is being demoted. To use the new syntax for metadata cleanup, follow these steps:- Run ntdsutil.
- Switch to the metadata cleanup prompt.
- Run the following commandremove selected server <DN of the server object in the config container>An example of this command is as follows.
Note The following is one line but has been wrapped.Remove selected server cn=servername,cn=servers,cn=sitename,cn=sites,cn=configuration,dc=<forest_root_domain> - Remove the cname record in the _msdcs.root domain of forest zone in DNS. Assuming that DC will be reinstalled and re-promoted, a new NTDS Settings object is created by using a new GUID and a matching cname record in DNS. You do not want the DCs that exist to use the old cname record.
As best practice, you should delete the host name and other DNS records. If the lease time that remains on Dynamic Host Configuration Protocol (DHCP) address assigned to offline server is exceeded, another client can obtain the IP address of the problem DC. - If the deleted computer was the last domain controller in a child domain, and the child domain was also deleted, use ADSIEdit to delete the trustDomain object for the child. To do this, follow these steps:
- Click Start, click
Run, type adsiedit.msc, and then click OK. - Expand the Domain NC container.
- Expand DC=Your Domain Name, DC=COM, PRI, LOCAL, NET.
- Expand CN=System.
- Right-click the Trust Domain object,, and then click Delete.
- Click Start, click
- Use Active Directory Sites and Services to remove the domain controller. To do this, follow these steps:
- Start Active Directory Sites and Services.
- Expand Sites.
- Expand the server's site. The default site is
Default-First-Site-Name. - Expand Server.
- Right-click the domain controller, and then click
Delete.
More Information
For more information about how to forcefully demote a Windows Server 2003 or Windows 2000 domain controller, click the following article number to view the article in the Microsoft Knowledge Base:
332199 Domain controllers do not demote gracefully when you use the Active Directory Installation Wizard to force demotion in Windows Server 2003 and in Windows 2000 Server
Determine the DN of the server
There are several ways to obtain the DN of the server object that is to be removed. The following example uses Ldp.exe. To obtain the DN by using Ldp.exe, follow these steps:- Run LDP.
- Bind to rootDSE.
- Select View\tree. Base DN should be cn=configuration,dc=rootdomain,dc=<suffix>.
- Expand Sites.
- Expand the site where the server object resides.
- Expand Servers.
- Expand the server that you are removing.
- Look for a line on the right hand side that starts with DN.
- Copy whole line excluding the DN.
Example snip of the first part of the LDP spew:Expanding base 'CN=DC1,CN=Servers,CN=Default-First-Site-Name,CN=Sites,CN=Configuration,DC=corp,DC=com'... Result <0>: (null) Matched DNs: Getting 1 entries: >> Dn: CN=DC1,CN=Servers,CN=Default-First-Site-Name,CN=Sites,CN=Configuration,DC=corp,DC=com” What you would copy would be "CN=DC1,CN=Servers,CN=Default-First-Site-Name,CN=Sites,CN=Configuration,DC=corp,DC=com"
887424 "DsRemoveDsDomainW error 0x2015" error message when you use Ntdsutil to try to remove metadata for a domain controller that was removed from your network in Windows Server 2003
References
For more information about how to use a script to remove Active Directory metadata for a domain controller, visit the following Microsoft TechNet Web site:
For more information about how to use the Graphical User Interface (GUI) to perform metadata cleanup in Windows Server 2008 and later, visit the following Microsoft TechNet Web Site:
For more information about how to use the Graphical User Interface (GUI) to perform metadata cleanup in Windows Server 2008 and later, visit the following Microsoft TechNet Web Site:
www.inCOREporation.com
EXTRA
Migrate Your SYSVOL Replication from FRS to DFSR


Applies To: Windows Server 2008, Windows Server 2008 R2
SYSVOL is a collection of folders that contain a copy of the domain’s public files, including system policies, logon scripts, and important elements of Group Policy objects (GPOs). The SYSVOL directory must be present and the appropriate subdirectories must be shared on a server before the server can advertise itself on the network as a domain controller. Shared subdirectories in the SYSVOL tree are replicated to every domain controller in the domain.
Note
For Group Policy, only the Group Policy template (GPT) is replicated through SYSVOL replication. The Group Policy container (GPC), which is stored in the domain, is replicated through Active Directory replication. For Group Policy to be effective, both parts must be available on a domain controller.
SYSVOL terminology and capitalization
SYSVOL is referred to as the “SYSVOL share.” The default root of the SYSVOL replica is at the path %systemroot%\SYSVOL\domain, but the folder that is actually shared by the domain controller is the %systemroot%\SYSVOL\sysvol folder by default.
Note
The location of the SYSVOL directory and subdirectories is configurable during and after Active Directory installation. The default locations under %systemroot%\SYSVOL are used throughout this guide only as a relative reference to the location of SYSVOL files and folders.
The %systemroot%\SYSVOL\domain and %systemroot%\SYSVOL\sysvol folders appear to contain the same content because SYSVOL uses junction points (also called reparse points). A junction point is a physical location on a hard disk that points to data that is located elsewhere on the hard disk or on another storage device. Junction points look like folders and behave like folders (in Windows Explorer they appear to be shortcuts to folders), but they are not folders. A junction point contains a link to another folder. When a program opens it, the junction point automatically redirects the program to the folder to which the junction point is linked. The redirection is completely transparent to the user and the application. For example, if you open a command prompt and type
dir to list the contents of \%systemroot%\SYSVOL\sysvol, you notice a folder that is listed as <JUNCTION>. The junction point in %systemroot%\SYSVOL\sysvol links to %systemroot%\SYSVOL\domain.
In this guide, in reference to SYSVOL components and folders, the capitalization that is used reflects the capitalization of the default folders and parameters as they appear in the file system, in the registry, and in Active Directory Domain Services (AD DS). For example, the default SYSVOL directory tree always appears as %systemroot%\SYSVOL\sysvol, as it appears in Windows Explorer. When the topic is specific to the sysvol shared folder, lowercase sysvol is used. Similarly, the area of SYSVOL that is historically referred to as “the staging area” is described in this guide as “the staging areas subdirectory.” In this way, the folder “%systemroot%\SYSVOL\staging areas” is clearly understood and distinct from the “%systemroot%\SYSVOL\staging” folder. Capitalization of registry parameters and Active Directory attribute names are presented as they appear in those locations.
Using DFS Replication for replicating SYSVOL in Windows Server 2008
Distributed File System (DFS) Replication is a replication service that is available for replicating SYSVOL to all domain controllers in domains that have the Windows Server 2008 domain functional level. DFS Replication was introduced in Windows Server 2003 R2. However, on domain controllers that are running Windows Server 2003 R2, SYSVOL replication is performed by the File Replication Service (FRS).
Note
The information and instructions in this section relate to DFS Replication of SYSVOL. For information about managing SYSVOL when you use FRS for file replication, see Administering FRS-Replicated SYSVOL (http://go.microsoft.com/fwlink/?LinkId=122535).
DFS Replication technology significantly improves replication of SYSVOL. In Windows 2000 Server, Windows Server 2003, and Windows Server 2003 R2, FRS is used to replicate the contents of the SYSVOL share. When a change to a file occurs, FRS replicates the entire updated file. With DFS Replication, for files larger than 64 KB, only the updated portion of the file is replicated.
To replicate only updates to files, DFS Replication uses an algorithm called remote differential compression (RDC). RDC detects changes to the data in a file and enables DFS Replication to replicate changes in the form of file blocks, without having to replicate the entire file. RDC detects insertions, removals, and rearrangements of data in files. The DFS Replication service monitors SYSVOL, and, if a change occurs to any file that is stored in SYSVOL, DFS Replication automatically replicates the file updates to the SYSVOL folders on the other domain controllers in the domain. An additional improvement is that DFS Replication does not require the version vector join (vvjoin) operation, which is performed between FRS replication partners when new connections are created. Vvjoin is a CPU-intensive operation that can affect the performance of the server and cause increased replication traffic.
In Windows Server 2008, DFS Replication is the default file replication service for domains that are initially created on domain controllers running Windows Server 2008. However, in a domain that is upgraded from another operating system to Windows Server 2008, FRS is the default replication service for SYSVOL replication. To implement DFS Replication of SYSVOL after an upgrade to Windows Server 2008 domain functional level, you must perform a preliminary migration process for replication of the SYSVOL tree.
Requirements for using DFS Replication
In Windows Server 2008, for newly created domains operating at the Active Directory domain functional level of Windows Server 2008, DFS Replication is used by default for SYSVOL replication. If your domain controllers are upgraded from another operating system to Windows Server 2008, you must install DFS Replication on all domain controllers in the domain, raise the domain functional level to Windows Server 2008, and then follow a migration process to move from using FRS replication of SYSVOL to DFS Replication. For more information about the SYSVOL migration process, see SYSVOL Migration Series: Part 1 – Introduction to the SYSVOL migration process (http://go.microsoft.com/fwlink/?LinkID=119296). For more information about DFS Replication, see Distributed File System Replication: Frequently Asked Questions (http://go.microsoft.com/fwlink/?LinkId=122537).
The day-to-day operation of SYSVOL replication is an automated process that does not require any human intervention other than watching for alerts that the DFS Replication service raises. Occasionally, you might perform some system maintenance as you change your network.
The topics in this section describe the tasks that are required for managing SYSVOL replication, including maintaining capacity and relocating SYSVOL components.
Key considerations for administering SYSVOL
A new graphical user interface (GUI) management tool, DFS Management, provides options for performing many SYSVOL management tasks. In Windows Server 2003, most SYSVOL management tasks required registry changes. In Windows Server 2008, you can use DFS Management to perform the following SYSVOL updates:
- Change the space that is allocated to the staging area
- Change the staging area path
Note
You cannot use DFS Management to change the SYSVOL path. You must make this change in the registry directly. For information about changing the SYSVOL path, see Relocating SYSVOL Manually.
- View shared folders
You can use the Diagnostic Reports features of DFS Management to implement a monitoring system to detect low disk space and other potential DFS Replication disruptions so that you can resolve these issues before the system stops replicating. The Ultrasound utility, which is a tool for monitoring FRS, cannot be used for DFS Replication. Instead, you can use the DFS Replication health reports that DFS Management generates. For information about using DFS Management to generate diagnostic reports, see Create a Diagnostic Report for DFS Replication (http://go.microsoft.com/fwlink/?LinkId=122538).
Other key considerations for managing SYSVOL include the following:
- CapacityTo manage SYSVOL, enough space must be provided to store SYSVOL. The quota that is allocated to the DFS Replication staging area is 4 gigabytes (GB) (4096 MB). The maximum size is 4 terabytes (TB) (4096 GB). Depending on the configuration of your domain, SYSVOL can require a significant amount of disk space to function properly. During the initial deployment, SYSVOL might be allocated adequate disk space to function. However, as your installation of Active Directory Domain Services (AD DS) grows in size and complexity, the required capacity can exceed the available disk space.If you receive indications that disk space is low, determine whether the cause is attributable to inadequate physical space on the disk or the DFS Management setting that limits the quota that is allocated to the staging area. If staging area disk space is low, DFS Replication encounters frequent staging area cleanup events. You can avoid this scenario by using .admx file capability to implement a Central Store in SYSVOL to store and to replicate Windows Vista policy files. For information about using this solution, see article 929841 in the Microsoft Knowledge Base (http://go.microsoft.com/fwlink/?LinkId=122539). You can also reduce SYSVOL size and replication time by managing Administrative Templates in Group Policy. For information about using this solution, see article 813338 in the Microsoft Knowledge Base (http://go.microsoft.com/fwlink/?LinkId=122540).
- Hardware maintenanceSystem maintenance, such as removal of a disk drive, can make it necessary for you to relocate SYSVOL. Even if the maintenance occurs on a different disk drive, verify that the maintenance does not affect SYSVOL. Logical drive letters can change after you add and remove disks. DFS Replication locates SYSVOL by using paths that are stored in AD DS. If drive letters change after you add or remove disk drives, you must manually update the paths in AD DS.
- Backing up GPOsThe successful operation of Group Policy depends on the reliable operation of SYSVOL. Key components of GPOs exist in SYSVOL (in the policies subdirectory), and it is essential that these GPO components remain synchronized with related components in AD DS. Therefore, backing up only the SYSVOL component does not represent a full and complete backup of your GPOs. The Group Policy Management Console (GPMC) provides both UI-based and scriptable methods for backing up GPOs. It is important that you back up GPOs as part of your regular backup/disaster recovery processes. Soon after installation of a new domain, the default domain and default domain controllers' GPOs should be backed up. They should also be backed up after any subsequent changes are made. GPOs are included in system state backups. For information about backing up system state, see Backing Up Active Directory Domain Services. For information about backing up GPOs, see Back Up a Group Policy Object (http://go.microsoft.com/fwlink/?LinkID=122542).
- Relocating SYSVOLWhen you relocate SYSVOL, you must first copy the entire folder structure to a new location. Then, you must update the junction points and path values that are stored in the registry and in AD DS to maintain the relationships between the paths, the folders, and the junctions. As an option, you can relocate the staging area and leave the rest of SYSVOL at its original location. In this case, you must update the staging folder path in AD DS.
Relocating SYSVOL folders
SYSVOL relocation should be undertaken only when required by disk space maintenance or upgrades. By default, SYSVOL is contained in the %systemroot%\SYSVOL folder. The tree of folders that is contained within this folder can be extensive, depending on the size of SYSVOL, number of GPOs, and use of logon scripts. When you relocate SYSVOL folders, ensure that you copy all folders (including any hidden folders) and ensure that the relationships of the folders do not change.
Note
To ensure that all folders appear in Windows Explorer, on the Tools menu, click Folder Options. On the View tab, select Show hidden files and folders.
Before you attempt to relocate all or portions of SYSVOL, you must clearly understand the folder structure and the relationships between the folders and the path and size information that is stored in AD DS. When folders are moved, any associated values that are stored in AD DS and the registry must be updated to match the new location. The folder structure contains junction points that also require updating after folders are moved to a new location.
When you relocate folders, you use the first three levels of subdirectories to properly update the path locations that DFS Replication uses. These levels are affected by junction points and parameter settings. These folders include the following:
- %systemroot%\SYSVOL
- %systemroot%\SYSVOL\domain
- %systemroot%\SYSVOL\domain\DfsrPrivate
- %systemroot%\SYSVOL\domain\Policies
- %systemroot%\SYSVOL\domain\scripts
- %systemroot%\SYSVOL\staging
- %systemroot%\SYSVOL\staging\domain
- %systemroot%\SYSVOL\staging areas
- %systemroot%\SYSVOL\staging areas\<FQDN>, where FQDN is the fully qualified domain name of the domain that this domain controller hosts, for example, contoso.com.
- %systemroot%\SYSVOL\sysvol
- %systemroot%\SYSVOL\sysvol\<FQDN>, where FQDN is the fully qualified domain name of the domain that this domain controller hosts, for example, contoso.com.
Note
If any of the folders do not appear in Windows Explorer, click Tools, and then click Folder Options. On the View tab, click Show hidden files and folders.
If you use Windows Explorer to view these folders, they appear to be typical folders. If you open a command prompt and type
dir to list these folders, you notice that two special folders are listed as <JUNCTION>. Both folders labeled FQDN are junction points. The junction point in %systemroot%\SYSVOL\sysvol links to %systemroot%\SYSVOL\domain. The junction in %systemroot%\SYSVOL\staging areas links to %systemroot%\SYSVOL\staging\domain. If you change the path to the folders to which the junctions are linked, you must also update the junctions, including drive letter changes and folder changes.
Besides junction points linking to folders within the SYSVOL tree, the registry and AD DS also store references to folders. These references contain paths that you must update if you change the location of the folder:
- Registry: The SysVol Netlogon parameter in HKEY_LOCAL_MACHINE\SYSTEM\CurrentControlSet\Services\Netlogon\Parameters. This registry entry stores the path to the sysvol shared folder (default %systemroot%\SYSVOL\sysvol). The Netlogon service uses this path to identify the location of the folder that it uses to create the SYSVOL and NETLOGON (scripts) share points.
- AD DS: Two attributes in AD DS store the paths for the SYSVOL root and staging area folders, as shown in the following table.
| Directory value | Default referenced location | Contents |
|---|---|---|
msDFSR-RootPath
|
%systemroot\SYSVOL\domain
|
Policies and scripts
|
msDFSR-StagingPath
|
%systemroot\SYSVOL\staging\domain
|
Staging area folders
|
SYSVOL Migration Series: Part 1 – Introduction to the SYSVOL migration process
SYSVOL Migration Series: Part 1 – Introduction to the SYSVOL migration process
The File Replication Service (FRS) is used for replicating the contents of the SYSVOL share between Windows domain controllers. However, Windows Server 2008 domain controllers, which are operating in the Windows Server 2008 domain functional level, can use the DFS Replication service for replicating the contents of the SYSVOL share. A new Windows Server 2008 feature makes it possible for administrators to migrate replication of the SYSVOL share from FRS to the more reliable and efficient DFS Replication service.
This series of blog posts describe the procedure for migrating the replication of the SYSVOL share on Windows Server 2008 domain controllers from FRS replication to the DFS Replication service.
NOTE: The Windows Server 2008 SP2 release includes a couple of important bug-fixes in DFS Replication that address a few customer reported issues in SYSVOL migration. If you plan to migrate replication of the SYSVOL share to DFS Replication, it is highly recommended that you upgrade to Windows Server 2008 SP2 first.
The RTM release of Windows Server 2008 R2 includes these bug fixes.
|
Why migrate?
The DFS Replication service offers several advantages over the older File Replication Service (FRS). Some of the advantages that accrue from using the DFS Replication service are:
a) Efficient, scalable and reliable file replication protocol which has been tested extensively to ensure data consistency in multi-master replication scenarios.
b) Differential replication of changes to files using the Remote Differential Compression (RDC) algorithm, which enhances efficiency in branch office scenarios.
c) Flexible scheduling and bandwidth throttling mechanisms.
d) Self-heals from USN journal wraps and database corruptions – end user intervention and monitoring requirement is minimal.
e) Provides a new UI management tool (MMC snap-in) for ease of administration.
f) Provides built in health monitoring tools for ease of monitoring deployments.
g) Improved support for Read Only Domain Controllers.
It is hence highly recommended that customers migrate replication of the SYSVOL share to the DFS Replication service.
Migration – in a nutshell
Windows Server 2008 ships a command line tool called ‘dfsrmig.exe’ which can be used by an administrator to initiate migration of SYSVOL replication from FRS to the DFS Replication service. This tool essentially sets migration related directives in Active Directory. Thereafter, on each of the domain controllers in the domain, when the DFS Replication service running polls Active Directory for configuration information, it notices this migration directive and takes steps to migrate replication of SYSVOL to the DFS Replication service. The following section explains the various migration states that are possible during this migration process in more detail.
Thus migration directives are set only once (globally) and all domain controllers in the domain notice this directive and automatically take steps to attain the selected migration state, thus resulting in migration of SYSVOL replication from FRS to the DFS Replication service.

Figure 1: SYSVOL Migration in a nutshell.
An analogy …
Let’s use a conventional analogy to understand the process of SYSVOL migration better. Joe is an old timer who is due to retire from his job at the packaging plant this month end. Alex is supposed to take over Joe’s responsibilities once Joe retires. Normally, the transition of responsibilities from Joe to Alex would work out in four phases as shown in Figure 1.
Initially, before the transition begins, Joe is responsible for the day-to-day work where he mans the packaging assembly line. In Stage 2 of the transition plan, Alex shadows Joe and ‘learns the ropes’. He helps package a few units here and there, but Joe is still responsible for ensuring that daily production goals are met. In Stage 3, Alex begins to take over more of the day-to-day responsibilities from Joe right up to the point where Alex only consults with Joe when he needs help. Finally, when Alex is ready to take on all responsibilities, Joe is ready to retire.

Figure 2: SYSVOL Migration – an analogy.
If we extend this analogy to the process of migration of SYSVOL replication from FRS to the DFS Replication service, we can define four states in the migration process. These are:
a) ‘START’ state: In this state, FRS is responsible for replicating the contents of the SYSVOL share between domain controllers. The main replication engine for the SYSVOL share on each of the domain controllers in the domain is FRS.
b) ‘PREPARED’ state: In the ‘PREPARED’ state, the DFS Replication service makes a copy of the contents of the SYSVOL share for itself. It then proceeds to initiate replication of its copy of the SYSVOL folder with the DFS Replication service running on other peer domain controllers which have migrated to the ‘PREPARED’ state. At this stage of the migration process, the main replication engine for the SYSVOL share on each of the domain controllers in the domain is still FRS.
c) ‘REDIRECTED’ state: In the ‘REDIRECTED’ state, the replication responsibility is shifted to the DFS Replication service. The copy of the SYSVOL folder which was being replicated by the DFS Replication service is now the one that is shared out by the Netlogon service and advertized by the domain controller. FRS is, in the meantime, replicating the old SYSVOL folder with the FRS service running on other peer domain controllers. At this stage of the migration process, the main replication engine for each of the domain controllers in the domain is the DFS Replication service.
d) ’ELIMINATED’ state: In the ‘ELIMINATED’ state, once the domain administrator has ensured that replication is working fine, the FRS service is retired and the DFS Replication service assumes sole responsibility for replicating the contents of the SYSVOL share between all domain controllers in that domain.

Figure 3: Migrating from FRS replication of SYSVOL to the DFS Replication service.
Migration States
Stable States: There are four migration states which are defined as ‘Stable Migration States’ as alluded to above. During the process of migration, the administrator uses the migration tool (dfsrmig.exe) to set a migration directive in Active Directory. This directive essentially sets a domain wide migration state (also called global migration state) in Active Directory. This global migration state can be any one of the four stable migration states shown in the table below.
Stable Migration States
| |
0
|
‘START’ state
|
1
|
‘PREPARED’ state
|
2
|
‘REDIRECTED’ state
|
3
|
‘ELIMINATED’ state
|
Transition States: During migration, each domain controller takes appropriate actions locally so that it can attain the migration stable state which has been selected for the domain by the administrator. This operation causes the domain controller to cycle through intermediate states called ‘Transition States’. These transition states are shown in the table below.
Transition States
| |
4
|
‘PREPARING’ state
|
5
|
‘WAITING FOR INITIAL SYNC’ state
|
6
|
‘REDIRECTING’ state
|
7
|
‘ELIMINATING’ state
|
8
|
‘UNDO REDIRECTING’ state
|
9
|
‘UNDO PREPARING’ state
|
How migration works
The domain administrator uses the dfsrmig.exe tool to trigger the process of SYSVOL migration. This tool sets a migration directive in the Active Directory of the Primary Domain Controller, which is what directs the DFS Replication service to perform SYSVOL migration the next time it polls Active Directory for configuration information. The migration directive is an outcome of setting what is known as the global migration state in Active Directory. This is a domain wide migration state which can assume any of the values of the stable migration states detailed above.
When the DFS Replication service polls Active Directory for configuration information, it notices the global migration state and takes suitable actions to bring its local migration state in sync with this global migration state. This action is what causes the process of migration to take place. During the process of migration, when the DFS Replication service is trying to bring the local migration state in sync with the global migration state, the local migration state will cycle through the intermediate migration states before settling at the desired stable migration state. This is illustrated in the state transition diagrams that follow.
Migration:
The process of moving forward through the stable migration states in order to eliminate the FRS service and replace it with the DFS Replication service for replicating the contents of the SYSVOL share is known as migration. The state transition diagram corresponding to the migration process is as shown below:

Figure 4: State transition diagram for the migration process.
Rollback:
Before domain controllers migrate to the ‘ELIMINATED’ state, it is possible to roll back migration to the ‘PREPARED’ or ‘START’ states. This facility is provided so that administrators can commit to the SYSVOL migration procedure only once they are fully confident that the DFS Replication service is replicating SYSVOL properly in their environment. It is possible to use the rollback functionality to move to the previous stable state. When the dfsrmig.exe tool is used and the global migration state is set to the previous stable migration state, rollback is caused. For instance, if the current global migration state is ‘REDIRECTED’ and the administrator wants to rollback migration to the ‘PREPARED’ state, he can use the dfsrmig.exe tool to set the global migration state to ‘PREPARED’. The DFS Replication service on all domain controllers will follow this directive and rollback migration state to the ‘PREPARED’ state. The state transition diagram corresponding to the rollback process is as shown below:

Figure 5: State transition diagram for the rollback process.
NOTE: It is not possible to rollback once migration has reached the ‘ELIMINATED’ state. Therefore, it is recommended to migrate to this state only when you are sure that SYSVOL replication is working fine using the DFS Replication service.
Features of the SYSVOL migration process
The SYSVOL migration procedure is designed to provide the following features:
a) A robust mechanism to migrate replication of the SYSVOL share from FRS to the DFS Replication service, with reduced risk, minimal need for down-time and near zero end-user impact. This mechanism is resilient to domain controller crashes, reboots, promotions and demotions.
b) Sufficiently granular control over the migration procedure for administrators. This empowers administrators to control the process one step at a time so as to verify correct operation before changes are committed.
c) Allow rollback of the migration procedure at any point in time until the last step (‘ELIMINATED’ state) where the FRS service is eliminated. This feature enables administrators to roll back changes in case something was to go wrong during the migration process.
d) Works despite Active Directory replication latencies and is hence suited to branch office domain controller migration scenarios. In particular, the process is designed to work in instances where some domain controllers may not know that migration has been initiated owing to Active Directory replication latencies, since it does not assume that all domain controllers will be simultaneously reachable during migration.
e) Provides mechanisms by which a domain administrator can monitor the progress of migration.
More articles on SYSVOL Migration Series:
2: SYSVOL Migration Series: Part 2 – Dfsrmig.exe: The SYSVOL migration tool
3: SYSVOL Migration Series: Part 3 – Migrating to the Prepared State
4: SYSVOL Migration Series: Part 4 – Migrating to the ‘REDIRECTED’ state
5: SYSVOL Migration Series: Part 5 – Migrating to the ‘ELIMINATED’ state
3: SYSVOL Migration Series: Part 3 – Migrating to the Prepared State
4: SYSVOL Migration Series: Part 4 – Migrating to the ‘REDIRECTED’ state
5: SYSVOL Migration Series: Part 5 – Migrating to the ‘ELIMINATED’ state
www.inCOREporation.com
DFS Replication: Frequently Asked Questions (FAQ)
File Replication Service Diagnostics Tool (FRSDiag.exe)
https://www.microsoft.com/en-us/download/details.aspx?id=8613
Step-by-Step Guide for upgrading SYSVOL replication to DFSR (Distributed File System Replication)
SYSVOL is a folder shared by domain controller to hold its logon scripts, group policies and other items related to AD. All the domain controllers in network will replicate the content of SYSVOL folder. The default path for SYSVOL folder is %SystemRoot%\SYSVOL. This folder path can define when you install the active directory.
Windows Server 2003 and 2003 R2 uses File Replication Service (FRS) to replicate SYSVOL folder content to other domain controllers. But Windows server 2008 and later uses Distributed File System (DFS) for the replication. DFS is more efficient than FRS. Since windows server 2003 is going out of support, most people already done or still looking for migrate in to latest versions. However migrating FSMO roles WILL NOT migrate SYSVOL replication from FRS to DFS. Most of the engineers forget about this step when they migrate from windows 2003 to new versions.
For FRS to DFS migration we uses the Dfsrmig.exe utility. More info about it available on https://technet.microsoft.com/en-au/library/dd641227(v=ws.10).aspx
For the demo I am using windows server 2012 R2 server and I migrated FSMO roles already from a windows server 2003 R2 server.
In order to proceed with the migration forest function level must set to windows server 2008 or later. So if your organization not done this yet first step is to get the forest and domain function level updated.
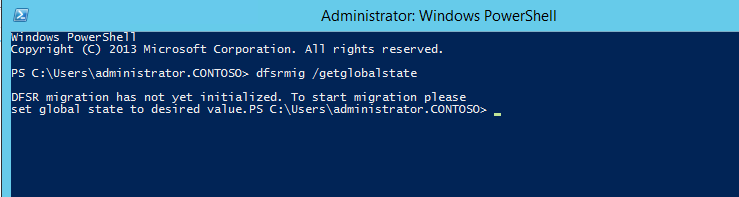
You can verify if the system uses the FRS using dfsrmig /getglobalstate , To do this
1) Log in to domain controller as Domain admin or Enterprise Admin
2) Launch powershell console and type dfsrmig /getglobalstate. Output explains it’s not initiated DFRS migration yet.
2) Launch powershell console and type dfsrmig /getglobalstate. Output explains it’s not initiated DFRS migration yet.
Before move in to the configurations we need to look into stages of the migration.
There are four stable states going along with the four migration phases.
1) State 0 – Start
2) State 1 – Prepared
3) State 2 – Redirected
4) State 3 – Eliminated
2) State 1 – Prepared
3) State 2 – Redirected
4) State 3 – Eliminated
State 0 – Start
With initiating this state, FRS will replicate SYSVOL folder among the domain controllers. It is important to have up to date copy of SYSVOL before begins the migration process to avoid any conflicts.
State 1 – Prepared
In this state while FRS continues replicating SYSVOL folder, DFSR will replicate a copy of SYSVOL folder. It will be located in %SystemRoot%\SYSVOL_DFRS by default. But this SYSVOL will not response for any other domain controller service requests.
State 2 – Redirected
In this state the DFSR copy of SYSVOL starts to response for SYSVOL service requests. FRS will continue the replication of its own SYSVOL copy but will not involve with production SYSVOL replication.
State 3 – Eliminated
In this state, DFS Replication will continue its replication and servicing SYSVOL requests. Windows will delete original SYSVOL folder users by FRS replication and stop the FRS replication.
In order to migrate from FRS to DFSR its must to go from State 1 to State 3.
Let’s look in to the migration steps.
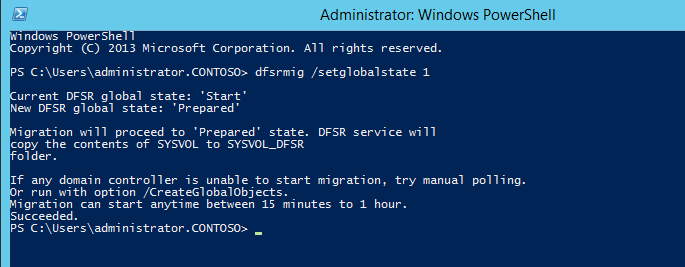
Prepared State
1. Log in to domain controller as Domain admin or Enterprise Admin
2. Launch powershell console
3. Type dfsrmig /setglobalstate 1 and press enter
2. Launch powershell console
3. Type dfsrmig /setglobalstate 1 and press enter
4. Type dfsrmig /getmigrationstate to confirm all domain controllers have reached prepared state

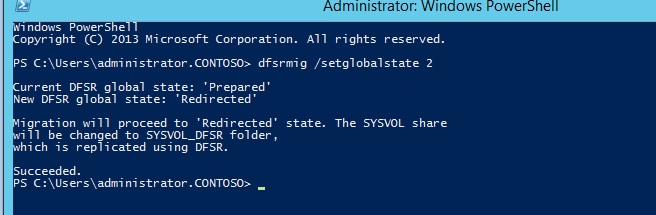
Redirected State
1. Log in to domain controller as Domain admin or Enterprise Admin
2. Launch powershell console
3. Type dfsrmig /setglobalstate 2 and press enter
2. Launch powershell console
3. Type dfsrmig /setglobalstate 2 and press enter
4. Type dfsrmig /getmigrationstate to confirm all domain controllers have reached redirected state

Eliminated State
1. Log in to domain controller as Domain admin or Enterprise Admin
2. Launch powershell console
3. Type dfsrmig /setglobalstate 3 and press enter
2. Launch powershell console
3. Type dfsrmig /setglobalstate 3 and press enter

4. Type dfsrmig /getmigrationstate to confirm all domain controllers have reached eliminated state

This completes the migration process and to confirm the SYSVOL share, type net share command and enter.
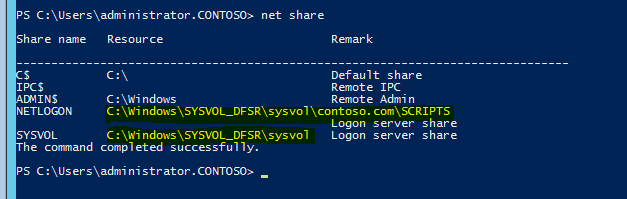
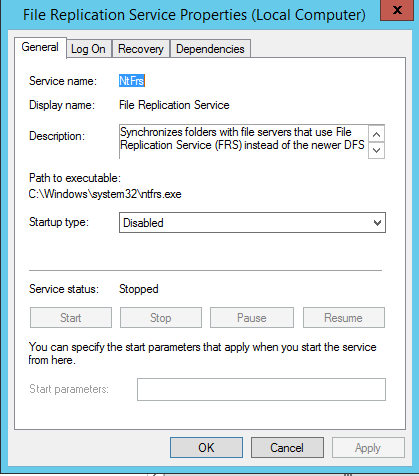
Also make sure in each domain controller FRS service is stopped and disabled.
www.inCOREporation.com
DFS Replication: How to troubleshoot missing SYSVOL and Netlogon shares
https://support.microsoft.com/en-ca/help/2958414/dfs-replication-how-to-troubleshoot-missing-sysvol-and-netlogon-shares
You may encounter a situation in which SYSVOL and Netlogon shares are not shared on a domain controller. The following additional symptoms or conditions may also apply:
- The SYSVOL folder is empty.
- The affected domain controller was recently promoted.
- The environment contains domain controllers running versions of Windows earlier than Windows Server 2012 R2.
- DFS Replication is used to replicate the SYSVOL Share replicated folder.
- An upstream domain controller's DFS Replication service is in an error state.
Cause
Domain controllers without SYSVOL shared cannot replicate inbound because of upstream (source) domain controllers being in an error state. Frequently (but not limited to), the upstream servers have stopped replication because of a dirty shutdown (event ID 2213). The event message is as follows:
Resolution
What follows are recommended methods for troubleshooting and resolving missing SYSVOL and Netlogon shares on domain controllers that replicate by using the DFS Replication service.
The process, detailed in KB article 2218556 "How to force an authoritative and non-authoritative synchronization for DFSR-replicated SYSVOL (like "D4/D2" for FRS)," reinitializes DFS Replication if SYSVOL is not shared on domain controllers. This is unnecessary in most cases, and it may cause data loss if done incorrectly. It also prevents determining the cause of the issue and averting future occurrences of the issue.
What follows are general steps to investigate the missing shares. Determine if the problem is caused by a one-time occurrence, or if the upstream domain controller(s) cannot support replication by using DFS Replication.
Deleting the DFS Replication database from the volume should not be required and is discouraged. Deleting the database causes DFS Replication to consider all local data on the server to be nonauthoritative. By letting DFS Replication recover the database gracefully (as instructed in the 2213 event), the last writer will still win any conflicting versions of SYSVOL data.
Check for the SYSVOL share
You may manually check whether SYSVOL is shared or you can run the following command to inspect each domain controller by using the net view command:
Check DFS Replication state
To check DFS Replication's state on domain controllers, you may query WMI. You can query all domain controllers in the domain for the SYSVOL Share replicated folder by using WMI as follows:
The "state" values can be any of the following:
Note Depending on a domain controller's condition, it may fail to report a state value and indicate "No Instance(s) Available."
Check Event logs for recent errors or warnings
If any domain controllers do not report the "SYSVOL Share" replicated folder as being in a state "4" (normal), check the event log of those domain controller(s) to evaluate their condition. Review each domain controller for recent errors or warnings in the DFS Replication event log, such as the warning event ID 2213, which indicates that DFS Replication is currently paused.
Check the Content Freshness configuration
Determine whether DFS Replication triggered content freshness protection on the affected domain controllers. Content Freshness is enabled on Windows Server 2012 (and later versions) domain controllers by default, but may also be manually enabled on Windows Server 2008 and 2008 R2 servers.
To evaluate if content freshness is enabled, the MaxOfflineTimeInDays setting will be set to 60. If content freshness is disabled, MaxOfflineTimeInDays will be set to 0. To check MaxOfflineTimeInDays, run the following command:
To query all domain controllers in the domain, run the following command:
For each domain controller enabled for content freshness, evaluate if DFS Replication has logged an event ID 4012 that indicates replication of the folder has stopped because replication has failed for longer than the MaxOfflineTimeInDays parameter.
For any domain controllers running Windows Server 2008 or 2008 R2, first install DFS Replication updates to prevent data loss and to fix known issues. It is a best practice to use the latest version of DFS Replication. The latest version of DFS Replication is discussed in article 968429.
Back up SYSVOL data
Perform a backup of SYSVOL data (if present) on each domain controller. Backups may be a simple file copy of the SYSVOL contents to a safe location or, it may be a backup that uses backup software.
Depending on the situation, policy files could be moved to "PreExisting" or "Conflict and Deleted." "PreExisting" and "Conflict and Deleted" contents will be purged if initial synchronization is performed multiple times on a server. Back up data in these locations to avoid data loss.
If content freshness is enabled on both domain controllers
If the second domain controller is waiting to perform initial synchronization (event 4614 logged without the 4604 anti-event), follow the section of article 2218556 to set the first domain controller as authoritative. You do not have to configure the second domain controller as nonauthoritative, because it is already waiting to perform initial synchronization.
Or, if the second domain controller is healthy and SYSVOL is shared, perform the following steps:
If content freshness is not enabled or triggered on both domain controllers
If the first domain controller is in the event ID 2213 state and the second domain controller has never completed initialization after it was promoted and content freshness has not been triggered, perform the following steps:
Or, if the first domain controller is in the 2213 state and the second domain controller is healthy (SYSVOL is shared), run the ResumeReplication WMI method on the first domain controller. It will log event ID 2214 at the completion of dirty shutdown recovery.
If content freshness is enabled and there are three or more domain controllers in the domain
Content freshness protection will log an event ID 4012 that indicates that replication has stopped because replication on the folder has failed for longer than the MaxOfflineTimeInDays parameter. You must follow the instructions in article 2218556to reinitialize DFS Replication on the affected domain controller(s).
If all domain controllers have logged the 4012 event and their "state" is "5," then follow the instructions in article 2218556to completely initialize SYSVOL. This is the only situation to set a DFS Replication server as authoritative. Make sure that the domain controller configured as authoritative has the most up-to-date copy of all SYSVOL contents.
Or, if one or more domain controllers are blocking replication because of content freshness, they each must be non-authoritatively recovered. To do this, follow these steps:
If content freshness is not enabled or triggered and there are three or more domain controllers in the domain
If content freshness protection was not triggered, run the ResumeReplication WMI method on the affected domain controllers. You must be aware of the replication topology, and you must "fan out" from a healthy domain controller by selecting direct partners of it, then recovering further downstream domain controllers, and so on. After replication is resumed, DFS Replication will log events 2212, 2218, and then 2214 (indicating that DFS Replication initialized the SYSVOL replicated folder).
The Service Control Manager (SCM) uses the default time-out time of 20 seconds for stopping a service. In some complex DFS Replication implementations, this time-out value may be too short, and DFS Replication stops before the appropriate database is closed. At service restart, DFS Replication detects this condition, and then performs the database recovery. WaitToKillServiceTimeout may be used to grant DFS Replication more time to commit changes to the database during shutdown. For more information, go to article 977518.
After you have restored DFS Replication of SYSVOL, DFS Replication health must be carefully monitored in the environment to prevent this scenario. Regular review of DFS Replication event logs, collecting of DFS Replication health reports, and collecting of replication state (by using the WMI query in the "Check DFS Replication state" section under "Step 1 - Evaluate the state of DFS Replication on all domain controllers" in this article) are recommended.
The process, detailed in KB article 2218556 "How to force an authoritative and non-authoritative synchronization for DFSR-replicated SYSVOL (like "D4/D2" for FRS)," reinitializes DFS Replication if SYSVOL is not shared on domain controllers. This is unnecessary in most cases, and it may cause data loss if done incorrectly. It also prevents determining the cause of the issue and averting future occurrences of the issue.
What follows are general steps to investigate the missing shares. Determine if the problem is caused by a one-time occurrence, or if the upstream domain controller(s) cannot support replication by using DFS Replication.
Deleting the DFS Replication database from the volume should not be required and is discouraged. Deleting the database causes DFS Replication to consider all local data on the server to be nonauthoritative. By letting DFS Replication recover the database gracefully (as instructed in the 2213 event), the last writer will still win any conflicting versions of SYSVOL data.
Step 1 - Evaluate the state of DFS Replication on all domain controllers
Evaluate how many domain controllers are not sharing SYSVOL, have recently logged an Error event, and are in an "error" state. To do this, follow these steps.Check for the SYSVOL share
You may manually check whether SYSVOL is shared or you can run the following command to inspect each domain controller by using the net view command:
For /f %i IN ('dsquery server -o rdn') do @echo %i && @(net view \\%i | find "SYSVOL") & echo
Check DFS Replication state
To check DFS Replication's state on domain controllers, you may query WMI. You can query all domain controllers in the domain for the SYSVOL Share replicated folder by using WMI as follows:
For /f %i IN ('dsquery server -o rdn') do @echo %i && @wmic /node:"%i" /namespace:\\root\microsoftdfs path dfsrreplicatedfolderinfo WHERE replicatedfoldername='SYSVOL share' get replicationgroupname,replicatedfoldername,state
The "state" values can be any of the following:
0 = Uninitialized
1 = Initialized
2 = Initial Sync
3 = Auto Recovery
4 = Normal
5 = In Error
1 = Initialized
2 = Initial Sync
3 = Auto Recovery
4 = Normal
5 = In Error
Note Depending on a domain controller's condition, it may fail to report a state value and indicate "No Instance(s) Available."
Check Event logs for recent errors or warnings
If any domain controllers do not report the "SYSVOL Share" replicated folder as being in a state "4" (normal), check the event log of those domain controller(s) to evaluate their condition. Review each domain controller for recent errors or warnings in the DFS Replication event log, such as the warning event ID 2213, which indicates that DFS Replication is currently paused.
Check the Content Freshness configuration
Determine whether DFS Replication triggered content freshness protection on the affected domain controllers. Content Freshness is enabled on Windows Server 2012 (and later versions) domain controllers by default, but may also be manually enabled on Windows Server 2008 and 2008 R2 servers.
To evaluate if content freshness is enabled, the MaxOfflineTimeInDays setting will be set to 60. If content freshness is disabled, MaxOfflineTimeInDays will be set to 0. To check MaxOfflineTimeInDays, run the following command:
wmic.exe /node:%computername% /namespace:\\root\microsoftdfs path DfsrMachineConfig get MaxOfflineTimeInDays
To query all domain controllers in the domain, run the following command:
For /f %i IN ('dsquery server -o rdn') do @echo %i && @wmic /node:"%i" /namespace:\\root\microsoftdfs path DfsrMachineConfig get MaxOfflineTimeInDays
For each domain controller enabled for content freshness, evaluate if DFS Replication has logged an event ID 4012 that indicates replication of the folder has stopped because replication has failed for longer than the MaxOfflineTimeInDays parameter.
Step 2 - Prepare the domain controllers that are in an error state
Install appropriate updatesFor any domain controllers running Windows Server 2008 or 2008 R2, first install DFS Replication updates to prevent data loss and to fix known issues. It is a best practice to use the latest version of DFS Replication. The latest version of DFS Replication is discussed in article 968429.
Back up SYSVOL data
Perform a backup of SYSVOL data (if present) on each domain controller. Backups may be a simple file copy of the SYSVOL contents to a safe location or, it may be a backup that uses backup software.
Depending on the situation, policy files could be moved to "PreExisting" or "Conflict and Deleted." "PreExisting" and "Conflict and Deleted" contents will be purged if initial synchronization is performed multiple times on a server. Back up data in these locations to avoid data loss.
Step 3 - Recover DFS Replication on the domain controllers in the error state
Based on the number of domain controllers in the domain, select the appropriate method to recover the DFS Replication service.For environments that have two domain controllers
Determine whether a dirty shutdown was detected (event ID 2213) on either domain controller. You may find the second domain controller is waiting to complete initialization of SYSVOL, This is because after promotion, it will have logged a 4614 event that indicates that DFS Replication is waiting to perform initial replication, and it will not have logged a 4604 event signaling that DFS Replication has initialized SYSVOL.If content freshness is enabled on both domain controllers
If the second domain controller is waiting to perform initial synchronization (event 4614 logged without the 4604 anti-event), follow the section of article 2218556 to set the first domain controller as authoritative. You do not have to configure the second domain controller as nonauthoritative, because it is already waiting to perform initial synchronization.
Or, if the second domain controller is healthy and SYSVOL is shared, perform the following steps:
- Back up all SYSVOL contents of the first domain controller.
- Evaluate if the second domain controller's SYSVOL data is up to date. If it is not, you may want to copy updated SYSVOL files to the second domain controller from the first domain controller. Otherwise, any existing data present on first domain controller not present on the second will go into the 'PreExisting' and 'Conflict and Deleted' folders.
- Set the first domain controller as nonauthoritative by disabling the membership per 2218556. Confirm that an event ID 4114 is logged to indicate the membership is disabled.
- Enable the first domain controller's membership, and wait for the 4614 and 4604 events that report completion of the initial synchronization. If it is necessary, restore any updated files from "PreExisting" to the original location.
If content freshness is not enabled or triggered on both domain controllers
If the first domain controller is in the event ID 2213 state and the second domain controller has never completed initialization after it was promoted and content freshness has not been triggered, perform the following steps:
- Run the ResumeReplication WMI method on the first domain controller as instructed in the 2213 event.
- After replication resumes, it will log an event ID 4602 that indicates that DFS Replication initialized the SYSVOL replicated folder and designated it as the primary member.
- Run the dfsrdiag pollad command on the second domain controller to trigger it to complete initial sync (event ID 4614). As soon as initial sync is finished, event ID 4604 is logged, signaling SYSVOL has completed initialization.
Or, if the first domain controller is in the 2213 state and the second domain controller is healthy (SYSVOL is shared), run the ResumeReplication WMI method on the first domain controller. It will log event ID 2214 at the completion of dirty shutdown recovery.
For environments that have three or more domain controllers
Determine whether a dirty shutdown was detected and whether DFS Replication is paused on any domain controllers (event ID 2213). You may find a domain controller is waiting to complete initialization of SYSVOL after promotion. It will have logged a 4614 event that indicates that DFS Replication is waiting to perform initial replication, and it will not have logged a 4604 event signaling that DFS Replication has initialized SYSVOL.If content freshness is enabled and there are three or more domain controllers in the domain
Content freshness protection will log an event ID 4012 that indicates that replication has stopped because replication on the folder has failed for longer than the MaxOfflineTimeInDays parameter. You must follow the instructions in article 2218556to reinitialize DFS Replication on the affected domain controller(s).
If all domain controllers have logged the 4012 event and their "state" is "5," then follow the instructions in article 2218556to completely initialize SYSVOL. This is the only situation to set a DFS Replication server as authoritative. Make sure that the domain controller configured as authoritative has the most up-to-date copy of all SYSVOL contents.
Or, if one or more domain controllers are blocking replication because of content freshness, they each must be non-authoritatively recovered. To do this, follow these steps:
- Backup all SYSVOL contents of the domain controller(s). Typically, policy edits are performed on the PDC Emulator, but this is not guaranteed. Any data present on the recovered domain controller(s) not matching the partners will go into the "PreExisting" or "Conflict and Deleted" folder, or both.
- Next, set the domain controller(s) as nonauthoritative by disabling the membership as described in article 2218556. You must be aware of the replication topology, and you must "fan out" from a healthy domain controller by selecting direct partners of it, then recovering further downstream domain controllers, and so on. Event ID 4144 will be logged to confirm the membership is disabled. Make sure all domain controllers requiring recovery log this event. It may be necessary to force Active Directory replication and then run the dfsrdiag pollad command on each domain controller to detect the disabled membership quickly.
- Enable the membership and wait for the 4614 and 4604 events to report completion of the initial synchronization. Restore any required files from backup or from "PreExisting" and "Conflict and Deleted" as necessary.
If content freshness is not enabled or triggered and there are three or more domain controllers in the domain
If content freshness protection was not triggered, run the ResumeReplication WMI method on the affected domain controllers. You must be aware of the replication topology, and you must "fan out" from a healthy domain controller by selecting direct partners of it, then recovering further downstream domain controllers, and so on. After replication is resumed, DFS Replication will log events 2212, 2218, and then 2214 (indicating that DFS Replication initialized the SYSVOL replicated folder).
Preventing future occurrences of the issue
Check whether the Application and System event logs are frequently reporting ESENT database recovery operations, disk performance problems, or both. These typically coincide with unexpected shutdowns of the system, with DFS Replication not stopping gracefully, or disk subsystem failures. Consider updating the system's drivers, installing appropriate updates to the disk subsystem, or contacting the system's hardware manufacturer to investigate further. You may also contact Microsoft Customer Support Services to help evaluate the system's health and DFS Replication behavior.The Service Control Manager (SCM) uses the default time-out time of 20 seconds for stopping a service. In some complex DFS Replication implementations, this time-out value may be too short, and DFS Replication stops before the appropriate database is closed. At service restart, DFS Replication detects this condition, and then performs the database recovery. WaitToKillServiceTimeout may be used to grant DFS Replication more time to commit changes to the database during shutdown. For more information, go to article 977518.
After you have restored DFS Replication of SYSVOL, DFS Replication health must be carefully monitored in the environment to prevent this scenario. Regular review of DFS Replication event logs, collecting of DFS Replication health reports, and collecting of replication state (by using the WMI query in the "Check DFS Replication state" section under "Step 1 - Evaluate the state of DFS Replication on all domain controllers" in this article) are recommended.
More Information
DFSR Event Messages Reference
www.inCOREporation.com
sysvol and netlogon missing server 2016
https://www.youtube.com/results?search_query=sysvol+and+netlogon+missing+server+2016
How to troubleshoot and fix Active Directory replication issues on Windows Server 2012 R2
https://www.youtube.com/watch?v=sdJdwslWkf4
How to Force an Authoritative DFSR Sync of SYSVOL - Fix Group Policy Replication
https://www.youtube.com/watch?v=ja53C2Mz1EQ
How to Perform SYSVOL Migration from FRS to DFRS Replication
https://www.youtube.com/watch?v=cc2ZNaBXSuo
sysvol not shared 2012 r2
sysvol and netlogon folder missing server 2016


No comments:
Post a Comment