Jamf Now
Jamf Pro
Apple MDM https://support.apple.com/profile-manager
ManageEngine https://www.manageengine.com/
Saturday, March 24, 2018
Monday, March 19, 2018
Set up directory synchronization for Office 365
Set up directory synchronization for Office 365
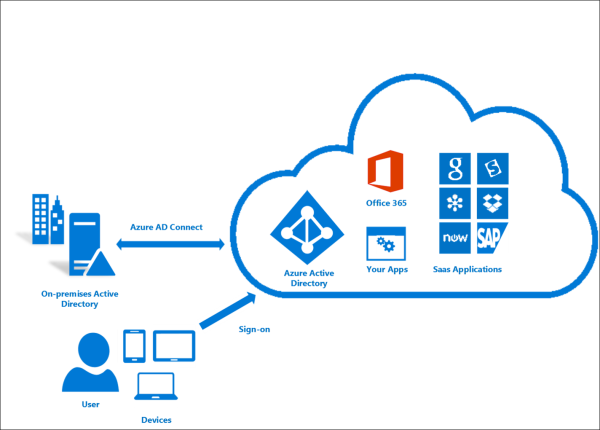
Office 365 uses the cloud-based user identity management service Azure Active Directory to manage users. You can also integrate your on-premises Active Directory with Azure AD by synchronizing your on-premises environment with Office 365. Once you set up synchronization you can decide to have their user authentication take place within Azure AD or within your on-premises directory.
Office 365 Directory synchronization
You can either use synchronized identity or federated identity between your on-premises organization and Office 365. With synchronized identity, you manage your users on-premises, and they are authenticated by Azure AD when they use the same password in the cloud as on-premises. This is the most common directory synchronization scenario. Federated identity, also known as single sign-on (SSO), allows you to manage your users on-premises and they are authenticated by your on-premises directory. Federated identity requires additional configuration and enables your users to only sign in once. For details, read Understanding Office 365 Identity and Azure Active Directory.
Want to upgrade from Windows Azure Active Directory sync (DirSync) to Azure Active Directory Connect?
If you are currently using DirSync and want to upgrade, head over to azure.com for upgrade instructions.
Prerequisites for Azure AD Connect
You get a free subscription to Azure AD with your Office 365 subscription. When you set up directory synchronization, you will install Azure Active Directory Connect on one of your on-premises servers.
For Office 365 you will need to:
- Verify your on-premises domain (the procedure will guide you through this).
- Have Global Administrator permissions for your Office 365 tenant and on-premises Active Directory.
For your on-premises server on which you install Azure AD Connect you will need the following software:
Server OS
|
Other software
|
Windows Server 2012 R2
|
PowerShell is installed by default, no action is required.
Net 4.5.1 and later releases are offered through Windows Update. Make sure you have installed the latest updates to Windows Server in the Control Panel.
|
Windows Server 2008 R2 with Service Pack 1 (SP1) or Windows Server 2012
|
The latest version of PowerShell is available in Windows Management Framework 4.0. Search for it on Microsoft Download Center.
.Net 4.5.1 and later releases are available on Microsoft Download Center.
|
Windows Server 2008
|
The latest supported version of PowerShell is available in Windows Management Framework 3.0, available on Microsoft Download Center.
.Net 4.5.1 and later releases are available on Microsoft Download Center.
|
Note: If you're using Azure Active Directory DirSync, the maximum number of distribution group members that you can synchronize from your on-premises Active Directory to Azure Active Directory is 15,000. For Azure AD Connect, that number is 50,000.
To more carefully review hardware, software, account and permissions requirements, SSL certificate requirements, and object limits for Azure AD Connect, read Prerequisites for Azure Active Directory Connect.
You can also review the Azure AD Connect version release history to see what is included and fixed in each release.
To set up directory synchronization
- Sign in to the Office 365 admin center and choose Users > Active Users on the left navigation.
- In the Office 365 admin center, on the Active users page, choose More > Directory synchronization.
 In the old Office 365 admin center, on the ACTIVE USERS page, choose Set up next to Active Directory synchronization.
- On the Is directory sync right for you? page, the two first choices of 1-10, and 11-50 result in "Based on the size of your organization, we recommend that you create and manage users in the cloud. Using directory synchronization will make your setup more complex. Go to Active users to add your users."You can still, however, continue setting up directory synchronization by choosing Continue here on the bottom of the page.If you select the two latter choices, 51-250 or 251 or greater, the synchronization setup will recommend directory synchronization. Choose Next to continue.

- On the Sync your local directory with the cloud, read the information, and if you want more information, choose the learn more link that goes to: Prepare to provision users through directory synchronization to Office 365, and then choose Next .
- On the Let's check your directory page, review the requirements for automatically checking your directory. If you meet the requirements, choose Next > Start scan. If you can't meet the requirements you can still continue by choosing continue manually.

- If you select to scan your directories, choose Start scan on the Evaluating directory synchronization setup page.Follow the instructions to download and run the scan.
- Once the scan is complete, return to the setup wizard, and choose Next to see your scan results.
- Verify your domains as instructed on the Verify Ownership of your domains page. For detailed instructions, see Create DNS records for Office 365 when you manage your DNS records.Important: After you have added a TXT record to verify you own your domain, do not go to the next step of adding users in the domains wizard. The directory synchronization will add users for you.Return to the Office 365 Setup page and choose Refresh

- On the Your domains are ready page, choose Next.
- On the Clean up your environment page, optionally follow the instructions to download IDFix to check your Active Directory. Choose Next to continue.
- On the Run Azure Active Directory Connect page, choose Download to install Azure AD Connect wizard.Note: At this point you will be in the Azure AD Connect wizard. Make sure you leave the directory synchronization wizard page you were last on open in your browser, so you can return to it after the Azure AD Connect steps are done.After Azure AD Connect wizard has installed it will automatically open. You can also open it from your desktop, the default install site. Follow the wizard instructions depending on your scenario:
- For directory synchronization with password synchronization, use Azure AD Connect with express settings.
- For multiple forests and SSO options, use Custom Installation of Azure AD Connect.Select Customize on the Express Settings page to use these options.
- After the Azure AD Connect wizard is done, return to the Office 365 Setup wizard, and follow the instructions on the Make sure sync worked as expected page. Choose Next to continue.
- Read the instructions on the Activate users page and then choose Next.
- Choose Finish on the You're all setup page.
Assign licences to synchronized users
- After you have synchronized your users to Office 365, they are created but you need to assign licenses to them so they can use Office 365 features, such as mail. For instructions, see Assign licenses to users in Office 365 for business.
Finish setting up domains
- Follow the steps in Create DNS records for Office 365 when you manage your DNS records to finish setting up your domains.
IT Consultant inCOREporation.com
Integrate your on-premises directories with Azure Active Directory
Integrate your on-premises directories with Azure Active Directory
https://docs.microsoft.com/en-us/azure/active-directory/connect/active-directory-aadconnect
Azure AD Connect will integrate your on-premises directories with Azure Active Directory. This allows you to provide a common identity for your users for Office 365, Azure, and SaaS applications integrated with Azure AD. This topic will guide you through the planning, deployment, and operation steps. It is a collection of links to the topics related to this area.
Why use Azure AD Connect
Integrating your on-premises directories with Azure AD makes your users more productive by providing a common identity for accessing both cloud and on-premises resources. Users and organizations can take advantage of the following:
- Users can use a single identity to access on-premises applications and cloud services such as Office 365.
- Single tool to provide an easy deployment experience for synchronization and sign-in.
- Provides the newest capabilities for your scenarios. Azure AD Connect replaces older versions of identity integration tools such as DirSync and Azure AD Sync. For more information, see Hybrid Identity directory integration tools comparison.
How Azure AD Connect works
Azure Active Directory Connect is made up of three primary components: the synchronization services, the optional Active Directory Federation Services component, and the monitoring component named Azure AD Connect Health.
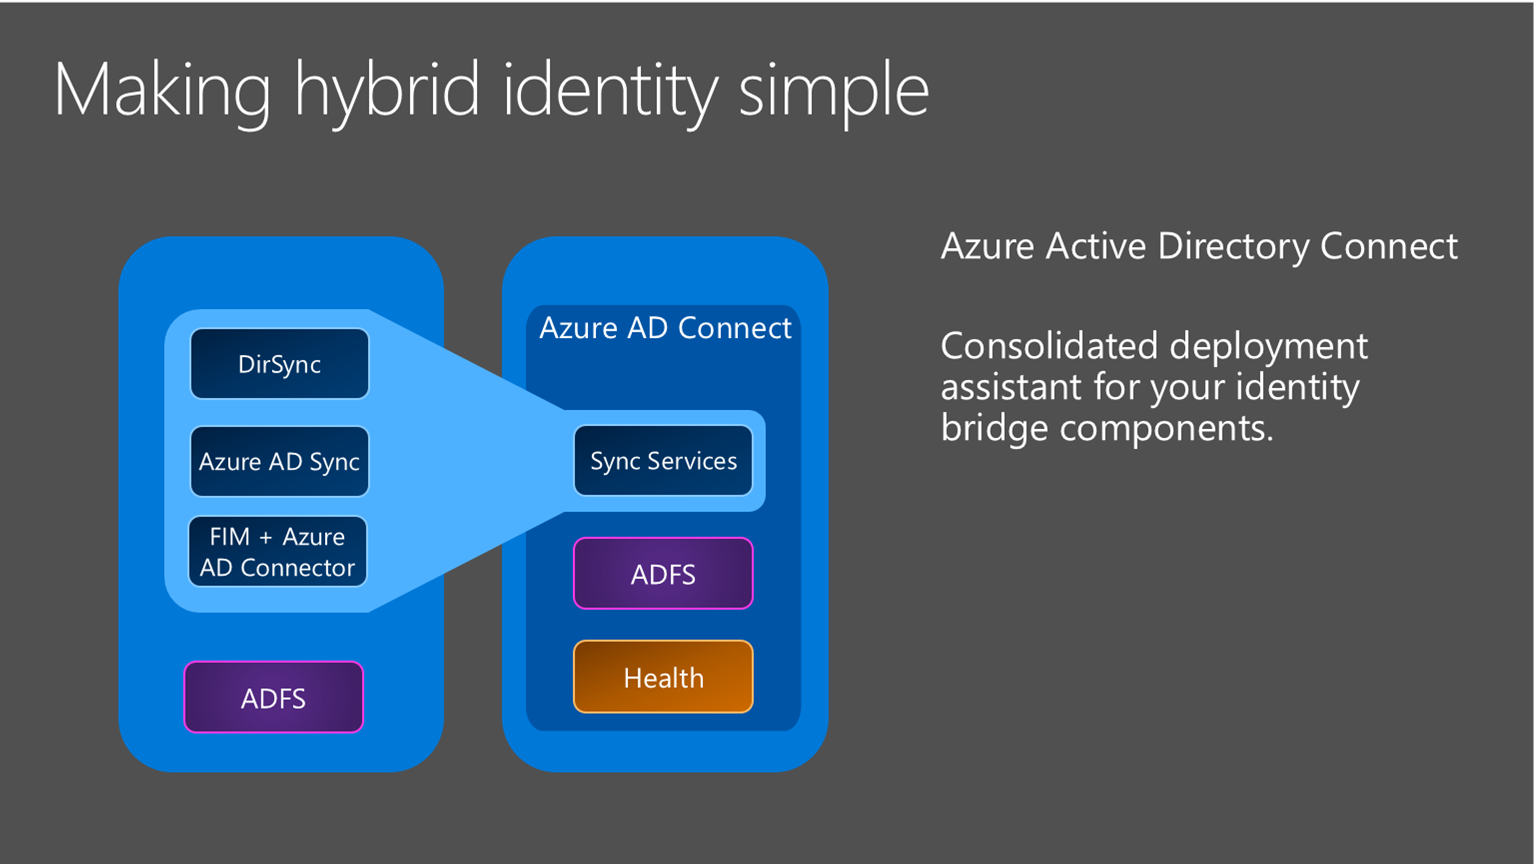
- Synchronization - This component is responsible for creating users, groups, and other objects. It is also responsible for making sure identity information for your on-premises users and groups is matching the cloud.
- AD FS - Federation is an optional part of Azure AD Connect and can be used to configure a hybrid environment using an on-premises AD FS infrastructure. This can be used by organizations to address complex deployments, such as domain join SSO, enforcement of AD sign-in policy, and smart card or 3rd party MFA.
- Health Monitoring - Azure AD Connect Health can provide robust monitoring and provide a central location in the Azure portal to view this activity. For additional information, see Azure Active Directory Connect Health.
Install Azure AD Connect
You can find the download for Azure AD Connect on Microsoft Download Center.
| Solution | Scenario |
|---|---|
| Before you start - Hardware and prerequisites |
|
| Express settings |
|
| Customized settings |
|
| Upgrade from DirSync |
|
| Upgrade from Azure AD Sync or Azure AD Connect |
|
After installation you should verify it is working as expected and assign licenses to the users.
Next steps to Install Azure AD Connect
| Topic | Link |
|---|---|
| Download Azure AD Connect | Download Azure AD Connect |
| Install using Express settings | Express installation of Azure AD Connect |
| Install using Customized settings | Custom installation of Azure AD Connect |
| Upgrade from DirSync | Upgrade from Azure AD sync tool (DirSync) |
| After installation | Verify the installation and assign licenses |
Learn more about Install Azure AD Connect
You also want to prepare for operational concerns. You might want to have a stand-by server so you easily can fall over if there is a disaster. If you plan to make frequent configuration changes, you should plan for a staging mode server.
| Topic | Link |
|---|---|
| Supported topologies | Topologies for Azure AD Connect |
| Design concepts | Azure AD Connect design concepts |
| Accounts used for installation | More about Azure AD Connect credentials and permissions |
| Operational planning | Azure AD Connect sync: Operational tasks and considerations |
| User sign-in options | Azure AD Connect User sign-in options |
Configure sync features
Azure AD Connect comes with several features you can optionally turn on or are enabled by default. Some features might sometimes require more configuration in certain scenarios and topologies.
Filtering is used when you want to limit which objects are synchronized to Azure AD. By default all users, contacts, groups, and Windows 10 computers are synchronized. You can change the filtering based on domains, OUs, or attributes.
Password synchronization synchronizes the password hash in Active Directory to Azure AD. The end-user can use the same password on-premises and in the cloud but only manage it in one location. Since it uses your on-premises Active Directory as the authority, you can also use your own password policy.
Password writeback will allow your users to change and reset their passwords in the cloud and have your on-premises password policy applied.
Device writeback will allow a device registered in Azure AD to be written back to on-premises Active Directory so it can be used for conditional access.
The prevent accidental deletes feature is turned on by default and protects your cloud directory from numerous deletes at the same time. By default it allows 500 deletes per run. You can change this setting depending on your organization size.
Automatic upgrade is enabled by default for express settings installations and ensures your Azure AD Connect is always up to date with the latest release.
Next steps to configure sync features
| Topic | Link |
|---|---|
| Configure filtering | Azure AD Connect sync: Configure filtering |
| Password synchronization | Azure AD Connect sync: Implement password synchronization |
| Password writeback | Getting started with password management |
| Device writeback | Enabling device writeback in Azure AD Connect |
| Prevent accidental deletes | Azure AD Connect sync: Prevent accidental deletes |
| Automatic upgrade | Azure AD Connect: Automatic upgrade |
Customize Azure AD Connect sync
Azure AD Connect sync comes with a default configuration that is intended to work for most customers and topologies. But there are always situations where the default configuration does not work and must be adjusted. It is supported to make changes as documented in this section and linked topics.
If you have not worked with a synchronization topology before you want to start to understand the basics and the terms used as described in the technical concepts. Azure AD Connect is the evolution of MIIS2003, ILM2007, and FIM2010. Even if some things are identical, a lot has changed as well.
The default configuration assumes there might be more than one forest in the configuration. In those topologies a user object might be represented as a contact in another forest. The user might also have a linked mailbox in another resource forest. The behavior of the default configuration is described in users and contacts.
The configuration model in sync is called declarative provisioning. The advanced attribute flows are using functions to express attribute transformations. You can see and examine the entire configuration using tools which comes with Azure AD Connect. If you need to make configuration changes, make sure you follow the best practices so it is easier to adopt new releases.
Next steps to customize Azure AD Connect sync
| Topic | Link |
|---|---|
| All Azure AD Connect sync articles | Azure AD Connect sync |
| Technical concepts | Azure AD Connect sync: Technical Concepts |
| Understanding the default configuration | Azure AD Connect sync: Understanding the default configuration |
| Understanding users and contacts | Azure AD Connect sync: Understanding Users and Contacts |
| Declarative provisioning | Azure AD Connect Sync: Understanding Declarative Provisioning Expressions |
| Change the default configuration | Best practices for changing the default configuration |
Configure federation features
Azure AD Connect provides several features that simplify federating with Azure AD using AD FS and managing your federation trust. Azure AD Connect supports AD FS on Windows Server 2012R2 or later.
Update SSL certificate of AD FS farm even if you are not using Azure AD Connect to manage your federation trust.
Add an AD FS server to your farm to expand the farm as required.
Repair the trust with Azure AD in a few simple clicks.
ADFS can be configured to support multiple domains. For example you might have multiple top domains you need to use for federation.
if your ADFS server has not been configured to automatically update certificates from Azure AD or if you use a non-ADFS solution, then you will be notified when you have to update certificates.
Next steps to configure federation features
| Topic | Link |
|---|---|
| All AD FS articles | Azure AD Connect and federation |
| Configure ADFS with subdomains | Multiple Domain Support for Federating with Azure AD |
| Manage AD FS farm | AD FS management and customization with Azure AD Connect |
| Manually updating federation certificates | Renewing Federation Certificates for Office 365 and Azure AD |
More information and references
| Topic | Link |
|---|---|
| Version history | Version history |
| Compare DirSync, Azure ADSync, and Azure AD Connect | Directory integration tools comparison |
| Non-ADFS compatibility list for Azure AD | Azure AD federation compatibility list |
| Configuring a SAML 2.0 Idp | Using a SAML 2.0 Identity Provider (IdP) for Single Sign On |
| Attributes synchronized | Attributes synchronized |
| Monitoring using Azure AD Connect Health | Azure AD Connect Health |
| Frequently Asked Questions | Azure AD Connect FAQ |
Additional Resources
Ignite 2015 presentation on extending your on-premises directories to the cloud.
IT Consultant inCOREporation.com
Subscribe to:
Comments (Atom)
-
Someone is asking how to enable users to post articles on your website. One common solution is to use a Wordpress plugin to allow users to p...
-
 After upgrading to Mac OS X Yosemite 10.10 a Java error window keeps popping up with a message that reads as: “To view this web content you...
