Start free ECWID Simple Flexible eCommerce
ECWID
USA and International DandyHosting.com IT Consultant inCOREporation.com CANADA WWebServices.ca
Creating your own design theme
https://support.ecwid.com/hc/en-us/articles/115005498489-Creating-your-own-design-theme#owntheme
ECWID
USA and International DandyHosting.com IT Consultant inCOREporation.com CANADA WWebServices.ca
Creating your own design theme
https://support.ecwid.com/hc/en-us/articles/115005498489-Creating-your-own-design-theme#owntheme
If you want to design your store on your own, we can suggest creating your own CSS theme -- a set of CSS rules that determines the look of every visual element in the store (the size, shape, color, and place on a page). You can create your own CSS themes in yourEcwid Control Panel → Settings → Design.
Building a CSS theme from scratch requires knowledge of web design languages such as HTML and CSS. If you are having trouble with a custom CSS theme, we can help. Please fill in this form: Custom design for Ecwid store We will be glad to help you with designing your Ecwid store.
Create your own design theme
You can create your own theme and make your store look absolutely unique. It is totally possible as Ecwid allows you to create your own design theme with the help of CSS. CSS (Cascading Style Sheets) is a special language that is used to define how the site elements should look.
You can create your own theme and make your store look absolutely unique. It is totally possible as Ecwid allows you to create your own design theme with the help of CSS. CSS (Cascading Style Sheets) is a special language that is used to define how the site elements should look.
How to find an element in your store?
In creating our own CSS theme we will use classes and IDs that are used in Ecwid.
To understand how to change the look of some element you need to find out what class or ID is has. It is very easy to do it with the help of web-inspector that is present in any browser.
- In Google Chrome and Opera: right-click on the element (e.g. link) and select “Inspect Element” in the menu
- In Internet Explorer: Press F12 to open the inspector panel Press Ctrl+B Select the element.
- In Safari: Enable the “Develop” menu in the browser (https://developer.apple.com/library/mac/documentation/AppleApplications/Conceptual/Safari_Developer_Guide/GettingStarted/GettingStarted.htmland http://www.youtube.com/watch?v=VNC4Giu3mYQ) Right-click on the element and select “Inspect Element”. There is a video tutorial on that: http://www.youtube.com/watch?v=rXdR5eIFZ8k
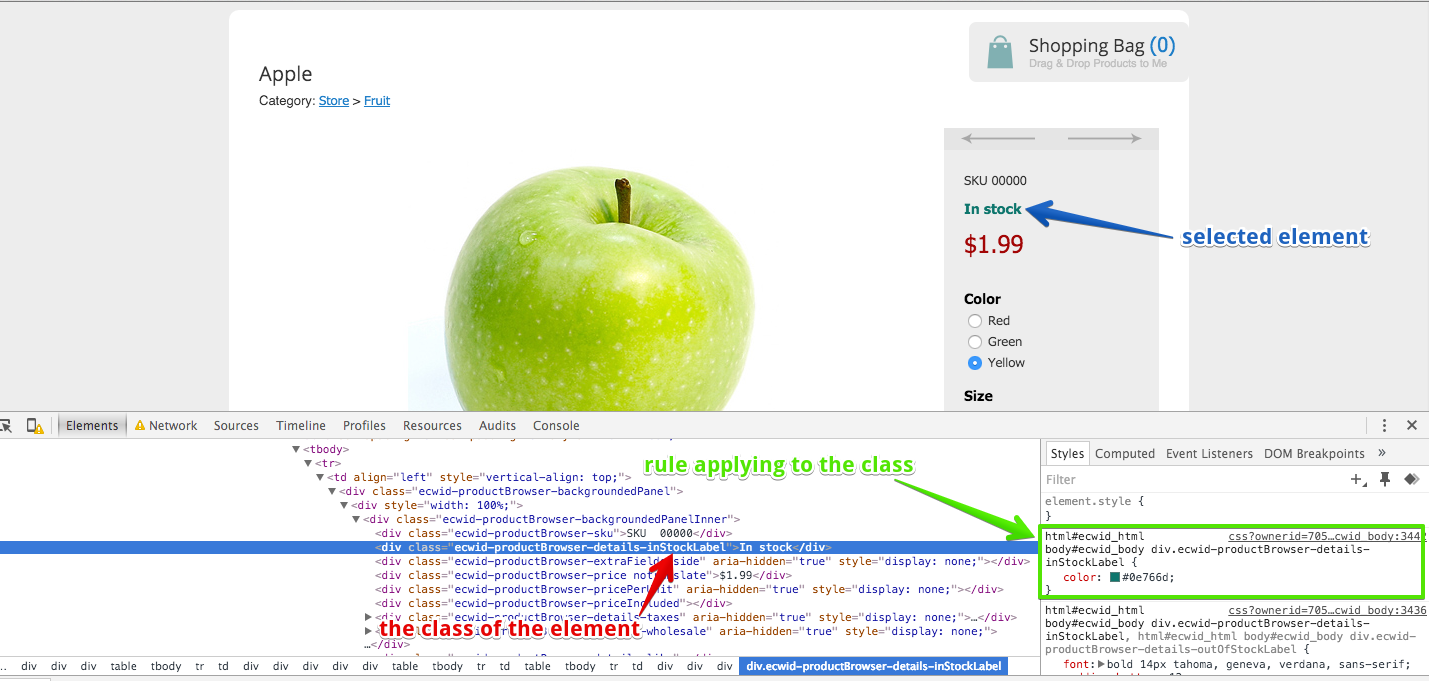
Here is how the web-inspector looks in Chrome. In our screenshot we have selected the “In Stock” label and you can see the class and the rule applying to the label.
In creating our own CSS theme we will use classes and IDs that are used in Ecwid.
To understand how to change the look of some element you need to find out what class or ID is has. It is very easy to do it with the help of web-inspector that is present in any browser.
To understand how to change the look of some element you need to find out what class or ID is has. It is very easy to do it with the help of web-inspector that is present in any browser.
- In Google Chrome and Opera: right-click on the element (e.g. link) and select “Inspect Element” in the menu
- In Internet Explorer: Press F12 to open the inspector panel Press Ctrl+B Select the element.
- In Safari: Enable the “Develop” menu in the browser (https://developer.apple.com/library/mac/documentation/AppleApplications/Conceptual/Safari_Developer_Guide/GettingStarted/GettingStarted.htmland http://www.youtube.com/watch?v=VNC4Giu3mYQ) Right-click on the element and select “Inspect Element”. There is a video tutorial on that: http://www.youtube.com/watch?v=rXdR5eIFZ8k
Here is how the web-inspector looks in Chrome. In our screenshot we have selected the “In Stock” label and you can see the class and the rule applying to the label.

Example of how it works
See below the example of how to change an element in your store. Let’s suppose that we want to make all the headings in products descriptions blue. To do it you need to let the browser “know” the following:
- this part of text is a heading
- headings must be blue.
See below the example of how to change an element in your store. Let’s suppose that we want to make all the headings in products descriptions blue. To do it you need to let the browser “know” the following:
- this part of text is a heading
- headings must be blue.
- this part of text is a heading
- headings must be blue.
How to change elements?
There is a special language that is used for marking the site pages, it is HTML (HyperText Markup Language). This language allows to use special tags for “telling” the browser what part of text is a heading, what part is a paragraph, what line is a link, etc. A tag for marking the headings is <h1>.
So, we do the following:
- navigate to Ecwid Control Panel > Catalog > Products and create a test product;
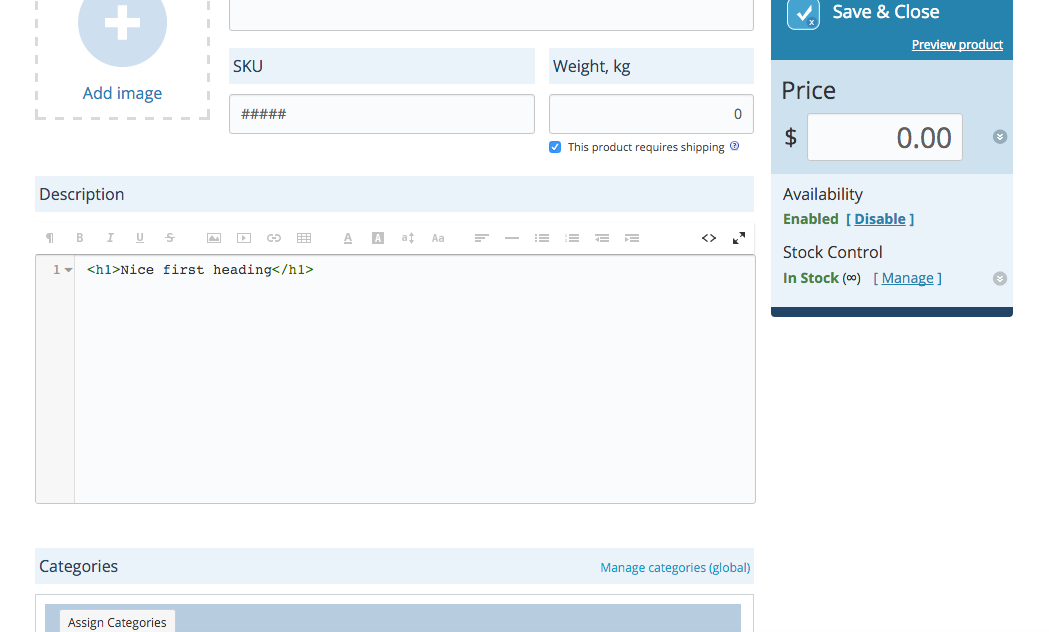
- add a text to the product description, putting it between the <h1> and </h1> tags, that will “tell” the browser that this text is a first level heading:
<h1>Nice first heading</h1>
- navigate to Ecwid Control Panel > Settings > Design > CSS themes
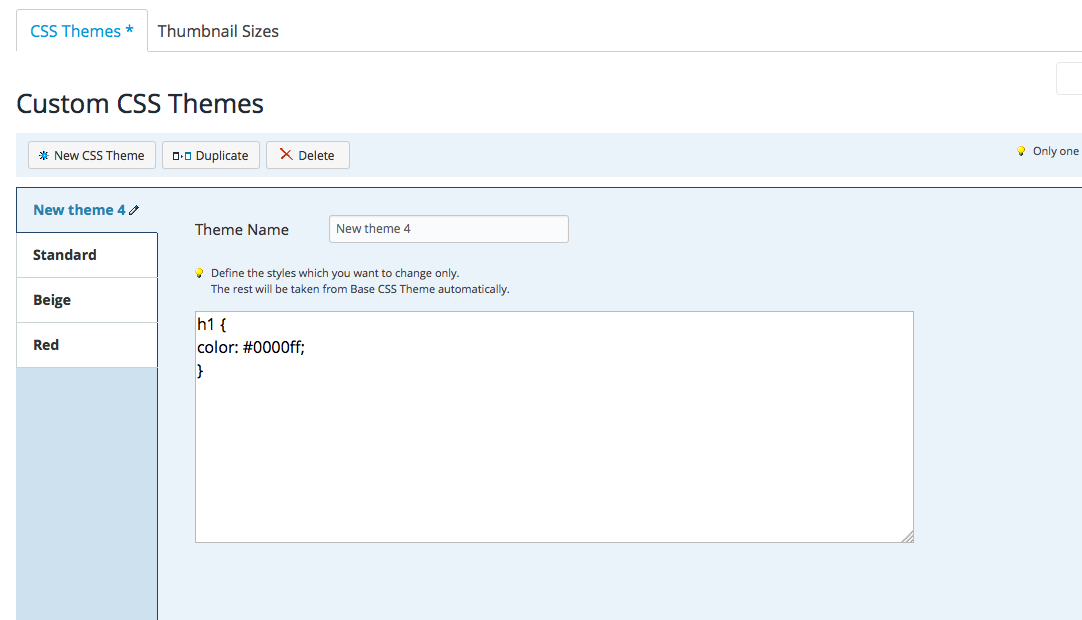
- create a new theme by clicking “New CSS Theme” button and add a rule that will tell the browser that all the first level headings must be blue:
h1 {
color: #0000ff;
}
- h1 is a selector that defines what element the rule applies to
- color is a parameter that we are going to change
- #0000ff is the value of this parameter. In our case it is the color code. You can easily find any color code with the help of special services, e.g. at http://www.color-hex.com/
- Activate the theme, click “Save”.
Now we can open the product page in our store, look at it… Here you go! The product description has a blue heading:
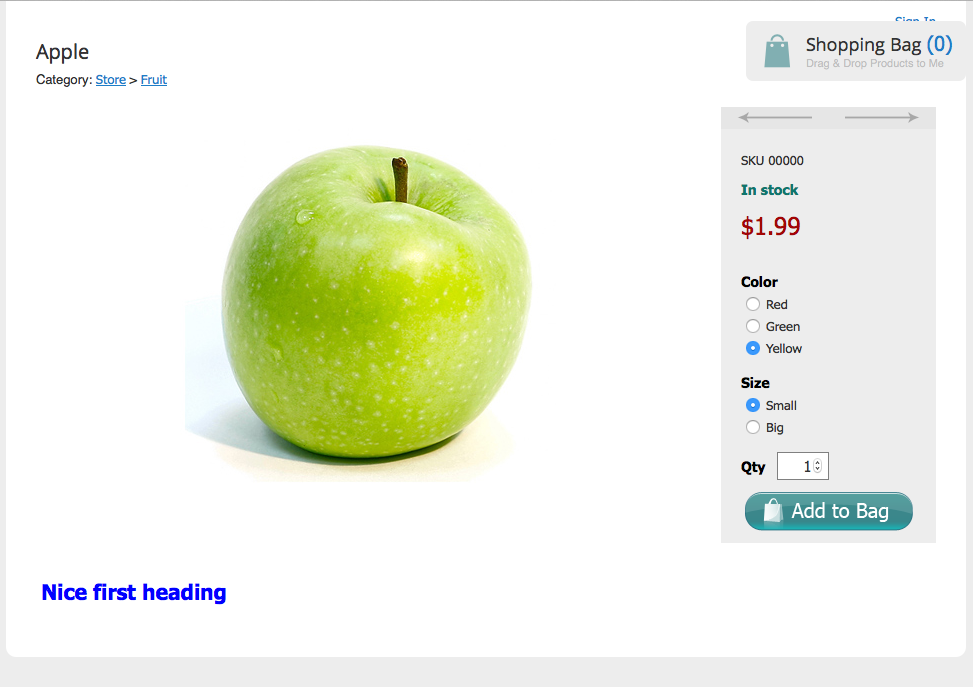 Moreover, all the first level headings in your store will be blue.
An what should we do if we want to make blue not all, but only some of the headings?
There are special classes that are used in CSS for achieving this. Classes are selectors that allow to differentiate similar elements and define different styles for them.
Let’s add one more heading in product description and set a class for it:
<h1>Nice first heading</h1>
<h1 class="pinkheading">Pink heading</h1>
Now we open our custom CSS theme and add a rule for headings with a class “pinkheading”. Classes is CSS look like this: “.class_name”
h1 {
color: #0000ff;
}
h1.pinkheading {
color: #ff69b4;
}
Save the changes, open the product page - we have one more heading now and it is pink.
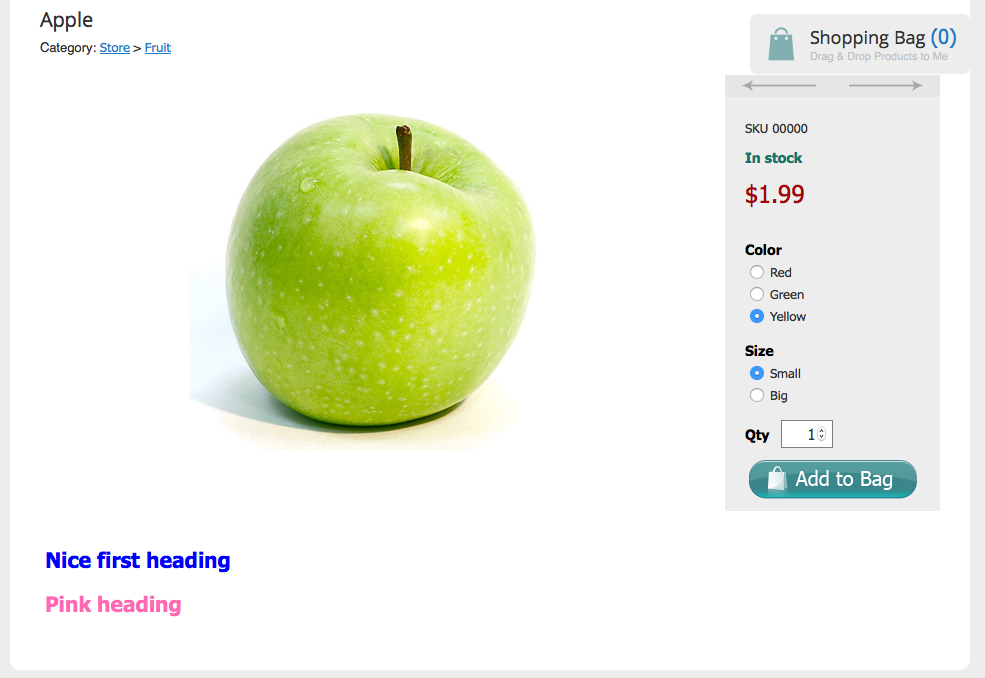 Besides the classes there is one more selector type in CSS, it is ID. IDs are different from classes - the same class can be applied to many elements on a page and one ID applies to just one element.
Let’s add one more heading to a product description and set ID for it:
<h1>Nice first heading</h1>
<h1 class="pinkheading">Pink heading</h1>
<h1 id="orangeheading">Orange heading</h1>
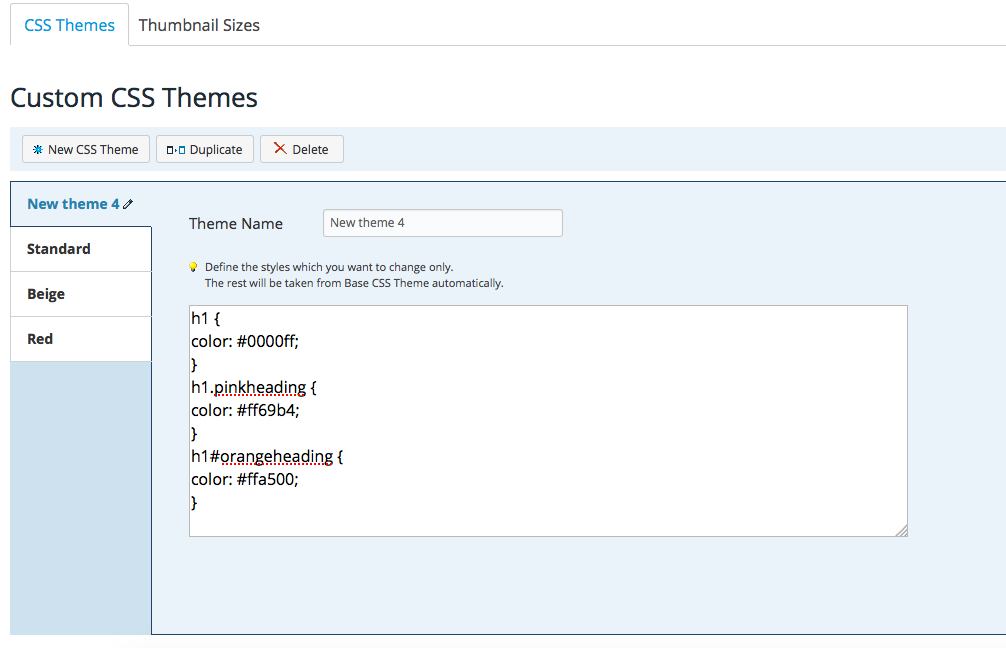
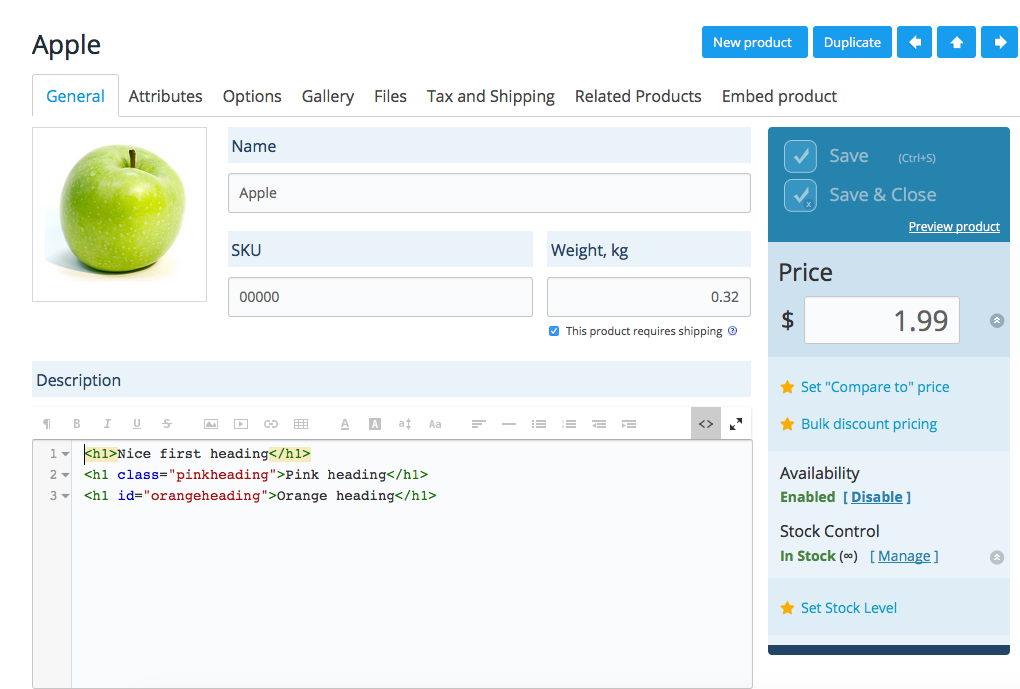 Now we add a corresponding rule to the custom CSS theme in our store. ID in CSS is marked with a #.
h1#orangeheading {
color: #ffa500;
}
There is a special language that is used for marking the site pages, it is HTML (HyperText Markup Language). This language allows to use special tags for “telling” the browser what part of text is a heading, what part is a paragraph, what line is a link, etc. A tag for marking the headings is <h1>.
So, we do the following:
- navigate to Ecwid Control Panel > Catalog > Products and create a test product;
- add a text to the product description, putting it between the <h1> and </h1> tags, that will “tell” the browser that this text is a first level heading:
<h1>Nice first heading</h1>
So, we do the following:
- navigate to Ecwid Control Panel > Catalog > Products and create a test product;
- add a text to the product description, putting it between the <h1> and </h1> tags, that will “tell” the browser that this text is a first level heading:
<h1>Nice first heading</h1>

- navigate to Ecwid Control Panel > Settings > Design > CSS themes
- create a new theme by clicking “New CSS Theme” button and add a rule that will tell the browser that all the first level headings must be blue:
h1 {
color: #0000ff;
}
color: #0000ff;
}
- h1 is a selector that defines what element the rule applies to
- color is a parameter that we are going to change
- #0000ff is the value of this parameter. In our case it is the color code. You can easily find any color code with the help of special services, e.g. at http://www.color-hex.com/

- Activate the theme, click “Save”.
Now we can open the product page in our store, look at it… Here you go! The product description has a blue heading:

Moreover, all the first level headings in your store will be blue.
An what should we do if we want to make blue not all, but only some of the headings?
There are special classes that are used in CSS for achieving this. Classes are selectors that allow to differentiate similar elements and define different styles for them.
An what should we do if we want to make blue not all, but only some of the headings?
There are special classes that are used in CSS for achieving this. Classes are selectors that allow to differentiate similar elements and define different styles for them.
Let’s add one more heading in product description and set a class for it:
<h1>Nice first heading</h1>
<h1 class="pinkheading">Pink heading</h1>
Now we open our custom CSS theme and add a rule for headings with a class “pinkheading”. Classes is CSS look like this: “.class_name”
h1 {
color: #0000ff;
}
h1.pinkheading {
color: #ff69b4;
}
Save the changes, open the product page - we have one more heading now and it is pink.

Besides the classes there is one more selector type in CSS, it is ID. IDs are different from classes - the same class can be applied to many elements on a page and one ID applies to just one element.
Let’s add one more heading to a product description and set ID for it:
Let’s add one more heading to a product description and set ID for it:
<h1>Nice first heading</h1>
<h1 class="pinkheading">Pink heading</h1>
<h1 id="orangeheading">Orange heading</h1>
<h1 class="pinkheading">Pink heading</h1>
<h1 id="orangeheading">Orange heading</h1>

Now we add a corresponding rule to the custom CSS theme in our store. ID in CSS is marked with a #.
h1#orangeheading {
color: #ffa500;
}

How do I target my CSS changes to some particular page or pages in Ecwid?
It is possible to apply some CSS rule only to some particular page in Ecwid by changing the selector of the said rule. Please, refer to this article for comprehensive information on that: How to apply CSS changes only to particular pages in Ecwid
It is possible to apply some CSS rule only to some particular page in Ecwid by changing the selector of the said rule. Please, refer to this article for comprehensive information on that: How to apply CSS changes only to particular pages in Ecwid
Oops. I did something wrong to CSS and messed up my store. How do I revert changes?
Just activate the standard scheme. Your store will look as it did before you made any changes.
Just activate the standard scheme. Your store will look as it did before you made any changes.
Themes from the Ecwid App Market
There are plenty of applications in the Ecwid App Market that can help you customize the look of your online store. Please see below the two apps for changing your theme colors without any coding required.
Store Designer
Store Designer allows you to edit the colors for buttons, text, and background.
In the preview mode you can play with colors until you are satisfied with the result before you apply your new design to the storefront.

The app costs $4.99 USD per month with a 7-day free trial.
Decorator
Decorator is another cool application, similar to the Store Designer app, but with a few more options.
In the Quick-start mode, that is ideal for beginners, you can easily tweak the main aspects of your online storefront. The Full settings mode is meant for more advanced alternations of colors, fonts, button styles and more.

The app is free to install and try for as long as you like, you’ll only have to pay for the custom designs you make. Before making a purchase, you are able to preview the results of your work on your computer.
Both Decorator and Store Designer apps are available on Ecwid Venture plan and higher. If you’re on a Free plan, please, consider upgrading your account to a paid plan. Upgrade to get this feature
Ecwid CSS Themes Made Easy!
According tohttps://daniella.io/ecwid-css-themes-made-easy/
From Youtube
https://www.youtube.com/watch?v=j90OS5FpOT0
Ecwid CSS Themes Made Easy!
“I have an awesome Ecwid store but I do not know how to make it visually match my brand and needs… How can I do this?”
Ever since I started providing Ecwid tutorials, like how to create your Ecwid store in 5 minutes, I have received requests non-stop for CSS tips. Ecwid is very flexible in the sense that it allows you to customize your store to match your brand. However, without any CSS knowledge, making these changes can become very tedious and frustrating for newbies.
So, here is (almost) everything you need to easily make your store look exactly the way you want it to. All you will need to do is copy and paste a few lines of code to get it the way you want!
Use the following tips and tricks to customize your store for free!
A Quick Intro Video
Video transcript:
Hi, this is Daniella from Daniella.io and today I will show you how to customize the look of your Ecwid store using CSS.Before I begin, if you dont have an Ecwid account check out this video on how to create an Ecwid store in 5 minutes.So it is super easy to customize your Ecwid store. All you have to do is open your seller dashboard, head over to Settings > Design > CSS Theme.You have a few options:
- You can activate an already available theme (beige or red) or
- You could edit the beige or red theme by duplicating either one and editing the CSS
- Or you can create a theme that will be based off of Ecwid’s standard theme.
We are going to make minor changes to the standard theme so I am going to create a “ New CSS Theme.” Rename your theme to whatever you wish.Now click on this blog post that contains all the CSS codes you need to customize your store.I am going to change the color and size of the price using this code and a flat design color chooser.If you are totally new to CSS you may never heard of Color Hexes. Color hexes are codes used to identify a color. Knowing the codes you want is key if you wish to change the colors of your Ecwid store.
Tip: Make sure you activate your theme. You may have to clear your browser cache or open your site in a different browser if changes are not made right away.
If you didn’t find all the necessary code you need to fully customize your store in my blog post you can find what you need by right clicking on an element you want to modify and choosing “Inspect element.” I am using Chrome but every browser has an option or something similar.This is where you can find the information on the element you want to modify. You can test it out for fun directly in your browser but you still need to copy/paste this info to Ecwid and to activate it for the changes to be permanent.If you liked this video dont forget to subscribe.I am Daniella from Daniella.io.Thanks for watching.
How to Fully Customize YouR Store
Step 1: Create Your Theme
It is super easy to create your custom theme in Ecwid. All you have to do is open your seller dashboard, head over to Settings > Design > CSS Theme.

Tip: Create your new theme based on the theme that looks the most li
ke your brand colors or the colors on your website. If your website is dark, you may wish to use the red theme which uses darker colors. If your website is light, you could use the beige or standard theme as a base to create your custom theme.
Create a new theme by clicking on “ New CSS Theme.” Rename your theme to whatever you wish. Ecwid will use the base theme and make edits depending on the code you add.
New Ecwid Feature for WordPress Users! (2016): If you use the Ecwid Plugin on a WordPress site you can use Ecwid’s new Chameleon skin feature. Chameleon skin will adapt to the design of your theme by detecting predominant colors and fonts. You can enable Chameleon on the “Advanced” tab in the Ecwid plugin settings in your WordPress backend (creating a custom Ecwid WordPress theme).
Step 2: Customizing your Ecwid Theme
You can change, add, remove and edit change many different items using various CSS styles. All you need to do add some CSS code to your active theme. You can add and edit different styles to all of the following labels including: font, font size, color, etc.
If you are totally new to CSS you may never heard of Color Hexes. Color hexes are codes used to identify a color. Knowing the codes you want is key if you wish to change the colors of your Ecwid store. Here are a few resources to know and choose your color hexes:
- Get Color Hex from Image: if you do not know what your color codes are you can use this reverse tool to upload your logo or image to easily extract your color codes.
- Color hex pickers:
- Popular flat design color codes:
You can change, add, remove and edit change many different items using various CSS styles. All you need to do add some CSS code to your active theme. You can add and edit different styles to all of the following labels including: font, font size, color, etc.
How to Change Items
Here are a bunch of codes you can use to change items that appear in your Ecwid store. All you need to do is create a new theme (Settings > Design > CSS Themes > New Theme) and paste the codes you wish to use in your store.
Important: do not forget to replace #FFFFFF (white) with the color codes you want to appear in your store!

Change the Color of Prices in your Store
div.ecwid-productBrowser-price {color: #FFFFFF; }
Change the “In Stock” Label Color
div.ecwid-productBrowser-details-inStockLabel {
color: #FFFFFF;
}
Change Border That Appears when you Hover Over a Product
div.ecwid-productBrowser-productsGrid-productTopFragment-mouseover {
border: solid 1px #FFFFFF;
border-bottom: none;
}
div.ecwid-productBrowser-productsGrid-productBottomFragment-mouseover {
border: solid 1px #FFFFFF;
border-top: none;
}
Change Default Product and Description Text Size
div.ecwid-productBrowser-details-descr {
color: #FFFFF;
font-family: "Arial";
}
Change Product Price Font
div.ecwid-productBrowser-price {
font-size: 20px;
}
Change the Text Color of your Product Options
div.ecwid-productBrowser-details-optionPanel label.ecwid-fieldLabel {
 font-weight: bold;
 color: #FFFFFF;
 }
Change the Product Title Hover Color
table.ecwid-productBrowser-productsGrid-v2
div.ecwid-productBrowser-productNameLink:hover a {
color: #FFFFFF;}
Change Product Browser category Label Colour (Size, Font…)
div.ecwid-productBrowser-subcategories-categoryName {
font: normal 19px "trebuchet MS", helvetica, verdana, sans-serif;
color: #FFFFFFF;
margin-top: 15px;
text-align: center;
}
Change Sign in Pop up Background Color
div.ecwid-popup {
border: solid 18px #FFFFFF;
background-color: #FFFFFF;
padding: 5px;
}
Change Sign in Pop up Header Font or Color
div.ecwid-popup-headLabel {
font: 30px georgia, "times new roman", times, serif;
color: #FFFFFF;
margin: 0 0 12px 0;
min-width: 240px
}
Change the Position of the Mini-Cart
Change Product Titles
How to Add Items
Add Drop Shadow Effect to Product Images
.ecwid-productBrowser-productsGrid-productTopFragment img {
background:transparent url(http://kb.ecwid.com/f/shadow-1000x1000.gif) no-repeat scroll right bottom;
padding:5px 10px 10px 5px;
}
.ecwid-productBrowser-details-thumbnail img {
background:transparent url(http://kb.ecwid.com/f/shadow-1000x1000.gif) no-repeat scroll right bottom;
padding:15px 20px 20px 15px;
}
Add border around products
Add GIFS as product images
Add tabs to product descriptions
Add a sale price view
How to Remove Items
Remove Delivery Time From Names of Shipping Methods
If you select automatic shipping methods for your products such as Fedex, USPS or UPS, delivery time may also be displayed at checkout. You can hide this information with the following code:
span.ecwid-shippingOption-days, span.ecwid-Invoice-ShippingDetails-transitTime {
display:none !important;
}
Remove Breadcrumbs
A breadcrumb is a string of links that show your path on a site. On the left you can see an example of a breadcrumb in an Ecwid Store (usually found at the top left of your store). You can remove breadcrumbs with the following code:
div.ecwid-productBrowser-categoryPath {
display:none;
}
Remove “Sort By” Drop-Down Menu
div.ecwid-results-topPanel-sortByPanel {
display:none !important;
}
Remove “view as” link
div.ecwid-results-topPanel-viewAsPanel {
display:none !important;
}
Remove category title
div.ecwid-productBrowser-subcategories-categoryName {
display:none;
}
Remove the Mini-Cart
div.ecwid-minicart {
display:none !important;
}
Remove the Tax Line
table.ecwid-productBrowser-cart-taxAmountPanel,
tr.ecwid-Invoice-Summary-taxRow {
display:none !important;
}
Remove available quantity
div.ecwid-productBrowser-details-qtyAvailInfo {
display:none;
}
Remove Continue Shopping Button
Remove Category Icons from the Store
Remove Cart “Drag and Drop” Text
How to Edit Buttons
Make Buttons Round
Many Ways to Customize the Continue Shopping Button
Change Buy Now Button
3. Digging Deeper: Find Exactly What you Want to Edit
This video is a recap of the above tutorial but also contains an explanation on how to find and edit exactly what you are looking for if you did not find the options you need here.
Troubleshooting your Ecwid CSS Templates
If you are having issues with your CSS code, check out these tips on Ecwid’s (old) knowledge base. If ever you are really stuck, all you have to do is activate one of Ecwid’s default themes (Standard, beige or red).If, after following this easy tutorial, you still feel like CSS is too complicated for you, you have the following choices:
- Leave your store as is with Ecwid’s default standard theme
- Use another one of Ecwid’s free themes (beige or red)
- Pay 300$ for a custom theme: https://www.ecwid.com/apps/unique-design-for-ecwid
- Upgrade to an unlimited account and receive 12h of cusomization from Ecwid!
http://xdesigns.net/2016/02/ecwid-templates/


 With unique design and accent in details Maxx Fitness is perfect template. Design have gorgeous typography and elegant structure. Joomla Template is dependant on Warp7 Framework and made for many who would like a lightweight and modular website.


 The appearance Clean, Profesional Responsive WooCommerce Theme for On Line Fashion Shop. It comes with a lot of great benefits that could simply take you months to produce. It is completely responsive, it looks stunning on all types of screens and products.


Pakistan no.1 Article in my Installcrack.com site Now just 1 click to download!
ReplyDeletePCUnlocker Crack